关于本书
版本号: 1.2
该版日期: 2020-11-07
这是一本中高级难度的书,主要关注在如何使用 Combine 框架。 你需要对 Swift 及其中的引用和值类型、协议有透彻的理解,并且能够熟练使用 Foundation 框架中的常用元素,才能阅读本书和其中的示例。
如果你刚开始学习 Swift, Apple 提供了一些资源 可以用来学习, 还有一些作者写了非常棒的教程和入门书籍, 例如 Daniel Steinberg 写的 A Swift Kickstart 和 Paul Hudson 写的 Hacking with Swift。
这本书提供了对函数响应式编程概念的 简短介绍, 这正是 Combine 所要提供的编程方式。
支持作者
如果您觉得内容有用,可购买没有数字版权管理英文原版的 PDF 或 ePub 版本 http://gumroad.com/l/usingcombine.
如果发现中文翻译版有拼写、语法或者技术错误想要指出,可以 fork 这个仓库,更新或者纠正之后创建一个 pull requests 给我。
如果发现英文原版有拼写、语法或者技术错误想要指出,请在 GitHub 新建一个 issue。 如果你愿意的话,也可以 fork 英文原版的仓库,更新或者纠正之后创建一个 pull requests 给作者。
致谢
谢谢你们所有人花费时间和精力提交 pull request,使这本书变得更好!
作者简介
Joe Heck 在初创公司和大型公司中拥有广泛的软件工程开发和管理经验。 他为架构、开发、验证、部署和操作这所有阶段提供解决方案。
Joe 开发了从移动和桌面应用程序开发的项目到基于云的分布式系统。 他建立了团队、开发流程、CI 和 CD 流水线,并制定了验证和运营自动化。 Joe 还指导人们学习、构建、验证、部署和运行软件服务和基础架构。
Joe 广泛的贡献和参与到各种开源项目的工作中。 他在网站 https://rhonabwy.com/ 上撰写了各种主题的文章。
译者简介
樊志颖,专注于 iOS 开发。
个人网站: https://zhiying.space
Github: https://github.com/zhiying-fan
卫林霄,iOS 开发。
GitHub: https://github.com/yeland
翻译术语表
Framework |
框架 |
Pipeline |
管道 |
Functional programming |
函数式编程 |
Functional reactive programming |
函数响应式编程 |
Publisher |
发布者 |
Subscriber |
订阅者 |
Operator |
操作符 |
从哪获取这本书
没有数字版权管理英文原版的 PDF 或 ePub 版本可以在 http://gumroad.com/l/usingcombine 购买。
随着开发的继续,将对线上版本的内容持续更新。 更大的更新和宣告也会通过 作者在 Gumroad 的简介 进行提供。
本书的内容包括示例代码和测试,都放在 GitHub 的仓库中: https://github.com/heckj/swiftui-notes 。
下载项目
本书的内容以及本书引用的示例代码和单元测试,都被链接到了一个 Xcode 的项目中(swiftui-notes.xcodeproj)。
该 Xcode 项目包括完全可实操的示例代码,展示了 Combine 与 Uikit 和 SwiftUI 集成的示例。
该项目还包括运用此框架的大量单元测试,以说明框架组件的行为。
与本书关联的项目需要 Xcode 11 和 Macos 10.14 或更高版本。

-
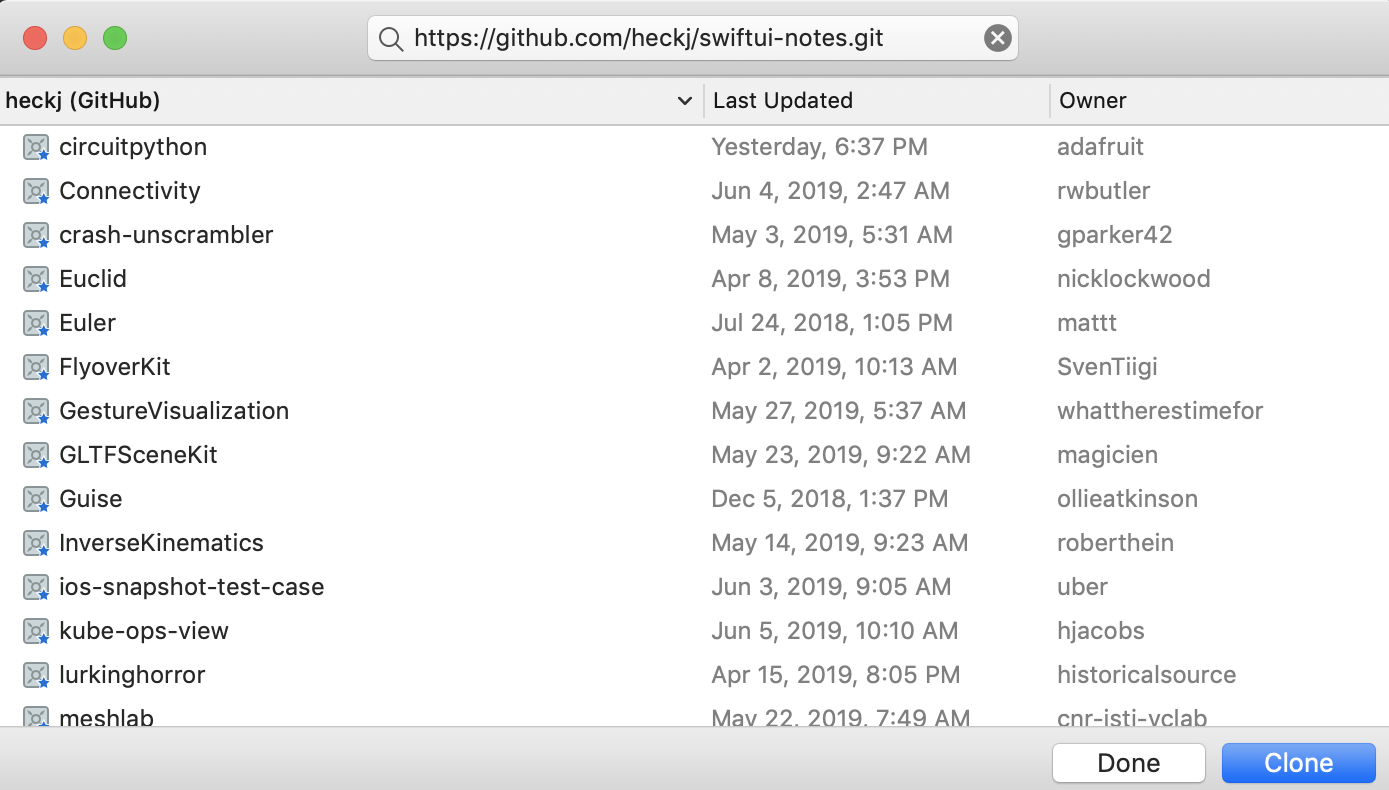
从 Welcome to Xcode 窗口,选择 Clone an existing project
-
输入
https://github.com/heckj/swiftui-notes.git然后点击Clone
-
选择
master分支检出
Combine 简介
用 Apple 官方的话来说,Combine 是:
a declarative Swift API for processing values over time.
Combine 是 Apple 用来实现函数响应式编程的库, 类似于 RxSwift。 RxSwift 是 ReactiveX 对 Swift 语言的实现。 Combine 使用了许多可以在其他语言和库中找到的相同的函数响应式概念,并将 Swift 的静态类型特性应用其中。
|
如果你已经熟悉 RxSwift 了,这里有 一份整理好的表单 可以让你把 RxSwift 的概念和 API 对应到 Combine 上。 |
函数响应式编程
函数响应式编程, 也称为数据流编程, 建立在 函数式编程 的概念上。
其中函数式编程适用于元素列表,函数响应式编程应用于元素流。
函数式编程中的各种函数,例如 map, filter, 和 reduce 也有可以应用于流的类似函数。
除了函数式编程原本的能力外,函数响应式编程还包括用于分割和合并流的函数。
像函数式编程一样,你可以对在流中的数据进行转换。
在我们编程的系统中有许多部分可以被视为异步信息流 - 事件、对象或数据。 观察者模式监听单个对象,在其更改变化时提供通知事件。 如果你随着时间的推移查看这些通知,它们会构成一个对象流。 函数响应式编程 Combine,允许你创建代码,来描述在流中获取到数据时发生的事情。
你可能希望创建逻辑以监听多个元素的改变。 你可能还希望包含有异步操作的逻辑,其中一些可能会失败。 您可能想要根据时序更改数据流的内容,或更改内容的时序。 处理这些事件流的流程、时序、发生的错误以及协调系统如何响应所有这些事件是函数响应式编程的核心。
基于函数响应式编程的解决方案在开发用户界面时特别有效。 它也更通常用于创建流水线,用来处理从外部源或异步 API 返回的数据。
Combine 的特性
将这些概念应用于像 Swift 这样的强类型语言是 Apple 在 Combine 中所创造的一部分。 Combine 通过嵌入 back-pressure 来扩展函数响应式编程。 Back-pressure 是指订阅者应该控制它一次获得多少信息以及需要处理多少信息。 这带来了高效的数据操作,并且通过流处理的数据量是可控和可取消的。
Combine 的元素被设置为组合式的,这有利于逐步地集成于现有的代码以采用它。
Apple 的其他一些框架利用了Combine。 SwiftUI 是最受关注的明显示例,同时包含订阅者和发布者。 RealityKit 也具有可用于对事件做出反应的发布者。 Foundation 有许多 Combine 特定的附加功能,包括作为发布者的 NotificationCenter、URLSession 和 Timer。
任何异步 API 都可以 与 Combine 一起使用。 例如,你可以使用 Vision 框架中的一些 API,通过利用 Combine 组合流入和流出的数据。
什么情况使用 Combine
当你想要设置对各种输入做出反应时,Combine 最合适, 用户界面也非常适合这种模式。
在用户界面中使用函数响应式编程的经典示例是表单验证,其中用户事件如更改文本字段、点击或鼠标点击 UI 元素构成正在流式传输的数据。 Combine 更进一步,支持监听属性、绑定到对象、从 UI 控件发送和接收更高级别的事件,并支持与几乎所有 Apple 现有 API 生态系统的集成。
你可以使用 Combine 执行的一些操作包括:
-
你可以设置管道以仅在字段中输入的值有效时启用提交按钮。
-
管道还可以执行异步操作(例如检查网络服务)并使用返回的值来选择在视图中更新的方式和内容。
-
管道还可用于对用户在文本字段中动态输入做出反应,并根据他们输入的内容更新用户界面视图。
Combine 不限于用户界面。 任何异步操作序列都可以被作为管道,尤其是当每个步骤的结果流向下一步时。 此类示例可能是一系列网络服务请求,然后对结果进行解码。
Combine 也可用于定义如何处理异步操作中的错误。 通过设置管道并将它们合并在一起,Combine 支持这样做。 Apple 使用 Combine 的示例之一是在本地网络受限时退而求其次地从网络服务获取较低分辨率图像的管道。
你使用 Combine 创建的许多管道都只有少量操作。 即使只进行少量操作,Combine 仍然可以让你更轻松地查看和理解在组合管道时发生的情况。 Combine 的管道是一种声明性方式,用于定义随着时间的推移对数据流中值进行的处理。
Apple 官方提供的 Combine 文档
Combine 的在线文档 可以在 https://developer.apple.com/documentation/combine 找到。 Apple 的开发者文档托管在 https://developer.apple.com/documentation/ 。
WWDC 2019 内容
Apple 在其开发者大会中提供了视频、幻灯片和一些示例代码。 关于 Combine 的详细信息主要来自 WWDC 2019。
|
自从在 WWDC 2019 上首次发布以来,Combine 一直在发展。 这些演示文稿中的一些内容现在略有过时或与当前存在的内容有所不同。 这些内容中的大部分对于介绍或了解 Combine 是什么以及可以做什么仍然非常有价值。 |
其中一些介绍并深入讲解了 Combine:
许多其他 WWDC19 会议提到了 Combine:
其他线上的 Combine 资源
除了 Apple 的文档之外,还有许多其他在线资源,你可以在其中找到有关 Combine 运作方式的问题、答案、讨论和说明。
-
Swift 论坛(托管于 swift 开源项目)有一个 combine tag 有许多有趣讨论。虽然 Combine 框架 不是 开源的,但在这些论坛中有它的一些实现和细节的讨论。
-
Stackoverflow 也有大量(并且还在不断增加)的 Combine 相关问答。
核心概念
你只需要了解几个核心概念,就能使用好 Combine,但理解它们非常重要。 这些概念中的每一个都通过通用协议反映在框架中,以将概念转化为预期的功能。
这些核心概念是:
Publisher and Subscriber
两个关键概念, publisher 和 subscriber,在 Swift 中被描述为协议。
当你谈论编程(尤其是 Swift 和 Combine)时,很多都使用类型描述。 当你说一个函数或方法返回一个值时,该值通常被描述为“此类型之一”。
Combine 就是定义随着时间的推移使用许多可能的值进行操作的过程。 Combine 还不仅仅是定义结果,它还定义了我们如何处理失败。 它不仅讨论可以返回的类型,还讨论可能发生的失败。
现在我们要引入的第一个核心概念是发布者。 当其被订阅之后,根据请求会提供数据, 没有任何订阅请求的发布者不会提供任何数据。 当你描述一个 Combine 的发布者时,应该用两种相关的类型来描述它:一种用于输出,一种用于失败。

这些通常使用泛型语法编写,该语法在描述类型的文本周围使用 < 和 > 符号。
这表示我们正在谈论这种类型的值的通用实例。
例如,如果发布者返回了一个 String 类型的实例,并且可能以 URLError 实例的形式返回失败,那么发布者可能会用 <String, URLError> 来描述。
与发布者匹配的对应概念是订阅者,是第二个要介绍的核心概念。
订阅者负责请求数据并接受发布者提供的数据(和可能的失败)。 订阅者同样被描述为两种关联类型,一种用于输入,一种用于失败。 订阅者发起数据请求,并控制它接收的数据量。 它可以被认为是在 Combine 中起“驱动作用”的,因为如果没有订阅者,其他组件将保持闲置状态,没有数据会流动起来。
发布者和订阅者是相互连接的,它们构成了 Combine 的核心。 当你将订阅者连接到发布者时,两种类型都必须匹配:发布者的输出和订阅者的输入以及它们的失败类型。 将其可视化的一种方法是对两种类型进行一系列并行操作,其中两种类型都需要匹配才能将组件插入在一起。

你可以用这些创建成链,用于处理和转换发布者提供的数据和订阅者请求的数据。
我称这些组合序列为管道。

操作符可用于转换值或类型 - 输出和失败类型都可以。 操作符还可以拆分或复制流,或将流合并在一起。 操作符必须始终按输出/失败这样的类型组合对齐。 编译器将强制执行匹配类型,因此类型错误将导致编译器错误(如果幸运的话,会有一个有用的 fixit 片段建议给你解决方案)。
用 swift 编写的简单的 Combine 管道如下所示:
let _ = Just(5) (1)
    .map { value -> String in (2)
        // do something with the incoming value here
        // and return a string
        return "a string"
    }
    .sink { receivedValue in (3)
        // sink is the subscriber and terminates the pipeline
        print("The end result was \(receivedValue)")
}| 1 | 管道从发布者 Just 开始,它用它定义的值(在本例中为整数 5)进行响应。输出类型为 <Integer>,失败类型为 <Never>。 |
| 2 | 然后管道有一个 map 操作符,它在转换值及其类型。
在此示例中,它忽略了发布者发出的输入并返回了一个字符串。
这也将输出类型转换为 <String>,并将失败类型仍然保持为 <Never>。 |
| 3 | 然后管道以 sink 订阅者结束。 |
当你去尝试理解管道时,你可以将其视为由输出和失败类型链接的一系列操作。 当你开始构建自己的管道时,这种模式就会派上用场。 创建管道时,你可以选择操作符来帮助你转换数据、类型或两者同时使用以实现最终目的。 最终目标可能是启用或禁用用户界面的某个元素,或者可能是得到某些数据用来显示。 许多 Combine 的操作符专门设计用来做这些转换。
有许多操作符是以 try 为前缀的,这表示它们返回一个 <Error> 的失败类型。
例如 map 和 tryMap。
map 操作符可以转换输出和失败类型的任意组合。
tryMap 接受任何输入和失败类型,并允许输出任何类型,但始终会输出 <Error> 的失败类型。
像 map 这样的操作符,你在定义返回的输出类型时,允许你基于提供给操作符的闭包中返回的内容推断输出类型。
在上面的例子中,map 操作符返回一个 String 的输出类型,因为这正是闭包返回的类型。
为了更具体地说明更改类型的示例,我们扩展了值在传输过程中的转换逻辑。此示例仍然以提供类型 <Int, Never> 的发布者开始,并以类型为 <String, Never> 的订阅结束。
let _ = Just(5) (1)
    .map { value -> String in (2)
        switch value {
        case _ where value < 1:
            return "none"
        case _ where value == 1:
            return "one"
        case _ where value == 2:
            return "couple"
        case _ where value == 3:
            return "few"
        case _ where value > 8:
            return "many"
        default:
            return "some"
        }
    }
    .sink { receivedValue in (3)
        print("The end result was \(receivedValue)")
}| 1 | Just 是创建一个 <Int, Never> 类型组合的发布者,提供单个值然后完成。 |
| 2 | 提供给 .map() 函数的闭包接受一个 <Int> 并将其转换为一个 <String>。由于 <Never> 的失败类型没有被改变,所以就直接输出了。 |
| 3 | sink 作为订阅者,接受 <String, Never> 类型的组合数据。 |
|
当你在 Xcode 中创建管道,类型不匹配时,Xcode 中的错误消息可能包含一个有用的修复建议 fixit。
在某些情况下,例如上个例子,当提供给 |
你可以将 Combine 的发布者、操作符和订阅者视为具有两种需要对齐的平行类型 —— 一种用于成功的有用值,另一种用于错误处理。 设计管道时经常会选择如何转换其中一种或两种类型以及与之相关的数据。
用弹珠图描述管道
函数响应式编程的管道可能难以理解。 发布者生成和发送数据,操作符对该数据做出响应并有可能更改它,订阅者请求并接收这些数据。 这本身就很复杂,但 Combine 的一些操作符还可能改变事件发生的时序 —— 引入延迟、将多个值合并成一个值等等。 由于这些比较复杂可能难以理解,因此函数响应式编程社区使用一种称为 弹珠图 的视觉描述来说明这些变化。
在探索 Combine 背后的概念时,你可能会发现自己正在查看其他函数响应式编程系统,如 RxSwift 或 ReactiveExtensions。 与这些系统相关的文档通常使用弹珠图。
弹珠图侧重于描述特定的管道如何更改数据流。 它显示数据是如何随着时间的变化而变化的,以及这些变化的时序。

怎么看懂弹珠图:
-
不管周围描述的是什么元素,在该例子的图上,中心是一个操作符。 具体的操作符的名称通常位于中心块上。
-
上面和下面的线表示随着时间移动的数据, 由左到右。 线上的符号表示离散着的数据。
-
我们通常假定数据正在向下流动。 在这种情况下,顶线表示对操作符的输入,底线表示输出。
-
在某些图表中,顶线上的符号可能与底线上的符号不同, 这时图表通常意味着输出的类型与输入的类型不同。
-
在有些图中,你也可能在时间线上看到竖线 “|” 或 “ X ” 或终结时间线, 这用于表示数据流的结束。 时间线末端的竖线意味着数据流已正常终止。 “X” 表示抛出了错误或异常。
这些图表有意忽略管道的配置,而倾向于关注一个元素来描述该元素的工作原理。
用弹珠图描述 Combine
这本书对基本的弹珠图做了扩展并稍作修改,用来突出 Combine 的一些细节。 最显著的区别是输入和输出是两条线。 由于 Combine 明确了输入和失败类型,因此它们在图表中也被分开来单独表示。

发布者的输出和失败类型,用上面的两条线来表示,然后数据经过操作符之后会流向下方。 操作符同时作为订阅者和发布者,处在中间, 订阅者接收的数据和失败类型,用下面的两条线来表示。
为了说明这些图表与代码的关系,让我们来看一个简单的示例。
在这个例子中,我们将关注 map 操作符以及如何用此图表描述它。
let _ = Just(5)
    .map { value -> String in (1)
        switch value {
        case _ where value < 1:
            return "none"
        case _ where value == 1:
            return "one"
        case _ where value == 2:
            return "couple"
        case _ where value == 3:
            return "few"
        case _ where value > 8:
            return "many"
        default:
            return "some"
        }
    }
    .sink { receivedValue in
        print("The end result was \(receivedValue)")
}| 1 | 提供给 “.map()” 函数的闭包接收一个 <Int> 类型的值,并将其转换为 <String> 类型。
由于失败类型 <Never> 没有改变,因此直接输出它。 |
以下图表表示了此代码片段。 此图描述了更详细的内容:它在图表中展示了闭包中的代码,以显示其关联性。

许多 Combine 的操作符都由你用一个闭包来配置。 大多数图表都不会将它包含在其中。 这意味着你通过 Combine 中的闭包提供的任何代码都将被简化成一个框,而不是详细的描述它。
此 map 操作符的输入类型为 <Int>,在最上面的线上用通用的语法进行表示。
传递给该操作符的失败类型为 <Never>,在输入类型的正下方用同一语法中表示。
map 操作符没有更改或影响失败类型,只是将其进行了传递。
为了表示这一点,上面输入和下面输出的失败类型都用虚线来表示,以弱化它。
最上面的线上展示了单一输入值(5),
在这个例子中,它在线上的具体位置是没有意义的,仅表示它是单一值。
如果线上有多个值,则左侧的值将优于在右侧的任意值被发送给 map 操作符。
当值到达操作符时,值 5 作为变量的 值 传递给闭包。
这个例子中,闭包的返回类型(本例中为 <String> )定义了当闭包中的代码完成并返回其值时 map 操作符的输出类型。
在这个例子中,输入了 5 然后返回了字符串 some。
字符串 some 展示在输入值正下方的输出线上,这意味着没有明显的延迟。
|
本书中的大多数图表不会像这个例子那样复杂或详细。 这些图表大多将侧重于描述操作符。 此图更复杂,是为了说明如何解释图表以及它们与你的代码之间的关系。 |
Back pressure
Combine 的设计使订阅者控制数据流,因此它也控制着在管道中处理数据的内容和时间。 这是一个在 Combine 中被叫做 back-pressure 的特性。
这意味着由订阅者通过提供其想要或能够接受多少信息量来推动管道内数据的处理。 当订阅者连接到发布者时,它会基于特定的 需求 去请求数据。
特定需求的请求通过组成管道进行传递。 每个操作符依次接受数据请求,然后请求与之相连的发布者提供信息。
|
在 Combine 框架的第一个版本中( iOS 13.3 和 macOS 10.15.2 之前),当订阅者请求具有特定需求的数据时,该请求是异步发生的。 由于此过程中是充当触发器的订阅者,去触发其连接的操作符,并最终触发发布者去请求数据,因此这意味着在某些情况下存在数据丢失的可能性。 因此,在 iOS 13.3 和以后的 Combine 版本中,请求的过程被改成了同步/阻塞线程的。 实际上,这意味着在发布者收到发送数据的请求之前,你可以更确信后序的管道已经完全准备好处理接下来的数据了。 如果你有兴趣阅读相关的更新历史,在 Swift 论坛上由关于此主题的 延伸讨论 |
有了订阅者驱动数据流这个特性,它允许 Combine 去取消这个过程。
订阅者均遵循 Cancellable 协议。
这意味着它们都有一个 cancel() 函数,可以调用该函数来终止管道并停止所有相关处理。
|
当管道被取消时,管道是不期望被重新启动的。 相比于重启一个被取消的管道,开发者更应该去创建一个新的管道。 |
发布者和订阅者的生命周期
订阅者和发布者以明确定义的顺序进行通信,因此使得它们具有从开始到结束的生命周期:

| 1 | 当调用 .subscribe(_: Subscriber) 时,订阅者被连接到了发布者。 |
| 2 | 发布者随后调用 receive(subscription: Subscription) 来确认该订阅。 |
| 3 | 在订阅被确认后,订阅者请求 N 个值,此时调用 request(_: Demand)。 |
| 4 | 发布者可能随后(当它有值时)发送 N 个或者更少的值,通过调用 receive(_: Input)。
发布者不会发送超过需求量的值。 |
| 5 | 订阅确认后的任何时间,订阅者都可能调用 .cancel() 来发送 cancellation |
| 6 | 发布者可以选择性地发送 completion:receive(completion:)。
完成可以是正常终止,也可以是通过 .failure 完成,可选地传递一个错误类型。
已取消的管道不会发送任何完成事件。 |
在上述图表中包含了一组堆积起来的弹珠图, 这是为了突出 Combine 的弹珠图在管道的整体生命周期中的重点。 通常,图表推断所有的连接配置都已完成并已发送了数据请求。 Combine 的弹珠图的核心是从请求数据到触发任何完成或取消之间的一系列事件。
发布者
发布者是数据的提供者。 当订阅者请求数据时, publisher protocol 有严格的返回值类型约定,并有一系列明确的完成信号可能会终止它。
当订阅者发出请求时,许多发布者会立即提供数据。
在某些情况下,发布者可能有一个单独的机制,使其能够在订阅后返回数据。
这是由协议 ConnectablePublisher 来约定实现的。
遵循 ConnectablePublisher 的发布者将有一个额外的机制,在订阅者发出请求后才启动数据流。
这可能是对发布者单独的调用 .connect() 来完成。
另一种可能是 .autoconnect(),一旦订阅者请求,它将立即启动数据流。
Combine 提供了一些额外的便捷的发布者:
Combine 之外的一些 Apple API 也提供发布者。
-
SwiftUI 使用
@Published和@ObservedObject属性包装,由 Combine 提供,含蓄地创建了一个发布者,用来支持它的声明式 UI 的机制。 -
Foundation
操作符
操作符是 Apple 参考文档中发布者下包含的一些预构建函数的便捷名称。 操作符用来组合成管道。 许多操作符会接受开发人员的一个或多个闭包,以定义业务逻辑,同时保持并持有发布者/订阅者的生命周期。
一些操作符支持合并来自不同管道的输出、更改数据的时序或过滤所提供的数据。 操作符可能还会对操作类型有限制, 还可用于定义错误处理和重试逻辑、缓冲和预先载入以及支持调试。
Mapping elements |
||
|---|---|---|
Filtering elements |
||
|---|---|---|
Reducing elements |
||
|---|---|---|
Mathematic operations on elements |
||
|---|---|---|
Applying matching criteria to elements |
||
|---|---|---|
Applying sequence operations to elements |
||
|---|---|---|
Combining elements from multiple publishers |
||
|---|---|---|
Handling errors |
||
|---|---|---|
Adapting publisher types |
||
|---|---|---|
Controlling timing |
||
|---|---|---|
Encoding and decoding |
||
|---|---|---|
Working with multiple subscribers |
||
|---|---|---|
Debugging |
||
|---|---|---|
Subjects
Subjects 是一种遵循 Subject 协议的特殊的发布者。
这个协议要求 subjects 有一个 .send(_:) 方法,来允许开发者发送特定的值给订阅者或管道。
Subjects 可以通过调用 .send(_:) 方法来将值“注入”到流中,
这对于将现有的命令式的代码与 Combine 集成非常有用。
一个 subject 还可以向多个订阅者广播消息。
如果多个订阅者连接到一个 subject,它将在调用 send(_:) 时向多个订阅者发送值。
一个 subject 还经常用于连接或串联多个管道,特别是同时给多个管道发送值时。
Subject 不会盲目地传递其订阅者的需求。
相反,它为需求提供了一个聚合点。
在没有收到订阅消息之前,一个 subject 不会向其连接的发布者发出需求信号。
当它收到订阅者的需求时,它会向它连接的发布者发出 unlimited 需求信号。
虽然 subject 支持多个订阅者,但任何未请求数据的订阅者,在请求之前均不会给它们提供数据。
Combine 中有两种内建的 subject : CurrentValueSubject 和 PassthroughSubject。
它们的行为类似,但不同的是 CurrentValueSubject 需要一个初始值并记住它当前的值,PassthroughSubject 则不会。
当调用 .send() 时,两者都将向它们的订阅者提供更新的值。
在给遵循 ObservableObject 协议的对象创建发布者时,CurrentValueSubject 和 PassthroughSubject 也很有用。
SwiftUI 中的多个声明式组件都遵循这个协议。
订阅者
虽然 Subscriber 是用于接收整个管道数据的协议,但通常 the subscriber 指的是管道的末端。
订阅者支持取消操作,取消时将终止订阅关系以及所有流完成之前,由发布者发送的数据。
Assign 和 Sink 都遵循 Cancellable 协议.
当你存储和自己订阅者的引用以便稍后清理时,你通常希望引用销毁时能自己取消订阅。
AnyCancellable 提供类型擦除的引用,可以将任何订阅者转换为 AnyCancellable 类型,允许在该引用上使用 .cancel(),但无法访问订阅者本身(对于实例来说可以,但是需要更多数据)。
存储对订阅者的引用非常重要,因为当引用被释放销毁时,它将隐含地取消其操作。
Assign 将从发布者传下来的值应用到由 keypath 定义的对象,
keypath 在创建管道时被设置。
一个在 Swift 中的例子:
.assign(to: \.isEnabled, on: signupButton)Sink 接受一个闭包,该闭包接收从发布者发送的任何结果值。
这允许开发人员使用自己的代码终止管道。
此订阅者在编写单元测试以验证发布者或管道时也非常有帮助。
一个在 Swift 中的例子:
.sink { receivedValue in
    print("The end result was \(String(describing: receivedValue))")
}
其他订阅者是其他 Apple 框架的一部分。
例如,SwiftUI 中的几乎每个 control 都可以充当订阅者。
SwiftUI 中的 View 协议 定义了一个 .onReceive(publisher) 函数,可以把视图当作订阅者使用。
onReceive 函数接受一个类似于 sink 接受的闭包,可以操纵 SwiftUI 中的 @State 或 @Bindings。
一个在 SwiftUI 中的例子:
struct MyView : View {

    @State private var currentStatusValue = "ok"
    var body: some View {
        Text("Current status: \(currentStatusValue)")
            .onReceive(MyPublisher.currentStatusPublisher) { newStatus in
                self.currentStatusValue = newStatus
            }
    }
}
对于任何类型的 UI 对象 (UIKit、AppKit 或者 SwiftUI), Assign 可以在管道中使用来更新其属性。
使用 Combine 进行开发
通常从利用现有的发布者、操作符和订阅者来组成管道开始。 本书中的许多示例突出了各种模式,其中许多模式旨在对界面内的用户输入提供声明性响应。
你可能还希望创建更容易集成到 Combine 的 API。 例如,创建一个封装远程 API 的发布者,返回单个结果或一系列结果。 或者,你可能正在创建一个订阅者来随着时间的推移去处理和消费数据。
关于管道运用的思考
在用 Combine 进行开发时,有两种更广泛的发布者模式经常出现:期望发布者返回单一的值并完成,和期望发布者随着时间的推移返回多个值。
我把第一个称作 “one-shot”(一次性)的发布者或管道。 这些发布者会创建单个响应(或者可能没有响应),然后正常终止。
我把第二个称作 “continuous”(连续)的发布者。 这些发布者和相关管道应始终处于活动状态,并提供处理持续事件的方法。 在这种情况下,管道的寿命要长得多,而且通常不希望此类管道发生失败或终止。
当你在考虑如何使用 Combine 进行开发时,把管道视作这两个类型之一,并把它们混合在一起以实现你的目标,往往是很有帮助的。 例如,模式 使用 flatMap 和 catch 在不取消管道的情况下处理错误 明确地在不间断的管道中使用一次性的管道来处理错误。
当你创建发布者或管道的实例时,好好思考你希望它如何工作是值得的 —— 要么是一次性的,要么是连续的。 你的选择将关系到你如何处理错误,或者你是否要处理操纵事件时序的操作符 (例如 debounce 或者 throttle).
除了管道或发布者将提供多少数据外,你还经常需要考虑管道将提供哪种类型对。 许多管道更多的是通过各种类型转换数据,并处理该过程中可能出现的错误情况。 该情况的一个例子是返回一个管道,在管道中如例子 通过用户输入更新声明式 UI 所示返回一个列表,以提供一种表示“空”结果的方法,即使列表中永远不会有超过 1 个元素。
最终,使用 Combine 来连接两端的数据:当数据可用时,由原始的发布者发送它们,然后订阅者最终消费数据。
Combine 发布者和订阅者涉及到的 Swift 类型
当你在 Swift 中构建管道时,函数链导致该类型被聚合为嵌套的通用类型。 如果你正在创建一个管道,然后想要将该管道作为 API 提供给代码的另一部分,则对于开发人员来说,暴露的属性或函数的类型定义可能异常复杂且毫无用处。
为了说明暴露的类型复杂性,如果你从 PassthroughSubject 创建了一个发布者,例如:
let x = PassthroughSubject<String, Never>()
    .flatMap { name in
        return Future<String, Error> { promise in
            promise(.success(""))
            }.catch { _ in
                Just("No user found")
            }.map { result in
                return "\(result) foo"
        }
}
结果的类型是:
Publishers.FlatMap<Publishers.Map<Publishers.Catch<Future<String, Error>, Just<String>>, String>, PassthroughSubject<String, Never>>当你想要暴露这个 subject 时,所有这些混合的细节可能会让你感到非常迷惑,使你的代码更难使用。
为了清理该接口,并提供一个好用的 API,可以使用类型擦除类来包装发布者或订阅者。 这样明确隐藏了 Swift 中从链式函数中构建的类型复杂性。
用于为订阅者和发布者暴露简化类型的两个类是:
每个发布者还继承了一种便利的方法 eraseToAnyPublisher(),它返回一个 AnyPublisher 实例。
eraseToAnyPublisher() 的使用非常像操作符,通常作为链式管道中的最后一个元素,以简化返回的类型。
如果你在上述代码的管道末尾添加 .eraseToAnyPublisher():
let x = PassthroughSubject<String, Never>()
    .flatMap { name in
        return Future<String, Error> { promise in
            promise(.success(""))
            }.catch { _ in
                Just("No user found")
            }.map { result in
                return "\(result) foo"
        }
}.eraseToAnyPublisher()
结果的类型将被简化为:
AnyPublisher<String, Never>管道和线程
Combine 不是一个单线程的结构。 操作符和发布者可以在不同的调度队列或 runloops 中运行。 构建的管道可以在单个队列中,也可以跨多个队列或线程传输数据。
Combine 允许发布者指定线程调度器,不论是从上游的发布者(操作符)接收数据或者向下游的订阅者发送数据,都使用它调度到指定线程。 在与更新 UI 元素的订阅者配合使用时,这一点至关重要,因为更新 UI 始终应该在主线程上。
例如,你可能在代码中看到这样的操作符:
.receive(on: RunLoop.main)许多其他操作符的参数也包括调度器。
例如 delay, debounce, 和 throttle.
这些也会对执行代码的队列产生影响 - 无论是对自己,还是对于后续在管道中执行的任何操作符。
这些操作符都使用 scheduler 参数,来切换到相应的线程或队列以完成工作。
任何后面连接着他们的操作符也会在其调度器上被调用,从而产生一些影响,如 receive。
|
如果你想明确指定操作符或后续的操作在哪个线程环境中运行,可以使用 receive 操作符。 |
把 Combine 运用到你的开发中
通常有两种途径使用 Combine 来进行开发:
Future 发布者是专门用来支持这类集成的, 在模式 用 Future 来封装异步请求以创建一次性的发布者 中有一个这样的示例。
如果你想使用发布者提供的数据作为创建此发布者的参数或输入,则有两种通用的方法可以这么做:
-
使用 flatMap 操作符, 使用传入的数据创建或返回发布者实例。 这是模式 使用 flatMap 和 catch 在不取消管道的情况下处理错误 的一种变体。
-
或者,map 或 tryMap 可被用做创建发布者实例,紧跟 switchToLatest 链将该发布者解析为将在管道内传递的值。
级联多个 UI 更新,包括网络请求 和 通过用户输入更新声明式 UI 模式说明了这种使用方法。
你可能会发现创建返回发布者的对象是值得的。 这通常使你的代码能够封装与远程或基于网络的 API 通信的详细信息。 可以使用 URLSession.dataTaskPublisher 或你自己的代码进行开发。 在模式 级联多个 UI 更新,包括网络请求 中详细介绍了这方面的一个简单的示例。
常用模式和方法
本章包括一系列模式和发布者、订阅者和管道的示例。 这些示例旨在说明如何使用 Combine 框架完成各种任务。
使用 sink 创建一个订阅者
- 目的
-
-
要接收来自发布者或管道生成的输出以及错误或者完成消息,你可以使用 sink 创建一个订阅者。
-
- 参考
- 另请参阅
- 代码和解释
-
Sink 创建了一个通用订阅者来捕获或响应来自 Combine 管道的数据,同时支持取消和 发布者和订阅者的生命周期。
let cancellablePipeline = publishingSource.sink { someValue in (1)
    // do what you want with the resulting value passed down
    // be aware that depending on the publisher, this closure
    // may be invoked multiple times.
    print(".sink() received \(someValue)")
})| 1 | 简单版本的 sink 是非常简洁的,跟了一个尾随闭包来接收从管道发送来的数据。 |
let cancellablePipeline = publishingSource.sink(receiveCompletion: { completion in (1)
    switch completion {
    case .finished:
        // no associated data, but you can react to knowing the
        // request has been completed
        break
    case .failure(let anError):
        // do what you want with the error details, presenting,
        // logging, or hiding as appropriate
        print("received the error: ", anError)
        break
    }
}, receiveValue: { someValue in
    // do what you want with the resulting value passed down
    // be aware that depending on the publisher, this closure
    // may be invoked multiple times.
    print(".sink() received \(someValue)")
})

cancellablePipeline.cancel() (2)| 1 | Sinks 是通过发布者或管道中的代码链创建的,并为管道提供终点。
当 sink 在发布者创建或调用时,它通过 subscribe 方法隐式地开始了 发布者和订阅者的生命周期,并请求无限制的数据。 |
| 2 | Sinks 是可取消的订阅者。在任何时候,你可以使用 sink 末端对其的引用,并在上面调用 .cancel() 来使管道失效并关闭管道。 |
使用 assign 创建一个订阅者
- 目的
-
-
使用管道的结果来设置值,这个值通常是位于用户界面或控制组件上的属性,不过任何符合 KVO 的对象都可以提供该值。
-
- 参考
- 另请参阅
- 代码和解释
-
Assign 是专门设计用于将来自发布者或管道的数据应用到属性的订阅者,每当它收到数据时都会更新该属性。 与 sink 一样,它创建时激活并请求无限数据。 Assign 要求将失败类型指定为
<Never>,因此,如果你的管道可能失败(例如使用 tryMap 等操作符),则需要在使用.assign之前 错误处理。
let cancellablePipeline = publishingSource (1)
    .receive(on: RunLoop.main) (2)
    .assign(to: \.isEnabled, on: yourButton) (3)

cancellablePipeline.cancel() (4)| 1 | .assign 通常在创建时链接到发布者,并且返回值是可取消的。 |
| 2 | 如果 .assign 被用于更新用户界面的元素,则需要确保在主线程更新它。这个调用确保了订阅者是在主线程上接收数据的。 |
| 3 | Assign 持有对使用 key path 更新的属性的引用,以及对正在更新的对象的引用。 |
| 4 | 在任何时候,你都可以调用 cancel() 终止和使管道失效。通常,当把从管道中更新的对象(如 viewController)销毁时,我们会取消管道。 |
使用 dataTaskPublisher 发起网络请求
- 目的
-
-
一个常见的用例是从 URL 请求 JSON 数据并解码。
-
- 参考
- 另请参阅
- 代码和解释
-
这可以通过使用 Combine 的 URLSession.dataTaskPublisher 搭配一系列处理数据的操作符来轻松完成。
最简单的,调用 URLSession 的 dataTaskPublisher,然后在数据到达订阅者之前使用 map 和 decode。
使用此操作的最简单例子可能是:
let myURL = URL(string: "https://postman-echo.com/time/valid?timestamp=2016-10-10")
// checks the validity of a timestamp - this one returns {"valid":true}
// matching the data structure returned from https://postman-echo.com/time/valid
fileprivate struct PostmanEchoTimeStampCheckResponse: Decodable, Hashable { (1)
    let valid: Bool
}

let remoteDataPublisher = URLSession.shared.dataTaskPublisher(for: myURL!) (2)
    // the dataTaskPublisher output combination is (data: Data, response: URLResponse)
    .map { $0.data } (3)
    .decode(type: PostmanEchoTimeStampCheckResponse.self, decoder: JSONDecoder()) (4)

let cancellableSink = remoteDataPublisher
    .sink(receiveCompletion: { completion in
            print(".sink() received the completion", String(describing: completion))
            switch completion {
                case .finished: (5)
                    break
                case .failure(let anError): (6)
                    print("received error: ", anError)
            }
    }, receiveValue: { someValue in (7)
        print(".sink() received \(someValue)")
})| 1 | 通常,你将有一个结构体的定义,至少遵循 Decodable 协议(即使没有完全遵循 Codable protocol)。此结构体可以只定义从网络拉取到的 JSON 中你感兴趣的字段。 不需要定义完整的 JSON 结构。 |
| 2 | dataTaskPublisher 是从 URLSession 实例化的。 你可以配置你自己的 URLSession,或者使用 shared session. |
| 3 | 返回的数据是一个元组:(data: Data, response: URLResponse)。
map 操作符用来获取数据并丢弃 URLResponse,只把 Data 沿管道向下传递。 |
| 4 | decode 用于加载数据并尝试解析它。 如果解码失败,它会抛出一个错误。 如果它成功,通过管道传递的对象将是来自 JSON 数据的结构体。 |
| 5 | 如果解码完成且没有错误,则将触发完成操作,并将值传递给 receiveValue 闭包。 |
| 6 | 如果发生失败(无论是网络请求还是解码),则错误将被传递到 failure 闭包。 |
| 7 | 只有当数据请求并解码成功时,才会调用此闭包,并且收到的数据格式将是结构体 PostmanEchoTimeStampCheckResponse 的实例。 |
使用 dataTaskPublisher 进行更严格的请求处理
- 目的
-
-
当 URLSesion 进行连接时,它仅在远程服务器未响应时报告错误。 你可能需要根据状态码将各种响应视为不同的错误。 为此,你可以使用 tryMap 检查 http 响应并在管道中抛出错误。
-
- 参考
- 另请参阅
- 代码和解释
-
要对 URL 响应中被认为是失败的操作进行更多控制,可以对
dataTaskPublisher的元组响应使用tryMap操作符。 由于dataTaskPublisher将响应数据和URLResponse都返回到了管道中,你可以立即检查响应,并在需要时抛出自己的错误。
这方面的一个例子可能看起来像:
let myURL = URL(string: "https://postman-echo.com/time/valid?timestamp=2016-10-10")
// checks the validity of a timestamp - this one returns {"valid":true}
// matching the data structure returned from https://postman-echo.com/time/valid
fileprivate struct PostmanEchoTimeStampCheckResponse: Decodable, Hashable {
    let valid: Bool
}
enum TestFailureCondition: Error {
    case invalidServerResponse
}

let remoteDataPublisher = URLSession.shared.dataTaskPublisher(for: myURL!)
    .tryMap { data, response -> Data in (1)
                guard let httpResponse = response as? HTTPURLResponse, (2)
                    httpResponse.statusCode == 200 else { (3)
                        throw TestFailureCondition.invalidServerResponse (4)
                }
                return data (5)
    }
    .decode(type: PostmanEchoTimeStampCheckResponse.self, decoder: JSONDecoder())

let cancellableSink = remoteDataPublisher
    .sink(receiveCompletion: { completion in
            print(".sink() received the completion", String(describing: completion))
            switch completion {
                case .finished:
                    break
                case .failure(let anError):
                    print("received error: ", anError)
            }
    }, receiveValue: { someValue in
        print(".sink() received \(someValue)")
})| 1 | tryMap 仍旧获得元组 (data: Data, response: URLResponse),并且在这里定义仅返回管道中的 Data 类型。 |
| 2 | 在 tryMap 的闭包内,我们将响应转换为 HTTPURLResponse 并深入进去,包括查看特定的状态码。 |
| 3 | 在这个例子中,我们希望将 200 状态码以外的任何响应视为失败。HTTPURLResponse.statusCode 是一种 Int 类型,因此你也可以使用 httpResponse.statusCode > 300 等逻辑。 |
| 4 | 如果判断条件未满足,则会抛出我们选择的错误实例:在这个例子中,是 invalidServerResponse。 |
| 5 | 如果没有出现错误,则我们只需传递 Data 以进行进一步处理。 |
标准化 dataTaskPublisher 返回的错误
当在管道上触发错误时,不管错误发生在管道中的什么位置,都会发送 .failure 完成回调,并把错误封装在其中。
此模式可以扩展来返回一个发布者,该发布者使用此通用模式可接受并处理任意数量的特定错误。 在许多示例中,我们用默认值替换错误条件。 如果我们想要返回一个发布者的函数,该发布者不会根据失败来选择将发生什么,则同样 tryMap 操作符可以与 mapError 一起使用来转换响应对象以及转换 URLError 错误类型。
enum APIError: Error, LocalizedError { (1)
    case unknown, apiError(reason: String), parserError(reason: String), networkError(from: URLError)

    var errorDescription: String? {
        switch self {
        case .unknown:
            return "Unknown error"
        case .apiError(let reason), .parserError(let reason):
            return reason
        case .networkError(let from): (2)
            return from.localizedDescription
        }
    }
}

func fetch(url: URL) -> AnyPublisher<Data, APIError> {
    let request = URLRequest(url: url)

    return URLSession.DataTaskPublisher(request: request, session: .shared) (3)
        .tryMap { data, response in (4)
            guard let httpResponse = response as? HTTPURLResponse else {
                throw APIError.unknown
            }
            if (httpResponse.statusCode == 401) {
                throw APIError.apiError(reason: "Unauthorized");
            }
            if (httpResponse.statusCode == 403) {
                throw APIError.apiError(reason: "Resource forbidden");
            }
            if (httpResponse.statusCode == 404) {
                throw APIError.apiError(reason: "Resource not found");
            }
            if (405..<500 ~= httpResponse.statusCode) {
                throw APIError.apiError(reason: "client error");
            }
            if (500..<600 ~= httpResponse.statusCode) {
                throw APIError.apiError(reason: "server error");
            }
            return data
        }
        .mapError { error in (5)
            // if it's our kind of error already, we can return it directly
            if let error = error as? APIError {
                return error
            }
            // if it is a TestExampleError, convert it into our new error type
            if error is TestExampleError {
                return APIError.parserError(reason: "Our example error")
            }
            // if it is a URLError, we can convert it into our more general error kind
            if let urlerror = error as? URLError {
                return APIError.networkError(from: urlerror)
            }
            // if all else fails, return the unknown error condition
            return APIError.unknown
        }
        .eraseToAnyPublisher() (6)
}| 1 | APIError 是一个错误类型的枚举,我们在此示例中使用该枚举来列举可能发生的所有错误。 |
| 2 | .networkError 是 APIError 的一个特定情况,当 URLSession.dataTaskPublisher 返回错误时我们将把错误转换为该类型。 |
| 3 | 我们使用标准 dataTaskPublisher 开始生成此发布者。 |
| 4 | 然后,我们将路由到 tryMap 操作符来检查响应,根据服务器响应创建特定的错误。 |
| 5 | 最后,我们使用 mapError 将任何其他不可忽视的错误类型转换为通用的错误类型 APIError。 |
用 Future 来封装异步请求以创建一次性的发布者
- 目的
-
-
使用
Future将异步请求转换为发布者,以便在 Combine 管道中使用返回结果。
-
- 参考
- 另请参阅
- 代码和解释
import Contacts
let futureAsyncPublisher = Future<Bool, Error> { promise in (1)
    CNContactStore().requestAccess(for: .contacts) { grantedAccess, err in (2)
        // err is an optional
        if let err = err { (3)
            return promise(.failure(err))
        }
        return promise(.success(grantedAccess)) (4)
    }
}.eraseToAnyPublisher()| 1 | Future 本身由你定义返回类型,并接受一个闭包。
它给出一个与类型描述相匹配的 Result 对象,你可以与之交互。 |
| 2 | 只要传入的闭包符合类型要求,任何异步的 API 你都可以调用。 |
| 3 | 在异步 API 完成的回调中,由你决定什么是失败还是成功。
对 promise(.failure(<FailureType>)) 的调用返回一个失败的结果。 |
| 4 | 或者调用 promise(.success(<OutputType>)) 返回一个值。 |
如果您想返回一个已经被解析的 promise 作为 Future 发布者,你可以在闭包中立即返回你想要的结果。
以下示例将单个值 true 返回表示成功。
你同样可以简单地返回 false,发布者仍然会将其作为一个成功的 promise。
let resolvedSuccessAsPublisher = Future<Bool, Error> { promise in
    promise(.success(true))
}.eraseToAnyPublisher()
一个返回 Future 发布者的例子,它立即将 promise 解析为错误。
enum ExampleFailure: Error {
    case oneCase
}

let resolvedFailureAsPublisher = Future<Bool, Error> { promise in
    promise(.failure(ExampleFailure.oneCase))
}.eraseToAnyPublisher()
有序的异步操作
- 目的
-
-
使用 Combine 的管道来显式地对异步操作进行排序
-
|
这类似于一个叫做 "promise chaining" 的概念。 虽然你可以将 Combine 处理的和其行为一致,但它可能不能良好地替代对 promise 库的使用。 主要区别在于,promise 库总是将每个 promise 作为单一结果处理,而 Combine 带来了可能需要处理许多值的复杂性。 |
- 参考
- 另请参阅
-
-
使用此代码的 ViewController 在 github 的项目中 UIKit-Combine/AsyncCoordinatorViewController.swift.
- 代码和解释
-
任何需要按特定顺序执行的异步(或同步)任务组都可以使用 Combine 管道进行协调管理。 通过使用 Future 操作符,可以捕获完成异步请求的行为,序列操作符提供了这种协调功能的结构。
通过将任何异步 API 请求与 Future 发布者进行封装,然后将其与 flatMap 操作符链接在一起,你可以以特定顺序调用被封装的异步 API 请求。 通过使用 Future 或其他发布者创建多个管道,使用 zip 操作符将它们合并之后等待管道完成,通过这种方法可以创建多个并行的异步请求。
如果你想强制一个 Future 发布者直到另一个发布者完成之后才被调用,你可以把 future 发布者创建在 flatMap 的闭包中,这样它就会等待有值被传入 flatMap 操作符之后才会被创建。
通过组合这些技术,可以创建任何并行或串行任务的结构。
如果后面的任务需要较早任务的数据,这种协调异步请求的技术会特别有效。 在这些情况下,所需的数据结果可以直接通过管道传输。
此排序的示例如下。 在此示例中,按钮在完成时会高亮显示,按钮的排列顺序是特意用来显示操作顺序的。 整个序列由单独的按钮操作触发,该操作还会重置所有按钮的状态,如果序列中有尚未完成的任务,则都将被取消。 在此示例中,异步 API 请求会在随机的时间之后完成,作为例子来展示时序的工作原理。
创建的工作流分步表示如下:
-
步骤 1 先运行。
-
步骤 2 有三个并行的任务,在步骤 1 完成之后运行。
-
步骤 3 等步骤 2 的三个任务全部完成之后,再开始执行。
-
步骤 4 在步骤 3 完成之后开始执行。
此外,还有一个 activity indicator 被触发,以便在序列开始时开始动画,在第 4 步完成时停止。
import UIKit
import Combine

class AsyncCoordinatorViewController: UIViewController {

    @IBOutlet weak var startButton: UIButton!

    @IBOutlet weak var step1_button: UIButton!
    @IBOutlet weak var step2_1_button: UIButton!
    @IBOutlet weak var step2_2_button: UIButton!
    @IBOutlet weak var step2_3_button: UIButton!
    @IBOutlet weak var step3_button: UIButton!
    @IBOutlet weak var step4_button: UIButton!
    @IBOutlet weak var activityIndicator: UIActivityIndicatorView!

    var cancellable: AnyCancellable?
    var coordinatedPipeline: AnyPublisher<Bool, Error>?

    @IBAction func doit(_ sender: Any) {
        runItAll()
    }

    func runItAll() {
        if self.cancellable != nil { (1)
            print("Cancelling existing run")
            cancellable?.cancel()
            self.activityIndicator.stopAnimating()
        }
        print("resetting all the steps")
        self.resetAllSteps() (2)
        // driving it by attaching it to .sink
        self.activityIndicator.startAnimating() (3)
        print("attaching a new sink to start things going")
        self.cancellable = coordinatedPipeline? (4)
            .print()
            .sink(receiveCompletion: { completion in
                print(".sink() received the completion: ", String(describing: completion))
                self.activityIndicator.stopAnimating()
            }, receiveValue: { value in
                print(".sink() received value: ", value)
            })
    }
    // MARK: - helper pieces that would normally be in other files

    // this emulates an async API call with a completion callback
    // it does nothing other than wait and ultimately return with a boolean value
    func randomAsyncAPI(completion completionBlock: @escaping ((Bool, Error?) -> Void)) {
        DispatchQueue.global(qos: .background).async {
            sleep(.random(in: 1...4))
            completionBlock(true, nil)
        }
    }

    /// Creates and returns pipeline that uses a Future to wrap randomAsyncAPI
    /// and then updates a UIButton to represent the completion of the async
    /// work before returning a boolean True.
    /// - Parameter button: button to be updated
    func createFuturePublisher(button: UIButton) -> AnyPublisher<Bool, Error> { (5)
        return Future<Bool, Error> { promise in
            self.randomAsyncAPI() { (result, err) in
                if let err = err {
                    promise(.failure(err))
                } else {
                    promise(.success(result))
                }
            }
        }
        .receive(on: RunLoop.main)
            // so that we can update UI elements to show the "completion"
            // of this step
        .map { inValue -> Bool in (6)
            // intentionally side effecting here to show progress of pipeline
            self.markStepDone(button: button)
            return true
        }
        .eraseToAnyPublisher()
    }

    /// highlights a button and changes the background color to green
    /// - Parameter button: reference to button being updated
    func markStepDone(button: UIButton) {
        button.backgroundColor = .systemGreen
        button.isHighlighted = true
    }

    func resetAllSteps() {
        for button in [self.step1_button, self.step2_1_button, self.step2_2_button, self.step2_3_button, self.step3_button, self.step4_button] {
            button?.backgroundColor = .lightGray
            button?.isHighlighted = false
        }
        self.activityIndicator.stopAnimating()
    }

    // MARK: - view setup

    override func viewDidLoad() {
        super.viewDidLoad()
        self.activityIndicator.stopAnimating()

        // Do any additional setup after loading the view.

        coordinatedPipeline = createFuturePublisher(button: self.step1_button) (7)
            .flatMap { flatMapInValue -> AnyPublisher<Bool, Error> in
            let step2_1 = self.createFuturePublisher(button: self.step2_1_button)
            let step2_2 = self.createFuturePublisher(button: self.step2_2_button)
            let step2_3 = self.createFuturePublisher(button: self.step2_3_button)
            return Publishers.Zip3(step2_1, step2_2, step2_3)
                .map { _ -> Bool in
                    return true
                }
                .eraseToAnyPublisher()
            }
        .flatMap { _ in
            return self.createFuturePublisher(button: self.step3_button)
        }
        .flatMap { _ in
            return self.createFuturePublisher(button: self.step4_button)
        }
        .eraseToAnyPublisher()
    }
}| 1 | runItAll 协调此工作流的进行,它从检查当前是否正在执行开始。
如果是,它会在当前的订阅者上调用 cancel()。 |
| 2 | resetAllSteps 通过遍历所有表示当前工作流状态的按钮,并将它们重置为灰色和未高亮以回到初始状态。
它还验证 activity indicator 当前未处于动画中。 |
| 3 | 然后我们开始执行请求,首先开启 activity indicator 的旋转动画。 |
| 4 | 使用 sink 创建订阅者并存储对工作流的引用。 被订阅的发布者是在该函数外创建的,允许被多次复用。 管道中的 print 操作符用于调试,在触发管道时在控制台显示输出。 |
| 5 | 每个步骤都由 Future 发布者紧跟管道构建而成,然后立即由管道操作符切换到主线程,然后更新 UIButton 的背景色,以显示该步骤已完成。
这封装在 createFuturePublisher 的调用中,使用 eraseToAnyPublisher 以简化返回的类型。 |
| 6 | map 操作符用于创建并更新 UIButton,作为特定的效果以显示步骤已完成。 |
| 7 | 创建整个管道及其串行和并行任务结构,是结合了对 createFuturePublisher 的调用以及对 flatMap 和 zip 操作符的使用共同完成的。 |
错误处理
上述示例都假设,如果发生错误情况,订阅者将处理这些情况。 但是,你并不总是能够控制订阅者的要求——如果你使用 SwiftUI,情况可能如此。 在这些情况下,你需要构建管道,以便输出类型与订阅者的类型匹配。 这意味着你在处理管道内的任何错误。
例如,如果你正在使用 SwiftUI,并且你希望使用 assign 在按钮上设置 isEnabled 属性,则订阅者将有几个要求:
-
订阅者应匹配
<Bool, Never>的类型输出 -
应该在主线程调用订阅者
如果发布者抛出一个错误(例如 URLSession.dataTaskPublisher ),你需要构建一个管道来转换输出类型,还需要处理管道内的错误,以匹配错误类型 <Never>。
如何处理管道内的错误取决于管道的定义方式。 如果管道设置为返回单个结果并终止, 一个很好的例子就是 使用 catch 处理一次性管道中的错误。 如果管道被设置为持续更新,则错误处理要复杂一点。 这种情况下的一个很好的例子是 使用 flatMap 和 catch 在不取消管道的情况下处理错误。
使用 assertNoFailure 验证未发生失败
- 目的
-
-
验证管道内未发生错误
-
- 参考
- 另请参阅
- 代码和解释
-
在管道中测试常量时,断言 assertNoFailure 非常有用,可将失败类型转换为
<Never>。 如果断言被触发,该操作符将导致应用程序终止(或测试时导致调试器崩溃)。
这对于验证已经处理过错误的常量很有用。
比如你确信你处理了错误,对管道进行了 map 操作,该操作可以将 <Error> 的失败类型转换为 <Never> 传给所需的订阅者。
更有可能的是,你希望将错误处理掉,而不是终止应用程序。 期待后面的 使用 catch 处理一次性管道中的错误 和 使用 flatMap 和 catch 在不取消管道的情况下处理错误 模式吧,它们会告诉你如何提供逻辑来处理管道中的错误。
使用 catch 处理一次性管道中的错误
- 目的
-
-
如果你需要在管道内处理失败,例如在使用
assign操作符或其他要求失败类型为<Never>的操作符之前,你可以使用catch来提供适当的逻辑。
-
- 参考
- 另请参阅
- 代码和解释
-
catch 处理错误的方式,是将上游发布者替换为另一个发布者,这是你在闭包中用返回值提供的。
|
请注意,这实际上终止了管道。 如果你使用的是一次性发布者(不创建多个事件),那这就没什么。 |
例如,URLSession.dataTaskPublisher 是一个一次性的发布者,你可以使用 catch 在发生错误时返回默认值,以确保你得到响应结果。 扩展我们以前的示例以提供默认的响应:
struct IPInfo: Codable {
    // matching the data structure returned from ip.jsontest.com
    var ip: String
}
let myURL = URL(string: "http://ip.jsontest.com")
// NOTE(heckj): you'll need to enable insecure downloads in your Info.plist for this example
// since the URL scheme is 'http'

let remoteDataPublisher = URLSession.shared.dataTaskPublisher(for: myURL!)
    // the dataTaskPublisher output combination is (data: Data, response: URLResponse)
    .map({ (inputTuple) -> Data in
        return inputTuple.data
    })
    .decode(type: IPInfo.self, decoder: JSONDecoder()) (1)
    .catch { err in (2)
        return Publishers.Just(IPInfo(ip: "8.8.8.8"))(3)
    }
.eraseToAnyPublisher()| 1 | 通常,catch 操作符将被放置在几个可能失败的操作符之后,以便在之前任何可能的操作失败时提供回退或默认值。 |
| 2 | 使用 catch 时,你可以得到错误类型,并可以检查它以选择如何提供响应。 |
| 3 | Just 发布者经常用于启动另一个一次性管道,或在发生失败时直接提供默认的响应。 |
此技术的一个可能问题是,如果你希望原始发布者生成多个响应值,但使用 catch 之后原始管道就已结束了。 如果你正在创建一条对 @Published 属性做出响应的管道,那么在任何失败值激活 catch 操作符之后,管道将不再做出进一步响应。 有关此工作原理的详细信息,请参阅 catch。
如果你要继续响应错误并处理它们,请参阅 使用 flatMap 和 catch 在不取消管道的情况下处理错误。
在发生暂时失败时重试
当 retry 收到 .failure 结束事件时,它重试的方式是给它所链接的操作符或发布者重新创建订阅。
当尝试请求连接不稳定的网络资源时,通常需要 retry 操作符,或者再次请求时可能会成功的情况。
如果指定的重试次数全部失败,则将 .failure 结束事件传递给订阅者。
在下面的示例中,我们将 retry 与 delay 操作符相结合使用。 我们使用延迟操作符在下一个请求之前使其出现少量随机延迟。 这使得重试的尝试行为被分隔开,使重试不会快速连续的发生。
此示例还包括使用 tryMap 操作符以更全面地检查从 dataTaskPublisher 返回的任何 URL 响应。
服务器的任何响应都由 URLSession 封装,并作为有效的响应转发。
URLSession 不将 404 Not Found 的 http 响应视为错误响应,也不将任何 50x 错误代码视作错误。
使用 tryMap,我们可检查已发送的响应代码,并验证它是 200 的成功响应代码。
在此示例中,如果响应代码不是 200 ,则会抛出一个异常 —— 这反过来又会导致 tryMap 操作符传递 .failure 事件,而不是数据。
此示例将 tryMap 设置在 retry 操作符 之后,以便仅在网站未响应时重新尝试请求。
let remoteDataPublisher = urlSession.dataTaskPublisher(for: self.URL!)
    .delay(for: DispatchQueue.SchedulerTimeType.Stride(integerLiteral: Int.random(in: 1..<5)), scheduler: backgroundQueue) (1)
    .retry(3) (2)
    .tryMap { data, response -> Data in (3)
        guard let httpResponse = response as? HTTPURLResponse,
            httpResponse.statusCode == 200 else {
                throw TestFailureCondition.invalidServerResponse
        }
        return data
    }
    .decode(type: PostmanEchoTimeStampCheckResponse.self, decoder: JSONDecoder())
    .subscribe(on: backgroundQueue)
.eraseToAnyPublisher()| 1 | delay 操作符将流经过管道的结果保持一小段时间,在这个例子中随机选择1至5秒。通过在管道中添加延迟,即使原始请求成功,重试也始终会发生。 |
| 2 | 重试被指定为尝试3次。 如果每次尝试都失败,这将导致总共 4 次尝试 - 原始请求和 3 次额外尝试。 |
| 3 | tryMap 被用于检查 dataTaskPublisher 返回的数据,如果服务器的响应数据有效,但不是 200 HTTP 响应码,则返回 .failure 完成事件。 |
|
使用 retry 操作符与 URLSession.dataTaskPublisher 时,请验证你请求的 URL 如果反复请求或重试,不会产生副作用。 理想情况下,此类请求应具有幂等性。 如果没有,retry 操作符可能会发出多个请求,并产生非常意想不到的副作用。 |
使用 flatMap 和 catch 在不取消管道的情况下处理错误
- 目的
-
-
flatMap操作符可以与catch一起使用,以持续处理新发布的值上的错误。
-
- 参考
- 另请参阅
- 代码和解释
-
flatMap是用于处理持续事件流中错误的操作符。
你提供一个闭包给 flatMap,该闭包可以获取所传入的值,并创建一个一次性的发布者,完成可能失败的工作。
这方面的一个例子是从网络请求数据,然后将其解码。
你可以引入一个 catch 操作符,以捕获任何错误并提供适当的值。
当你想要保持对上游发布者的更新时,这是一个完美的机制,因为它创建一次性的发布者或短管道,发送一个单一的值,然后完成每一个传入的值。 所创建的一次性发布者的完成事件在 flatMap 中终止,并且不会传递给下游订阅者。
一个使用 dataTaskPublisher 的这样的例子:
let remoteDataPublisher = Just(self.testURL!) (1)
    .flatMap { url in (2)
        URLSession.shared.dataTaskPublisher(for: url) (3)
        .tryMap { data, response -> Data in (4)
            guard let httpResponse = response as? HTTPURLResponse,
                httpResponse.statusCode == 200 else {
                    throw TestFailureCondition.invalidServerResponse
            }
            return data
        }
        .decode(type: PostmanEchoTimeStampCheckResponse.self, decoder: JSONDecoder()) (5)
        .catch {_ in (6)
            return Just(PostmanEchoTimeStampCheckResponse(valid: false))
        }
    }
.eraseToAnyPublisher()| 1 | Just 以传入一个 URL 作为示例启动此发布者。 |
| 2 | flatMap 以 URL 作为输入,闭包继续创建一次性发布者管道。 |
| 3 | dataTaskPublisher 使用输入的 url 发出请求。 |
| 4 | 输出的结果(一个 (Data, URLResponse) 元组)流入 tryMap 以解析其他错误。 |
| 5 | decode 尝试将返回的数据转换为本地定义的类型。 |
| 6 | 如果其中任何一个失败,catch 将把错误转换为一个默认的值。
在这个例子中,是具有预设好 valid = false 属性的对象。 |
网络受限时从备用 URL 请求数据
- 目的
-
-
在 Apple 的 WWDC 2019 演示 Advances in Networking, Part 1 中,使用
tryCatch和tryMap操作符提供了示例模式,以响应网络受到限制的特殊错误。
-
- 参考
- 另请参阅
- 代码和解释
// Generalized Publisher for Adaptive URL Loading
func adaptiveLoader(regularURL: URL, lowDataURL: URL) -> AnyPublisher<Data, Error> {
    var request = URLRequest(url: regularURL) (1)
    request.allowsConstrainedNetworkAccess = false (2)
    return URLSession.shared.dataTaskPublisher(for: request) (3)
        .tryCatch { error -> URLSession.DataTaskPublisher in (4)
            guard error.networkUnavailableReason == .constrained else {
               throw error
            }
            return URLSession.shared.dataTaskPublisher(for: lowDataURL) (5)
        .tryMap { data, response -> Data in
            guard let httpResponse = response as? HTTPUrlResponse, (6)
                   httpResponse.statusCode == 200 else {
                       throw MyNetworkingError.invalidServerResponse
            }
            return data
}
.eraseToAnyPublisher() (7)
在苹果的 WWDC 中的这个例子,提供了一个函数,接受两个 URL 作为参数 —— 一个主要的 URL 和一个备用的。 它会返回一个发布者,该发布者将请求数据,并在网络受到限制时向备用 URL 请求数据。
| 1 | request 变量是一个尝试请求数据的 URLRequest。 |
| 2 | 设置 request.allowsConstrainedNetworkAccess 将导致 dataTaskPublisher 在网络受限时返回错误。 |
| 3 | 调用 dataTaskPublisher 发起请求。 |
| 4 | tryCatch 用于捕获当前的错误状态并检查特定错误(受限的网络)。 |
| 5 | 如果它发现错误,它会使用备用 URL 创建一个新的一次性发布者。 |
| 6 | 由此产生的发布者仍可能失败,tryMap 可以基于对应到错误条件的 HTTP 响应码来抛出错误,将此映射为失败。 |
| 7 | eraseToAnyPublisher 可在操作符链上进行类型擦除,因此 adaptiveLoader 函数的返回类型为 AnyPublisher<Data, Error>。 |
在示例中,如果从原始请求返回的错误不是网络受限的问题,则它会将 .failure 结束事件传到管道中。
如果错误是网络受限,则 tryCatch 操作符会创建对备用 URL 的新请求。
和 UIKit 或 AppKit 集成
通过用户输入更新声明式 UI
- 目的
-
-
查询基于 Web 的 API 并将要显示在 UI 中的数据返回
-
- 参考
-
-
带有此代码的 Xcode 项目 ViewController 在 github 工程中,位于
UIKit-Combine/GithubViewController.swift -
Publishers: @Published, URLSession.dataTaskPublisher
-
Operators: map, switchToLatest, receive, throttle, removeDuplicates
-
Subscribers: assign
-
- 另请参阅
- 代码和解释
-
像 Combine 这样的框架的主要好处之一是建立一个声明性结构,定义界面将如何根据用户输入进行更新。
将 Combine 与 UIKit 集成的模式是设置一个变量,该变量将保持对更新状态的引用,并使用 IBAction 连接控件。
以下示例是更大的 ViewController 实现中的代码的一部分。
这个例子与下一个模式 级联多个 UI 更新,包括网络请求 有点重叠,都建立在一个初始的发布者上。
import UIKit
import Combine

class ViewController: UIViewController {

    @IBOutlet weak var github_id_entry: UITextField! (1)

    var usernameSubscriber: AnyCancellable?

    // username from the github_id_entry field, updated via IBAction
    // @Published is creating a publisher $username of type <String, Never>
    @Published var username: String = "" (2)

    // github user retrieved from the API publisher. As it's updated, it
    // is "wired" to update UI elements
    @Published private var githubUserData: [GithubAPIUser] = []

    // MARK - Actions

    @IBAction func githubIdChanged(_ sender: UITextField) {
        username = sender.text ?? "" (3)
        print("Set username to ", username)
    }

    override func viewDidLoad() {
        super.viewDidLoad()
        // Do any additional setup after loading the view.

        usernameSubscriber = $username (4)
            .throttle(for: 0.5, scheduler: myBackgroundQueue, latest: true) (5)
            // ^^ scheduler myBackGroundQueue publishes resulting elements
            // into that queue, resulting on this processing moving off the
            // main runloop.
            .removeDuplicates() (6)
            .print("username pipeline: ") // debugging output for pipeline
            .map { username -> AnyPublisher<[GithubAPIUser], Never> in (7)
                return GithubAPI.retrieveGithubUser(username: username)
            }
            // ^^ type returned by retrieveGithubUser is a Publisher, so we use
            // switchToLatest to resolve the publisher to its value
            // to return down the chain, rather than returning a
            // publisher down the pipeline.
            .switchToLatest() (8)
            // using a sink to get the results from the API search lets us
            // get not only the user, but also any errors attempting to get it.
            .receive(on: RunLoop.main)
.assign(to: \.githubUserData, on: self) (9)| 1 | UITextField 是从用户交互推动更新的界面元素。 |
| 2 | 我们定义了一个 @Published 属性,既能保存数据,又能响应更新。
因为它是一个 @Published 属性,它提供了一个发布者,我们可以使用 Combine 的管道更新界面的其他变量或元素。 |
| 3 | 我们从 IBAction 内部设置变量 username,如果发布者 $username 有任何订阅者,它反过来就会触发数据流更新。 |
| 4 | 我们又在发布者 $username 上设置了一个订阅者,以触发进一步的行为。
在这个例子中,它使用更新过的 username 的值从 Github 的 REST API 取回一个 GithubAPIUser 实例。
每次更新用户名值时,它都会发起新的 HTTP 请求。 |
| 5 | throttle 在这里是防止每编辑一次 UITextField 都触发一个网络请求。
throttle 操作符保证了每半秒最多可发出 1 个请求。 |
| 6 | removeDuplicates 移除重复的更改用户名事件,以便不会连续两次对相同的值发起 API 请求。
如果用户结束编辑时返回的是之前的值,removeDuplicates 可防止发起冗余请求。 |
| 7 | map 在此处和 flatMap 处理错误类似,返回一个发布者的实例。 在 map 被调用时,API 对象返回一个发布者。 它不会返回请求的值,而是返回发布者本身。 |
| 8 | switchToLatest 操作符接收发布者实例并解析其中的数据。
switchToLatest 将发布者解析为值,并将该值传递到管道中,在这个例子中,是一个 [GithubAPIUser] 的实例。 |
| 9 | 在管道末尾的 assign 是订阅者,它将值分配到另一个变量:githubUserData。 |
模式 级联多个 UI 更新,包括网络请求 在此代码上扩展为各种UI元素的多个级联更新。
级联多个 UI 更新,包括网络请求
- 目的
-
-
由上游的订阅者触发多个 UI 元素更新
-
- 参考
-
-
带有此代码的 ViewController 在 github 项目中,位于 UIKit-Combine/GithubViewController.swift。 你可以通过在 github 项目中运行 UIKit target 来查看此代码。
-
GithubAPI 在 github 项目中,位于 UIKit-Combine/GithubAPI.swift
-
操作符: decode, catch, map, tryMap, switchToLatest, filter, handleEvents, subscribe, receive, throttle, removeDuplicates
-
- 另请参阅
- 代码和解释
-
以下提供的示例是扩展了 通过用户输入更新声明式 UI 例子中的发布者, 添加了额外的 Combine 管道,当有人与所提供的界面交互时以更新多个 UI 元素。
此视图的模式从接受用户输入的文本框开始,紧接着是一系列操作事件流:
-
使用一个 IBAction 来更新 @Published
username变量。 -
我们有一个订阅者(
usernameSubscriber)连接到$username发布者,该发布者发送值的更新,并尝试取回 GitHub user。 结果返回的变量githubUserData(也被 @Published 标记)是一个 GitHub 用户对象的列表。 尽管我们只期望在这里获得单个值,但我们使用列表是因为我们可以方便地在失败情况下返回空列表:无法访问 API 或用户名未在 GitHub 注册。 -
我们有
passthroughSubjectapiNetworkActivitySubscriber来反映 GithubAPI 对象何时开始或完成网络请求。 -
我们有另一个订阅者
repositoryCountSubscriber连接到$githubUserData发布者,该发布者从 github 用户数据对象中提取出仓库个数,并将其分配给要显示的文本字段。 -
我们有一个最终的订阅者
avatarViewSubscriber连接到$githubUserData,尝试取回与用户的头像相关的图像进行显示。
|
返回空列表很有用,因为当提供无效的用户名时,我们希望明确地移除以前显示的任何头像。
为此,我们需要管道始终有值可以流动,以便触发进一步的管道和相关的 UI 界面更新。
如果我们使用可选的 |
以 assign 和 sink 创建的订阅者被存储在 ViewController 实例的 AnyCancellable 变量中。
由于它们是在类实例中定义的,Swift 编译器创建的 deinitializers 会在类被销毁时,取消并清理发布者。
|
许多喜欢 RxSwift 的开发者使用的是 "CancelBag" 对象来存储可取消的引用,并在销毁时取消管道。
可以在这儿看到一个这样的例子:https://github.com/tailec/CombineExamples/blob/master/CombineExamples/Shared/CancellableBag.swift.
这与 Combine 中在 |
管道使用 subscribe 操作符明确配置为在后台队列中工作。 如果没有该额外的配置,管道将被在主线程调用并执行,因为它们是从 UI 线程上调用的,这可能会导致用户界面响应速度明显减慢。 同样,当管道的结果分配给或更新 UI 元素时,receive 操作符用于将该工作转移回主线程。
|
为了让 UI 在 @Published 属性发送的更改事件中不断更新,我们希望确保任何配置的管道都具有 <Never> 的失败类型。 这是 assign 操作符所必需的。 当使用 sink 操作符时,它也是一个潜在的 bug 来源。 如果来自 @Published 变量的管道以一个接受 Error 失败类型的 sink 结束,如果发生错误,sink 将给管道发送终止信号。 这将停止管道的任何进一步处理,即使有变量仍然被更新。 |
import Foundation
import Combine

enum APIFailureCondition: Error {
    case invalidServerResponse
}

struct GithubAPIUser: Decodable { (1)
    // A very *small* subset of the content available about
    //  a github API user for example:
    // https://api.github.com/users/heckj
    let login: String
    let public_repos: Int
    let avatar_url: String
}

struct GithubAPI { (2)
    // NOTE(heckj): I've also seen this kind of API access
    // object set up with with a class and static methods on the class.
    // I don't know that there's a specific benefit to making this a value
    // type/struct with a function on it.

    /// externally accessible publisher that indicates that network activity is happening in the API proxy
    static let networkActivityPublisher = PassthroughSubject<Bool, Never>() (3)

    /// creates a one-shot publisher that provides a GithubAPI User
    /// object as the end result. This method was specifically designed to
    /// return a list of 1 object, as opposed to the object itself to make
    /// it easier to distinguish a "no user" result (empty list)
    /// representation that could be dealt with more easily in a Combine
    /// pipeline than an optional value. The expected return type is a
    /// Publisher that returns either an empty list, or a list of one
    /// GithubAPUser, with a failure return type of Never, so it's
    /// suitable for recurring pipeline updates working with a @Published
    /// data source.
    /// - Parameter username: username to be retrieved from the Github API
    static func retrieveGithubUser(username: String) -> AnyPublisher<[GithubAPIUser], Never> { (4)

        if username.count < 3 { (5)
            return Just([]).eraseToAnyPublisher()
        }
        let assembledURL = String("https://api.github.com/users/\(username)")
        let publisher = URLSession.shared.dataTaskPublisher(for: URL(string: assembledURL)!)
            .handleEvents(receiveSubscription: { _ in (6)
                networkActivityPublisher.send(true)
            }, receiveCompletion: { _ in
                networkActivityPublisher.send(false)
            }, receiveCancel: {
                networkActivityPublisher.send(false)
            })
            .tryMap { data, response -> Data in (7)
                guard let httpResponse = response as? HTTPURLResponse,
                    httpResponse.statusCode == 200 else {
                        throw APIFailureCondition.invalidServerResponse
                }
                return data
            }
            .decode(type: GithubAPIUser.self, decoder: JSONDecoder()) (8)
            .map {
                [$0] (9)
            }
            .catch { err in (10)
                // When I originally wrote this method, I was returning
                // a GithubAPIUser? optional.
                // I ended up converting this to return an empty
                // list as the "error output replacement" so that I could
                // represent that the current value requested didn't *have* a
                // correct github API response.
                return Just([])
            }
            .eraseToAnyPublisher() (11)
            return publisher
    }
}| 1 | 此处创建的 decodable 结构体是从 GitHub API 返回的数据的一部分。 在由 decode 操作符处理时,任何未在结构体中定义的字段都将被简单地忽略。 |
| 2 | 与 GitHub API 交互的代码被放在一个独立的结构体中,我习惯于将其放在一个单独的文件中。 API 结构体中的函数返回一个发布者,然后与 ViewController 中的其他管道进行混合合并。 |
| 3 | 该结构体还使用 passthroughSubject 暴露了一个发布者,使用布尔值以在发送网络请求时反映其状态。 |
| 4 | 我最开始创建了一个管道以返回一个可选的 GithubAPIUser 实例,但发现没有一种方便的方法来在失败条件下传递 “nil” 或空对象。 然后我修改了代码以返回一个列表,即使只需要一个实例,它却能更方便地表示一个“空”对象。 这对于想要在对 GithubAPIUser 对象不再存在后,在后续管道中做出响应以擦除现有值的情况很重要 —— 这时可以删除 repositoryCount 和用户头像的数据。 |
| 5 | 这里的逻辑只是为了防止无关的网络请求,如果请求的用户名少于 3 个字符,则返回空结果。 |
| 6 | handleEvents 操作符是我们触发网络请求发布者更新的方式。
我们定义了在订阅和终结(完成和取消)时触发的闭包,它们会在 passthroughSubject 上调用 send()。
这是我们如何作为单独的发布者提供有关管道操作的元数据的示例。 |
| 7 | tryMap 添加了对来自 github 的 API 响应的额外检查,以将来自 API 的不是有效用户实例的正确响应转换为管道失败条件。 |
| 8 | decode 从响应中获取数据并将其解码为 GithubAPIUser 的单个实例。 |
| 9 | map 用于获取单个实例并将其转换为单元素的列表,将类型更改为 GithubAPIUser 的列表:[GithubAPIUser]。 |
| 10 | catch 运算符捕获此管道中的错误条件,并在失败时返回一个空列表,同时还将失败类型转换为 Never。 |
| 11 | eraseToAnyPublisher 抹去链式操作符的复杂类型,并将整个管道暴露为 AnyPublisher 的一个实例。 |
import UIKit
import Combine

class ViewController: UIViewController {

    @IBOutlet weak var github_id_entry: UITextField!
    @IBOutlet weak var activityIndicator: UIActivityIndicatorView!
    @IBOutlet weak var repositoryCountLabel: UILabel!
    @IBOutlet weak var githubAvatarImageView: UIImageView!

    var repositoryCountSubscriber: AnyCancellable?
    var avatarViewSubscriber: AnyCancellable?
    var usernameSubscriber: AnyCancellable?
    var headingSubscriber: AnyCancellable?
    var apiNetworkActivitySubscriber: AnyCancellable?

    // username from the github_id_entry field, updated via IBAction
    @Published var username: String = ""

    // github user retrieved from the API publisher. As it's updated, it
    // is "wired" to update UI elements
    @Published private var githubUserData: [GithubAPIUser] = []

    // publisher reference for this is $username, of type <String, Never>
    var myBackgroundQueue: DispatchQueue = DispatchQueue(label: "viewControllerBackgroundQueue")
    let coreLocationProxy = LocationHeadingProxy()

    // MARK - Actions

    @IBAction func githubIdChanged(_ sender: UITextField) {
        username = sender.text ?? ""
        print("Set username to ", username)
    }

    // MARK - lifecycle methods

    override func viewDidLoad() {
        super.viewDidLoad()
        // Do any additional setup after loading the view.

        let apiActivitySub = GithubAPI.networkActivityPublisher (1)
        .receive(on: RunLoop.main)
            .sink { doingSomethingNow in
                if (doingSomethingNow) {
                    self.activityIndicator.startAnimating()
                } else {
                    self.activityIndicator.stopAnimating()
                }
        }
        apiNetworkActivitySubscriber = AnyCancellable(apiActivitySub)

        usernameSubscriber = $username (2)
            .throttle(for: 0.5, scheduler: myBackgroundQueue, latest: true)
            // ^^ scheduler myBackGroundQueue publishes resulting elements
            // into that queue, resulting on this processing moving off the
            // main runloop.
            .removeDuplicates()
            .print("username pipeline: ") // debugging output for pipeline
            .map { username -> AnyPublisher<[GithubAPIUser], Never> in
                return GithubAPI.retrieveGithubUser(username: username)
            }
            // ^^ type returned in the pipeline is a Publisher, so we use
            // switchToLatest to flatten the values out of that
            // pipeline to return down the chain, rather than returning a
            // publisher down the pipeline.
            .switchToLatest()
            // using a sink to get the results from the API search lets us
            // get not only the user, but also any errors attempting to get it.
            .receive(on: RunLoop.main)
            .assign(to: \.githubUserData, on: self)

        // using .assign() on the other hand (which returns an
        // AnyCancellable) *DOES* require a Failure type of <Never>
        repositoryCountSubscriber = $githubUserData (3)
            .print("github user data: ")
            .map { userData -> String in
                if let firstUser = userData.first {
                    return String(firstUser.public_repos)
                }
                return "unknown"
            }
            .receive(on: RunLoop.main)
            .assign(to: \.text, on: repositoryCountLabel)

        let avatarViewSub = $githubUserData (4)
            .map { userData -> AnyPublisher<UIImage, Never> in
                guard let firstUser = userData.first else {
                    // my placeholder data being returned below is an empty
                    // UIImage() instance, which simply clears the display.
                    // Your use case may be better served with an explicit
                    // placeholder image in the event of this error condition.
                    return Just(UIImage()).eraseToAnyPublisher()
                }
                return URLSession.shared.dataTaskPublisher(for: URL(string: firstUser.avatar_url)!)
                    // ^^ this hands back (Data, response) objects
                    .handleEvents(receiveSubscription: { _ in
                        DispatchQueue.main.async {
                            self.activityIndicator.startAnimating()
                        }
                    }, receiveCompletion: { _ in
                        DispatchQueue.main.async {
                            self.activityIndicator.stopAnimating()
                        }
                    }, receiveCancel: {
                        DispatchQueue.main.async {
                            self.activityIndicator.stopAnimating()
                        }
                    })
                    .receive(on: self.myBackgroundQueue)
                    // ^^ do this work on a background Queue so we don't impact
                    // UI responsiveness
                    .map { $0.data }
                    // ^^ pare down to just the Data object
                    .map { UIImage(data: $0)!}
                    // ^^ convert Data into a UIImage with its initializer
                    .catch { err in
                        return Just(UIImage())
                    }
                    // ^^ deal the failure scenario and return my "replacement"
                    // image for when an avatar image either isn't available or
                    // fails somewhere in the pipeline here.
                    .eraseToAnyPublisher()
                    // ^^ match the return type here to the return type defined
                    // in the .map() wrapping this because otherwise the return
                    // type would be terribly complex nested set of generics.
            }
            .switchToLatest()
            // ^^ Take the returned publisher that's been passed down the chain
            // and "subscribe it out" to the value within in, and then pass
            // that further down.
            .receive(on: RunLoop.main)
            // ^^ and then switch to receive and process the data on the main
            // queue since we're messing with the UI
            .map { image -> UIImage? in
                image
            }
            // ^^ this converts from the type UIImage to the type UIImage?
            // which is key to making it work correctly with the .assign()
            // operator, which must map the type *exactly*
            .assign(to: \.image, on: self.githubAvatarImageView)

        // convert the .sink to an `AnyCancellable` object that we have
        // referenced from the implied initializers
        avatarViewSubscriber = AnyCancellable(avatarViewSub)

        // KVO publisher of UIKit interface element
        let _ = repositoryCountLabel.publisher(for: \.text) (5)
            .sink { someValue in
                print("repositoryCountLabel Updated to \(String(describing: someValue))")
        }
    }

}| 1 | 我们向我们之前的 controller 添加一个订阅者,它将来自 GithubAPI 对象的活跃状态的通知连接到我们的 activityIndicator。 |
| 2 | 从 IBAction 更新用户名的地方(来自我们之前的示例 通过用户输入更新声明式 UI)我们让订阅者发出网络请求并将结果放入一个我们的 ViewController 的新变量中(还是 @Published)。 |
| 3 | 第一个订阅者连接在发布者 $githubUserData 上。
此管道提取用户仓库的个数并更新到 UILabel 实例上。
当列表为空时,管道中间有一些逻辑来返回字符串 “unknown”。 |
| 4 | 第二个订阅者也连接到发布者 $githubUserData。
这会触发网络请求以获取 github 头像的图像数据。
这是一个更复杂的管道,从 githubUser 中提取数据,组装一个 URL,然后请求它。
我们也使用 handleEvents 操作符来触发对我们视图中的 activityIndicator 的更新。
我们使用 receive 在后台队列上发出请求,然后将结果传递回主线程以更新 UI 元素。
catch 和失败处理在失败时返回一个空的 UIImage 实例。 |
| 5 | 最终订阅者连接到 UILabel 自身。 任何来自 Foundation 的 Key-Value Observable 对象都可以产生一个发布者。 在此示例中,我们附加了一个发布者,该发布者触发 UI 元素已更新的打印语句。 |
|
虽然我们可以在更新 UI 元素时简单地将管道连接到它们,但这使得和实际的 UI 元素本身耦合更紧密。
虽然简单而直接,但创建明确的状态,以及分别对用户行为和数据做出更新是一个好的建议,这更利于调试和理解。
在上面的示例中,我们使用两个 @Published 属性来保存与当前视图关联的状态。
其中一个由 |
合并多个管道以更新 UI 元素
- 目的
-
-
观察并响应多个 UI 元素发送的值,并将更新的值联合起来以更新界面。
-
- 参考
-
-
带有此代码的 ViewController 在 github 项目中,位于 UIKit-Combine/FormViewController.swift
-
发布者: @Published,
-
操作符: combineLatest, map, receive
-
订阅者: assign
-
- 另请参阅
- 代码和解释
-
此示例故意模仿许多 Web 表单样式的验证场景,不过是在 UIKit 中使用 Combine。
ViewController 被配置了多个通过声明式更新的元素。 同时持有了 3 个主要的文本输入字段:
-
value1 -
value2 -
value2_repeat
它还有一个按钮来提交合并的值,以及两个 labels 来提供反馈。
这些字段的更新规则被实现为:
-
value1中的条目至少有 3 个字符。 -
value2中的条目至少有 5 个字符。 -
value2_repeat中的条目必须与value2相同。
如果这些规则中的任何一个未得到满足,则我们希望禁用提交按钮并显示相关消息,解释需要满足的内容。
这可以通过设置连接与合并在一起的一系列管道来实现。
-
有一个 @Published 属性匹配每个用户输入字段。 combineLatest 用于从属性中获取不断发布的更新,并将它们合并到单个管道中。 map 操作符强制执行所需字符和值必须相同的规则。 如果值与所需的输出不匹配,我们将在管道中传递 nil。
-
value1 还另外有一个验证管道,只使用了 map 操作符来验证值,或返回 nil。
-
执行验证的 map 操作符内部的逻辑也用于更新用户界面中的 label 信息。
-
最终管道使用 combineLatest 将两条验证管道合并为一条管道。 此组合的管道上连接了订阅者,以确定是否应启用提交按钮。
下面的示例将这些结合起来进行了展示。
import UIKit
import Combine

class FormViewController: UIViewController {

    @IBOutlet weak var value1_input: UITextField!
    @IBOutlet weak var value2_input: UITextField!
    @IBOutlet weak var value2_repeat_input: UITextField!
    @IBOutlet weak var submission_button: UIButton!
    @IBOutlet weak var value1_message_label: UILabel!
    @IBOutlet weak var value2_message_label: UILabel!

    @IBAction func value1_updated(_ sender: UITextField) { (1)
        value1 = sender.text ?? ""
    }
    @IBAction func value2_updated(_ sender: UITextField) {
        value2 = sender.text ?? ""
    }
    @IBAction func value2_repeat_updated(_ sender: UITextField) {
        value2_repeat = sender.text ?? ""
    }

    @Published var value1: String = ""
    @Published var value2: String = ""
    @Published var value2_repeat: String = ""

    var validatedValue1: AnyPublisher<String?, Never> { (2)
        return $value1.map { value1 in
            guard value1.count > 2 else {
                DispatchQueue.main.async { (3)
                    self.value1_message_label.text = "minimum of 3 characters required"
                }
                return nil
            }
            DispatchQueue.main.async {
                self.value1_message_label.text = ""
            }
            return value1
        }.eraseToAnyPublisher()
    }

    var validatedValue2: AnyPublisher<String?, Never> { (4)
        return Publishers.CombineLatest($value2, $value2_repeat)
            .receive(on: RunLoop.main) (5)
            .map { value2, value2_repeat in
                guard value2_repeat == value2, value2.count > 4 else {
                    self.value2_message_label.text = "values must match and have at least 5 characters"
                    return nil
                }
                self.value2_message_label.text = ""
                return value2
            }.eraseToAnyPublisher()
    }

    var readyToSubmit: AnyPublisher<(String, String)?, Never> { (6)
        return Publishers.CombineLatest(validatedValue2, validatedValue1)
            .map { value2, value1 in
                guard let realValue2 = value2, let realValue1 = value1 else {
                    return nil
                }
                return (realValue2, realValue1)
            }
            .eraseToAnyPublisher()
    }

    private var cancellableSet: Set<AnyCancellable> = [] (7)

    override func viewDidLoad() {
        super.viewDidLoad()

        self.readyToSubmit
            .map { $0 != nil } (8)
            .receive(on: RunLoop.main)
            .assign(to: \.isEnabled, on: submission_button)
            .store(in: &cancellableSet) (9)
    }
}| 1 | 此代码的开头遵照了 通过用户输入更新声明式 UI 中的模式. IBAction 消息用于更新 @Published 属性,触发对所连接的任何订阅者的更新。 |
| 2 | 第一个验证管道使用 map 操作符接收字符串值输入,如果与验证规则不符,则将其转换为 nil。
这也将发布者属性的输出类型从 <String> 转换为可选的 <String?>。
同样的逻辑也用于触发消息文本的更新,以提供有关所需内容的信息。 |
| 3 | 由于我们正在更新用户界面元素,因此我们明确将这些更新包裹在 DispatchQueue.main.async 中,以在主线程上调用。 |
| 4 | combineLatest 将两个发布者合并到一个管道中,该管道的输出类型是每个上游发布者的合并值。
在这个例子中,输出类型是 (<String>, <String>) 的元组。 |
| 5 | 与其使用 DispatchQueue.main.async,不如使用 receive 操作符明确在主线程上执行下一个操作符,因为它将执行 UI 更新。 |
| 6 | 两条验证管道通过 combineLatest 相结合,并将经过检查的输出合并为单个元组输出。 |
| 7 | 我们可以将分配的管道存储为 AnyCancellable? 引用(将其映射到 viewcontroller 的生命周期),但另一种选择是创建一个变量来收集所有可取消的引用。
这从空集合开始,任何 sink 或 assign 的订阅者都可以被添加到其中,以持有对它们的引用,以便他们在 viewcontroller 的整个生命周期内运行。
如果你正在创建多个管道,这可能是保持对所有管道的引用的便捷方式。 |
| 8 | 如果任何值为 nil,则 map 操作符将向管道传递 false 值。 对 nil 值的检查提供了用于启用(或禁用)提交按钮的布尔值。 |
| 9 | store 方法可在 Cancellable 协议上调用,该协议明确设置为支持存储可用于取消管道的引用。 |
通过包装基于 delegate 的 API 创建重复发布者
- 目的
-
-
将 Apple delegate API 之一包装为 Combine 管道来提供值。
-
- 参考
- 另请参阅
- 代码和解释
-
Future 发布者非常适合包装现有代码以发出单个请求,但它不适用于产生冗长或可能无限量输出的发布者。
Apple 的 Cocoa API 倾向于使用对象/代理模式,你可以选择接收任意数量的不同回调(通常包含数据)。 其中一个例子是在 CoreLocation 库中,提供了许多不同的数据源。
如果你想在管道中使用此类 API 之一提供的数据,你可以将对象包装起来,并使用 passthroughSubject 来暴露发布者。 下面的示例代码显示了一个包装 CoreLocation 中 CLManager 的对象并通过 UIKit 的 ViewController 消费其数据的示例。
import Foundation
import Combine
import CoreLocation

final class LocationHeadingProxy: NSObject, CLLocationManagerDelegate {

    let mgr: CLLocationManager (1)
    private let headingPublisher: PassthroughSubject<CLHeading, Error> (2)
    var publisher: AnyPublisher<CLHeading, Error> (3)

    override init() {
        mgr = CLLocationManager()
        headingPublisher = PassthroughSubject<CLHeading, Error>()
        publisher = headingPublisher.eraseToAnyPublisher()

        super.init()
        mgr.delegate = self (4)
    }

    func enable() {
        mgr.startUpdatingHeading() (5)
    }

    func disable() {
        mgr.stopUpdatingHeading()
    }
    // MARK - delegate methods

    /*
     *  locationManager:didUpdateHeading:
     *
     *  Discussion:
     *    Invoked when a new heading is available.
     */
    func locationManager(_ manager: CLLocationManager, didUpdateHeading newHeading: CLHeading) {
        headingPublisher.send(newHeading) (6)
    }

    /*
     *  locationManager:didFailWithError:
     *  Discussion:
     *    Invoked when an error has occurred. Error types are defined in "CLError.h".
     */
    func locationManager(_ manager: CLLocationManager, didFailWithError error: Error) {
        headingPublisher.send(completion: Subscribers.Completion.failure(error)) (7)
    }
}| 1 | CLLocationManager 作为 CoreLocation 的一部分,是被包装的核心。
因为要使用该框架,它有其他方法需要被调用,因此我将它暴露为一个 public 的只读属性。
这对于先请求用户许可然后使用位置 API 很有用,框架将该位置 API 暴露为一个在 CLLocationManager 上的方法。 |
| 2 | 使用一个具有我们要发布的数据类型的 private 的 PassthroughSubject 实例,来提供我们的类内部访问以转发数据。 |
| 3 | 一个 public 的属性 publisher 将来自上面的 subject 的发布者暴露给外部以供订阅。 |
| 4 | 其核心是将该类指定为 CLLocationManager 实例的代理,在该实例初始化的尾端进行设置。 |
| 5 | CoreLocation API 不会立即开始发送信息。
有些方法需要调用才能启动(并停止)数据流,这些方法被包装并暴露在此 LocationHeadingProxy 对象上。
大多数发布者都设置为订阅并根据订阅驱动消费,因此这有点不符合发布者如何开始生成数据的规范。 |
| 6 | 在定义代理和激活 CLLocationManager 后,数据将通过在 CLLocationManagerDelegate 上定义的回调提供。
我们为这个包装的对象实现了我们想要的回调,并在其中使用 passthroughSubject .send() 将信息转发给任何现有的订阅者。 |
| 7 | 虽然没有严格要求,但代理提供了 Error 上报回调,因此我们也将其包括在示例中通过 passthroughSubject 转发。 |
import UIKit
import Combine
import CoreLocation

class HeadingViewController: UIViewController {

    var headingSubscriber: AnyCancellable?

    let coreLocationProxy = LocationHeadingProxy()
    var headingBackgroundQueue: DispatchQueue = DispatchQueue(label: "headingBackgroundQueue")

    // MARK - lifecycle methods

    @IBOutlet weak var permissionButton: UIButton!
    @IBOutlet weak var activateTrackingSwitch: UISwitch!
    @IBOutlet weak var headingLabel: UILabel!
    @IBOutlet weak var locationPermissionLabel: UILabel!

    @IBAction func requestPermission(_ sender: UIButton) {
        print("requesting corelocation permission")
        let _ = Future<Int, Never> { promise in (1)
            self.coreLocationProxy.mgr.requestWhenInUseAuthorization()
            return promise(.success(1))
        }
        .delay(for: 2.0, scheduler: headingBackgroundQueue) (2)
        .receive(on: RunLoop.main)
        .sink { _ in
            print("updating corelocation permission label")
            self.updatePermissionStatus() (3)
        }
    }

    @IBAction func trackingToggled(_ sender: UISwitch) {
        switch sender.isOn {
        case true:
            self.coreLocationProxy.enable() (4)
            print("Enabling heading tracking")
        case false:
            self.coreLocationProxy.disable()
            print("Disabling heading tracking")
        }
    }

    func updatePermissionStatus() {
        let x = CLLocationManager.authorizationStatus()
        switch x {
        case .authorizedWhenInUse:
            locationPermissionLabel.text = "Allowed when in use"
        case .notDetermined:
            locationPermissionLabel.text = "notDetermined"
        case .restricted:
            locationPermissionLabel.text = "restricted"
        case .denied:
            locationPermissionLabel.text = "denied"
        case .authorizedAlways:
            locationPermissionLabel.text = "authorizedAlways"
        @unknown default:
            locationPermissionLabel.text = "unknown default"
        }
    }

    override func viewDidLoad() {
        super.viewDidLoad()
        // Do any additional setup after loading the view.

        // request authorization for the corelocation data
        self.updatePermissionStatus()

        let corelocationsub = coreLocationProxy
            .publisher
            .print("headingSubscriber")
            .receive(on: RunLoop.main)
            .sink { someValue in (5)
                self.headingLabel.text = String(someValue.trueHeading)
            }
        headingSubscriber = AnyCancellable(corelocationsub)
    }

}| 1 | CoreLocation 的特点之一是要向用户请求访问数据的许可。
启动此请求的 API 将立即返回,但即使用户允许或拒绝请求,它并不提供任何详细信息。
CLLocationManager 类包括信息,并在想要获取信息时将其作为类方法暴露给外部,但未提供任何信息来了解用户何时或是否响应了请求。
由于操作不提供任何返回信息,我们将整数提供给管道作为数据,主要表示已发出请求。 |
| 2 | 由于没有明确的方法来判断用户何时会授予权限,但权限是持久的,因此在尝试获取数据之前,我们简单地使用了 delay 操作符。 此使用只会将值的传递延迟两秒钟。 |
| 3 | 延迟后,我们调用类方法,并尝试根据当前提供的状态的结果更新界面中的信息。 |
| 4 | 由于 CoreLocation 需要调用方法来明确启用或禁用数据,因此将我们发布者 proxy 的方法连接到了一个 UISwitch 的 IBAction 开关上。 |
| 5 | 方位数据在本 sink 订阅者中接收,在此示例中,我们将其写到文本 label 上。 |
响应 NotificationCenter 的更新
- 目的
-
-
作为发布者接收 NotificationCenter 的通知,以声明式的对所提供的信息做出响应。
-
- 参考
- 另请参阅
- 代码和解释
-
大量的框架和用户界面组件通过 NotificationCenter 的通知提供有关其状态和交互的信息。 Apple 的文档包括一篇关于 receiving and handling events with Combine 的文章,特别提及了 NotificationCenter。
通过 NotificationCenter 发送的 Notifications 为你应用中的事件提供了一个通用的中心化的位置。
你还可以将自己的通知添加到你的应用程序中,在发送通知时,还可以在其 userInfo 属性中添加一个额外的字典来发送数据。
一个定义你自己通知的示例 .myExampleNotification:
extension Notification.Name {
    static let myExampleNotification = Notification.Name("an-example-notification")
}
通知名称是基于字符串的结构体。
当通知发布到 NotificationCenter 时,可以传递对象引用,表明发送通知的具体对象。
此外,通知可以包括 userInfo,是一个 [AnyHashable : Any]? 类型的值。
这允许将任意的字典(无论是引用类型还是值类型)包含在通知中。
let myUserInfo = ["foo": "bar"]

let note = Notification(name: .myExampleNotification, userInfo: myUserInfo)
NotificationCenter.default.post(note)|
虽然在 AppKit 和 macOS 应用程序中普遍地使用了通知,但并非所有开发人员都乐于大量使用 NotificationCenter。 通知起源于更具动态性的 Objective-C runtime ,广泛利用 Any 和 optional 类型。 在 Swift 代码或管道中使用它们意味着管道必须提供类型检查并处理与预期或非预期的数据相关的任何可能错误。 |
创建 NotificationCenter 发布者时,你提供要接收的通知的名称,并可选地提供对象引用,以过滤特定类型的对象。 属于 NSControl 子类的多个 AppKit 组件共享了一组通知,过滤操作对于获得这些组件的正确的通知至关重要。
订阅 AppKit 生成通知的示例:
let sub = NotificationCenter.default.publisher(for: NSControl.textDidChangeNotification, (1)
                                               object: filterField) (2)
    .map { ($0.object as! NSTextField).stringValue }  (3)
.assign(to: \MyViewModel.filterString, on: myViewModel) (4)| 1 | AppKit 中的 TextField 在值更新时生成 textDidChangeNotification 通知。 |
| 2 | 一个 AppKit 的应用程序通常可以具有大量可能被更改的 TextField。 包含对发送控件的引用可用于过滤你特别感兴趣的文本的更改通知。 |
| 3 | map 操作符可用于获取通知中包含的对象引用,在这个例子中,发送通知的 TextField 的 .stringValue 属性提供了它更新后的值。 |
| 4 | 由此产生的字符串可以使用可写入的 KeyValue 路径进行 assign。 |
一个订阅你自己的通知事件的示例:
let cancellable = NotificationCenter.default.publisher(for: .myExampleNotification, object: nil)
    // can't use the object parameter to filter on a value reference, only class references, but
    // filtering on 'nil' only constrains to notification name, so value objects *can* be passed
    // in the notification itself.
    .sink { receivedNotification in
        print("passed through: ", receivedNotification)
        // receivedNotification.name
        // receivedNotification.object - object sending the notification (sometimes nil)
        // receivedNotification.userInfo - often nil
    }
和 SwiftUI 集成
使用 ObservableObject 与 SwiftUI 模型作为发布源
- 目的
-
-
SwiftUI 包含 @ObservedObject 和 ObservableObject 协议,它为 SwiftUI 的视图提供了将状态外部化的手段,同时通知 SwiftUI 模型的变化。
-
- 参考
- 另请参阅
-
SwiftUI 的例子:
- 代码和解释
-
SwiftUI 视图是基于某些已知状态呈现的声明性结构,当该状态发生变化时,这些当前的结构将失效并更新。 我们可以使用 Combine 来提供响应式更新来操纵此状态,并将其暴露回 SwiftUI。 此处提供的示例是一个简单的输入表单,目的是根据对两个字段的输入提供响应式和动态的反馈。
以下规则被编码到 Combine 的管道中: 1. 两个字段必须相同 - 如输入密码或电子邮件地址,然后通过第二个条目进行确认。 2. 输入的值至少为 5 个字符的长度。 3. 根据这些规则的结果启用或禁用提交按钮。
SwiftUI 通过将状态外化为类中的属性,并使用 ObservableObject 协议将该类引用到模型中来实现此目的。
两个属性 firstEntry 和 secondEntry 作为字符串使用 @Published 属性包装,允许 SwiftUI 绑定到它们的更新,以及更新它们。
第三个属性 submitAllowed 暴露为 Combine 发布者,可在视图内使用,从而维护视图内部的 @State buttonIsDisabled 状态。
第四个属性 —— 一个 validationMessages 字符串数组 - 在 Combine 管道中将前两个属性进行组合计算,并且使用 @Published 属性包装暴露给 SwiftUI。
import Foundation
import Combine

class ReactiveFormModel : ObservableObject {

    @Published var firstEntry: String = "" {
        didSet {
            firstEntryPublisher.send(self.firstEntry) (1)
        }
    }
    private let firstEntryPublisher = CurrentValueSubject<String, Never>("") (2)

    @Published var secondEntry: String = "" {
        didSet {
            secondEntryPublisher.send(self.secondEntry)
        }
    }
    private let secondEntryPublisher = CurrentValueSubject<String, Never>("")

    @Published var validationMessages = [String]()
    private var cancellableSet: Set<AnyCancellable> = []

    var submitAllowed: AnyPublisher<Bool, Never>

    init() {

        let validationPipeline = Publishers.CombineLatest(firstEntryPublisher, secondEntryPublisher) (3)
            .map { (arg) -> [String] in (4)
                var diagMsgs = [String]()
                let (value, value_repeat) = arg
                if !(value_repeat == value) {
                    diagMsgs.append("Values for fields must match.")
                }
                if (value.count < 5 || value_repeat.count < 5) {
                    diagMsgs.append("Please enter values of at least 5 characters.")
                }
                return diagMsgs
            }

        submitAllowed = validationPipeline (5)
            .map { stringArray in
                return stringArray.count < 1
            }
            .eraseToAnyPublisher()

        let _ = validationPipeline (6)
            .assign(to: \.validationMessages, on: self)
            .store(in: &cancellableSet)
    }
}| 1 | firstEntry 和 secondEntry 都使用空字符串作为默认值。 |
| 2 | 然后,这些属性还用 currentValueSubject 进行镜像,该镜像属性使用来自每个 @Published 属性的 didSet 发送更新事件。这驱动下面定义的 Combine 管道,以便在值从 SwiftUI 视图更改时触发响应式更新。 |
| 3 | combineLatest 用于合并来自 firstEntry 或 secondEntry 的更新,以便从任一来源来触发更新。 |
| 4 | map 接受输入值并使用它们来确定和发布验证过的消息数组。该数据流 validationPipeline 是两个后续管道的发布源。 |
| 5 | 第一个后续管道使用验证过的消息数组来确定一个 true 或 false 的布尔值发布者,用于启用或禁用提交按钮。 |
| 6 | 第二个后续管道接受验证过的消息数组,并更新持有的该 ObservedObject 实例的 validationMessages,以便 SwiftUI 在需要时监听和使用它。 |
两种不同的状态更新的暴露方法 —— 作为发布者或外部状态,在示例中都进行了展示,以便于你可以更好的利用任一种方法。
提交按钮启用/禁用的选项可作为 @Published 属性进行暴露,验证消息的数组可作为 <String[], Never> 类型的发布者而对外暴露。
如果需要涉及作为显式状态去跟踪用户行为,则通过暴露 @Published 属性可能更清晰、不直接耦合,但任一种机制都是可以使用的。
上述模型与声明式地使用外部状态的 SwiftUI 视图相耦合。
import SwiftUI

struct ReactiveForm: View {

    @ObservedObject var model: ReactiveFormModel (1)
    // $model is a ObservedObject<ExampleModel>.Wrapper
    // and $model.objectWillChange is a Binding<ObservableObjectPublisher>
    @State private var buttonIsDisabled = true (2)
    // $buttonIsDisabled is a Binding<Bool>

    var body: some View {
        VStack {
            Text("Reactive Form")
                .font(.headline)

            Form {
                TextField("first entry", text: $model.firstEntry) (3)
                    .textFieldStyle(RoundedBorderTextFieldStyle())
                    .lineLimit(1)
                    .multilineTextAlignment(.center)
                    .padding()

                TextField("second entry", text: $model.secondEntry)
                    .textFieldStyle(RoundedBorderTextFieldStyle())
                    .multilineTextAlignment(.center)
                    .padding()

                VStack {
                    ForEach(model.validationMessages, id: \.self) { msg in (4)
                        Text(msg)
                            .foregroundColor(.red)
                            .font(.callout)
                    }
                }
            }

            Button(action: {}) {
                Text("Submit")
            }.disabled(buttonIsDisabled)
                .onReceive(model.submitAllowed) { submitAllowed in (5)
                    self.buttonIsDisabled = !submitAllowed
            }
            .padding()
            .background(RoundedRectangle(cornerRadius: 10)
                .stroke(Color.blue, lineWidth: 1)
            )

            Spacer()
        }
    }
}

struct ReactiveForm_Previews: PreviewProvider {
    static var previews: some View {
        ReactiveForm(model: ReactiveFormModel())
    }
}| 1 | 数据模型使用 @ObservedObject 暴露给 SwiftUI。 |
| 2 | @State buttonIsDisabled 在该视图中被声明为局部变量,有一个默认值 true。 |
| 3 | 属性包装($model.firstEntry 和 $model.secondEntry) 的预计值用于将绑定传递到 TextField 视图元素。当用户更改值时,Binding 将触发引用模型上的更新,并让 SwiftUI 的组件知道,如果暴露的模型正在被更改,则组件的更改也即将发生。 |
| 4 | 在数据模型中生成和 assign 的验证消息,作为 Combine 管道的发布者,在这儿对于 SwiftUI 是不可见的。相反,这只能对这些被暴露的值的变化所引起的模型的变化做出反应,而不关心改变这些值的机制。 |
| 5 | 作为如何使用带有 onReceive 的发布者的示例,使用 onReceive 订阅者来监听引用模型中暴露的发布者。在这个例子中,我们接受值并把它们作为局部变量 @State 存储在 SwiftUI 的视图中,但它也可以在一些转化后使用,如果该逻辑只和视图显示的结果值强相关的话。在这,我们将其与 Button 上的 disabled 一起使用,使 SwiftUI 能够根据 @State 中存储的值启用或禁用该 UI 元素。 |
测试和调试
Combine 中的发布者和订阅者接口是非常易于测试的。
借助 Combine 的可组合性,你可以利用此优势创建或消费符合 Publisher 协议的 API。
以 publisher protocol 为关键接口,你可以替换任何一方以单独验证你的代码。
例如,如果你的代码专注于通过 Combine 从外部 Web 服务中提供其数据,则可能会使此接口遵循 AnyPublisher<Data, Error>。
然后,你可以使用该接口独立测试管道的任何一侧。
使用 XCTestExpectation 测试发布者
- 目的
-
-
用于测试发布者(以及连接的任何管道)
-
- 参考
- 另请参阅
- 代码和解释
-
当你测试发布者或创建发布者的某些代码时,你可能无法控制发布者何时返回数据以进行测试。 由其订阅者驱动的 Combine 可以设置一个同步事件来启动数据流。 你可以使用 XCTestExpectation 等待一段确定的时间之后,再调用 completion 闭包进行测试。
此与 Combine 一起使用的模式:
-
在测试中设置 expectation。
-
确定要测试的代码。
-
设置要调用的代码,以便在执行成功的情况下,你调用 expectation 的
.fulfill()函数。 -
设置具有明确超时时间的
wait()函数,如果 expectation 在该时间窗口内未调用fulfill(),则测试将失败。
如果你正在测试管道中的结果数据,那么在 sink 操作符的 receiveValue 闭包中触发 fulfill() 函数是非常方便的。
如果你正在测试管道中的失败情况,则通常在 sink 操作符的 receiveCompletion 闭包中包含 fulfill() 方法是有效的。
下列示例显示使用 expectation 测试一次性发布者(本例中是 URLSession.dataTaskPublisher),并期望数据在不出错的情况下流动。
func testDataTaskPublisher() {
        // setup
        let expectation = XCTestExpectation(description: "Download from \(String(describing: testURL))") (1)
        let remoteDataPublisher = URLSession.shared.dataTaskPublisher(for: self.testURL!)
            // validate
            .sink(receiveCompletion: { fini in
                print(".sink() received the completion", String(describing: fini))
                switch fini {
                case .finished: expectation.fulfill() (2)
                case .failure: XCTFail() (3)
                }
            }, receiveValue: { (data, response) in
                guard let httpResponse = response as? HTTPURLResponse else {
                    XCTFail("Unable to parse response an HTTPURLResponse")
                    return
                }
                XCTAssertNotNil(data)
                // print(".sink() data received \(data)")
                XCTAssertNotNil(httpResponse)
                XCTAssertEqual(httpResponse.statusCode, 200) (4)
                // print(".sink() httpResponse received \(httpResponse)")
            })

        XCTAssertNotNil(remoteDataPublisher)
        wait(for: [expectation], timeout: 5.0) (5)
}| 1 | Expectation 设置为一个字符串,这样在发生失败时更容易调试。
此字符串仅在测试失败时才能看到。
我们在这里测试的代码是 dataTaskPublisher 从测试前就已定义好的预设的 URL 中取回数据。
发布者通过将 sink 订阅者连接到它开始触发请求。
如果没有 expectation,代码仍将运行,但构建的测试运行结构将不会等到结果返回之后再去检查是否有任何意外。
测试中的 expectation "暂停测试" 去等待响应,让操作符先发挥它们的作用。 |
| 2 | 在这个例子中,测试期望可以成功完成并正常终止,因此在 receiveCompletion 闭包内调用 expectation.fulfill(),具体是接收到 .finished completion 后调用。 |
| 3 | 由于我们不期望失败,如果我们收到 .failure completion,我们也明确地调用 XCTFail()。 |
| 4 | 我们在 receiveValue 中还有一些其他断言。
由于此发布者设置返回单个值然后终止,因此我们可以对收到的数据进行内联断言。
如果我们收到多个值,那么我们可以收集这些值,并就事后收到的内容做出断言。 |
| 5 | 此测试使用单个 expectation,但你可以包含多个独立的 expectation,去要求它们都被 fulfill()。
它还规定此测试的最长运行时间为 5 秒。
测试并不总是需要五秒钟,因为一旦收到 fulfill,它就会完成。
如果出于某种原因,测试需要超过五秒钟的响应时间,XCTest 将报告测试失败。 |
使用 PassthroughSubject 测试订阅者
- 目的
-
-
为了测试订阅者或包含订阅者的代码,我们可以使用 PassthroughSubject 模拟发布源,明确地控制哪些数据被发送和何时发送。
-
- 参考
- 另请参阅
- 代码和解释
-
当你单独测试订阅者时,你可以通过使用 passthroughSubject 模拟发布者以及使用相关的
.send()方法触发更新来更精细的控制测试。
此模式依赖于订阅者在构建时设置发布者-订阅者生命周期的初始部分,并让代码保持等待直到提供数据。
使用 PassthroughSubject,发送数据以触发管道和订阅者闭包,或跟踪可以被验证的状态更改,即可控制测试代码本身。
当你测试订阅者对失败的反应时,这种测试模式也非常有效,否则可能会终止订阅。
使用这种测试构建方法的一般模式是:
-
设置你的 subscriber 和任何你想包含在测试中影响它的管道。
-
在测试中创建一个
PassthroughSubject,构造合适的输出类型和失败类型以与订阅者匹配。 -
为任何初始值或先决条件设置断言。
-
通过 subject 发送数据。
-
测试发送数据的结果 —— 直接测试数据或断言预期的状态更改。
-
如果需要,发送其他数据。
-
测试状态或其他变化的进一步演变。
此模式的示例如下:
func testSinkReceiveDataThenError() {

    // setup - preconditions (1)
    let expectedValues = ["firstStringValue", "secondStringValue"]
    enum TestFailureCondition: Error {
        case anErrorExample
    }
    var countValuesReceived = 0
    var countCompletionsReceived = 0

    // setup
    let simplePublisher = PassthroughSubject<String, Error>() (2)

    let _ = simplePublisher (3)
        .sink(receiveCompletion: { completion in
            countCompletionsReceived += 1
            switch completion { (4)
            case .finished:
                print(".sink() received the completion:", String(describing: completion))
                // no associated data, but you can react to knowing the
                // request has been completed
                XCTFail("We should never receive the completion, the error should happen first")
                break
            case .failure(let anError):
                // do what you want with the error details, presenting,
                // logging, or hiding as appropriate
                print("received the error: ", anError)
                XCTAssertEqual(anError.localizedDescription,
                               TestFailureCondition.anErrorExample.localizedDescription) (5)
                break
            }
        }, receiveValue: { someValue in (6)
            // do what you want with the resulting value passed down
            // be aware that depending on the data type being returned,
            // you may get this closure invoked multiple times.
            XCTAssertNotNil(someValue)
            XCTAssertTrue(expectedValues.contains(someValue))
            countValuesReceived += 1
            print(".sink() received \(someValue)")
        })

    // validate
    XCTAssertEqual(countValuesReceived, 0) (7)
    XCTAssertEqual(countCompletionsReceived, 0)

    simplePublisher.send("firstStringValue") (8)
    XCTAssertEqual(countValuesReceived, 1)
    XCTAssertEqual(countCompletionsReceived, 0)

    simplePublisher.send("secondStringValue")
    XCTAssertEqual(countValuesReceived, 2)
    XCTAssertEqual(countCompletionsReceived, 0)

    simplePublisher.send(completion: Subscribers.Completion.failure(TestFailureCondition.anErrorExample))  (9)
    XCTAssertEqual(countValuesReceived, 2)
    XCTAssertEqual(countCompletionsReceived, 1)

    // this data will never be seen by anything in the pipeline above because
    // we have already sent a completion
    simplePublisher.send(completion: Subscribers.Completion.finished) (10)
    XCTAssertEqual(countValuesReceived, 2)
    XCTAssertEqual(countCompletionsReceived, 1)
}| 1 | 此测试设置了一些变量,以便在测试执行期间捕获和修改它们,用于验证 sink 代码的执行时间和工作方式。 此外,我们在此处定义了一个错误,以便在我们的测试代码中使用它来验证失败的情况。 |
| 2 | 此代码设置为使用 passthroughSubject 来驱动测试,但我们感兴趣的测试代码是订阅者。 |
| 3 | 该订阅者被配置在测试下(在这儿是一个标准的 sink)。 我们配置了在接收到数据和 completion 时会触发的代码。 |
| 4 | 在接收到 completion 时,我们对其调用 switch,添加了一个断言,如果 finish 被调用了,将不通过测试,因为我们期望只会生成 .failure completion。 |
| 5 | Swift 中的测试错误是否相等没那么容易,但如果错误是你正在控制的代码,有时你可以使用 localizedDescription 作为测试收到的错误类型的便捷方式。 |
| 6 | receiveValue 闭包在考虑如何对收到的值进行断言时更为复杂。
由于我们在此测试过程中会收到多个值,我们有一些额外的逻辑来检查值是否在我们发送的集合内。
与 completion 的处理逻辑一样,我们还是增加测试特定变量,我们将在以后断言这些变量以验证状态和操作顺序。 |
| 7 | 在我们发送任何数据以仔细检查我们的假设之前,我们先验证计数变量。 |
| 8 | 在测试中,send() 触发了操作,之后我们就可以立即通过验证我们更新的测试变量来验证所产生的效果了。
在你自己的代码中,你可能无法(或不想要)修改你的订阅者,但你可能能够向对象提供私有/可测试的属性或途径,以类似的方式验证它们。 |
| 9 | 我们还使用 send() 发送一个 completion,在这个例子中是一个失败的 completion。 |
| 10 | 最后的 send() 验证刚刚发生的失败事件 —— 当前发送的 finished completion 应该没有被处理,并且应该没有后续的状态更新再发生。 |
使用从 PassthroughSubject 预定好的发送的事件测试订阅者
实现这个的方法之一是利用 XCTestExpectation 和 passthroughSubject,将两者结合起来。
基于 使用 XCTestExpectation 测试发布者 和 使用 PassthroughSubject 测试订阅者,在测试中添加 DispatchQueue,以安排 PassthroughSubject 的 .send() 方法的调用。
一个这种用法的例子:
func testKVOPublisher() {
    let expectation = XCTestExpectation(description: self.debugDescription)
    let foo = KVOAbleNSObject()
    let q = DispatchQueue(label: self.debugDescription) (1)

    let _ = foo.publisher(for: \.intValue)
        .print()
        .sink { someValue in
            print("value of intValue updated to: >>\(someValue)<<")
        }

    q.asyncAfter(deadline: .now() + 0.5, execute: { (2)
        print("Updating to foo.intValue on background queue")
        foo.intValue = 5
        expectation.fulfill() (3)
    })
    wait(for: [expectation], timeout: 5.0) (4)
}| 1 | 这将为你的测试添加 DispatchQueue,并以测试的描述 debugDescription 来命名该队列。
这只在调试中测试失败时显示,并且在还有其它后台线程也在使用时,方便地提醒测试代码中发生了什么情况。 |
| 2 | .asyncAfter 和参数 deadline 一起使用,用来定义何时发起请求. |
| 3 | 这是将任何相关的断言嵌入到订阅者或其周围的最简单的方式。此外,将 .fulfill() 作为你发送队列的最后一个条目,好让测试知道它现在已完成。 |
| 4 | 请确保当你设置等待超时时间时,有足够的时间让你的队列被调用。 |
此技术的一个明显缺点是,它使得测试花费的最短时间至少是测试中的最大的队列延迟。
另一种选择是第三方库,名为 EntwineTest,开发灵感来自 RxTest 库。 EntwineTest 是 Entwine 的一部分,一个提供了一些 helpers 扩展了 Combine 的 Swift 库。 该库可以在 github 上找到,位于 https://github.com/tcldr/Entwine.git,只要使用时遵守 MIT 证书即可。
EntwineTest 中包含的关键元素之一是虚拟时间调度器,以及使用此调度器时安排(TestablePublisher)并收集和记录(TestableSubscriber)结果时间的其他类。
来自 EntwineTest 工程的 README 中的一个例子包含在:
func testExampleUsingVirtualTimeScheduler() {
    let scheduler = TestScheduler(initialClock: 0) (1)
    var didSink = false
    let cancellable = Just(1) (2)
        .delay(for: 1, scheduler: scheduler)
        .sink { _ in
            didSink = true
        }

    XCTAssertNotNil(cancellable)
    // where a real scheduler would have triggered when .sink() was invoked
    // the virtual time scheduler requires resume() to commence and runs to
    // completion.
    scheduler.resume() (3)
    XCTAssertTrue(didSink) (4)
}| 1 | 使用虚拟时间调度器需要在测试开始时创建一个,将其时钟初始化为起始值。
EntwineTest 中的虚拟时间调度器将以 200 的值开始订阅,如果管道在时间为 900 时还没完成,则会超时。 |
| 2 | 你和以往创建任何发布者或订阅者一样,创建你的管道。 EntwineTest 还提供可测试的发布者和订阅者,以供使用。 有关 EntwineTest 这些部分的更多详细信息,请看 使用 EntwineTest 创建可测试的发布器和订阅者. |
| 3 | .resume() 需要在虚拟时间调度器上调用,以开始其工作和触发管道运行。 |
| 4 | 在管道运行到完成后,对预期的最终结果进行断言。 |
使用 EntwineTest 创建可测试的发布器和订阅者
- 目的
-
-
当你想要测试的是管道的时序时,用于测试管道或订阅者。
-
- 参考
- 另请参阅
- 代码和解释
-
EntwineTest 库可在 gitHub https://github.com/tcldr/Entwine.git 找到,为使管道可测试提供了一些额外的选择。 除了虚拟时间调度器外,EntwineTest 还有一个
TestablePublisher和TestableSubscriber。 这些与虚拟时间调度器协调工作,允许你指定发布者生成数据的时间,并验证订阅者收到的数据。
|
截至 Xcode 11.2,SwiftPM 存在影响使用 Entwine 作为测试库的 bug。 详细信息可在 Swift 的开源 bug 报告中找到 SR-11564。 如果使用 Xcode 11.2,你可能需要应用该解决方法,将项目设置修改为 |
包含在 EntwineTest 项目中的一个这样的例子:
import XCTest
import EntwineTest
// library loaded from
// https://github.com/tcldr/Entwine/blob/master/Assets/EntwineTest/README.md
// as a Swift package https://github.com/tcldr/Entwine.git : 0.6.0,
// Next Major Version

class EntwineTestExampleTests: XCTestCase {

    func testMap() {

        let testScheduler = TestScheduler(initialClock: 0)

        // creates a publisher that will schedule its elements relatively
        // at the point of subscription
        let testablePublisher: TestablePublisher<String, Never> = testScheduler.createRelativeTestablePublisher([ (1)
            (100, .input("a")),
            (200, .input("b")),
            (300, .input("c")),
        ])

        // a publisher that maps strings to uppercase
        let subjectUnderTest = testablePublisher.map { $0.uppercased() }

        // uses the method described above (schedules a subscription at 200
        // to be cancelled at 900)
        let results = testScheduler.start { subjectUnderTest } (2)

        XCTAssertEqual(results.recordedOutput, [ (3)
            (200, .subscription),
            // subscribed at 200
            (300, .input("A")),
            // received uppercased input @ 100 + subscription time
            (400, .input("B")),
            // received uppercased input @ 200 + subscription time
            (500, .input("C")),
            // received uppercased input @ 300 + subscription time
        ])
    }
}| 1 | TestablePublisher 允许你设置一个在特定时间返回特定值的发布者。
在这个例子中,它会以相同的间隔返回 3 个值。 |
| 2 | 当你使用虚拟时间调度器时,重要的是要确保从 start 开始调用它。 这会启动虚拟时间调度器,它的运行速度可以比时钟快,因为它只需要增加虚拟时间,而不是等待真实过去的时间。 |
| 3 | results 是一个 TestableSubscriber 对象,包括 recordedOutput 属性,该属性提供所有数据的有序列表,并将控制事件的交互与其时间组合在一起。 |
如果这个测试序列是用 asyncAfter 完成的,那么测试将至少需要 500ms 才能完成。 当我在我的笔记本电脑上运行此测试时,它记录花费了 0.0121 秒以完成测试(12.1ms)。
|
EntwineTest 的副作用是,使用虚拟时间调度器的测试比实时时钟运行速度快得多。 使用实时调度机制来延迟数据发送值的相同测试可能需要更长的时间才能完成。 |
使用 print 操作符调试管道
- 目的
-
-
为了了解管道中正在发生的事情,查看所有控制事件和数据交互。
-
- 参考
-
-
带有此代码的 ViewController 在 github 项目位于 UIKit-Combine/GithubViewController.swift
-
retry 的单元测试在 github 项目中位于 UsingCombineTests/RetryPublisherTests.swift
- 另请参阅
- 代码和解释
-
我获取的最详细的信息来自有选择地使用 print 操作符。 缺点是它打印了大量信息,因此输出可能很快变得非常庞大。 要理解简单的管道,使用
.print()作为没有任何参数的操作符是非常简单的。 一旦你想要添加多个 print 操作符,你可能要使用 string 参数,该参数会作为前缀放在输出中。
示例 级联多个 UI 更新,包括网络请求 在几个地方都有用到它,使用比较长的描述性前缀,以明确是哪个管道在提供信息。
通过连接到一个私有的 @Published 的变量 —— githubUserData,两个管道被层叠到了一起。
该示例代码中的两个相关管道:
usernameSubscriber = $username
    .throttle(for: 0.5, scheduler: myBackgroundQueue, latest: true)
    // ^^ scheduler myBackGroundQueue publishes resulting elements
    // into that queue, resulting on this processing moving off the
    // main runloop.
    .removeDuplicates()
    .print("username pipeline: ") // debugging output for pipeline
    .map { username -> AnyPublisher<[GithubAPIUser], Never> in
        return GithubAPI.retrieveGithubUser(username: username)
    }
    // ^^ type returned in the pipeline is a Publisher, so we use
    // switchToLatest to flatten the values out of that
    // pipeline to return down the chain, rather than returning a
    // publisher down the pipeline.
    .switchToLatest()
    // using a sink to get the results from the API search lets us
    // get not only the user, but also any errors attempting to get it.
    .receive(on: RunLoop.main)
    .assign(to: \.githubUserData, on: self)

// using .assign() on the other hand (which returns an
// AnyCancellable) *DOES* require a Failure type of <Never>
repositoryCountSubscriber = $githubUserData
    .print("github user data: ")
    .map { userData -> String in
        if let firstUser = userData.first {
            return String(firstUser.public_repos)
        }
        return "unknown"
    }
    .receive(on: RunLoop.main)
    .assign(to: \.text, on: repositoryCountLabel)
当你运行 UIKit-Combine 示例代码时,随着我慢慢的输入用户名 heckj,终端会显示以下输出。
在进行这些查找的过程中,在最终的帐户之前发现并检索到了另外两个 github 帐户(hec 和 heck)。
username pipeline: : receive subscription: (RemoveDuplicates)
username pipeline: : request unlimited
github user data: : receive subscription: (CurrentValueSubject)
github user data: : request unlimited
github user data: : receive value: ([])
username pipeline: : receive value: ()
github user data: : receive value: ([])

Set username to  h
username pipeline: : receive value: (h)
github user data: : receive value: ([])

Set username to  he
username pipeline: : receive value: (he)
github user data: : receive value: ([])

Set username to  hec
username pipeline: : receive value: (hec)

Set username to  heck
github user data: : receive value: ([UIKit_Combine.GithubAPIUser(login: "hec", public_repos: 3, avatar_url: "https://avatars3.githubusercontent.com/u/53656?v=4")])

username pipeline: : receive value: (heck)
github user data: : receive value: ([UIKit_Combine.GithubAPIUser(login: "heck", public_repos: 6, avatar_url: "https://avatars3.githubusercontent.com/u/138508?v=4")])

Set username to  heckj
username pipeline: : receive value: (heckj)
github user data: : receive value: ([UIKit_Combine.GithubAPIUser(login: "heckj", public_repos: 69, avatar_url: "https://avatars0.githubusercontent.com/u/43388?v=4")])
一些放在 sink 闭包中,用来查看最终结果的无关打印语句已被删除。
你可以在开始时看到初始化订阅的设置,然后看到通知,包括通过 print 操作符传递的值的调试信息。
虽然上面的示例内容中未显示它,但你还会在出现错误时看到取消管道的事件,或在发布者报告没有进一步数据时的 completions 事件。
在操作符两侧使用 print 来了解其具体的操作方式也很有用。
一个这样做的例子如下,利用前缀显示 retry 操作符及其工作原理:
func testRetryWithOneShotFailPublisher() {
    // setup

    let _ = Fail(outputType: String.self, failure: TestFailureCondition.invalidServerResponse)
        .print("(1)>") (1)
        .retry(3)
        .print("(2)>") (2)
        .sink(receiveCompletion: { fini in
            print(" ** .sink() received the completion:", String(describing: fini))
        }, receiveValue: { stringValue in
            XCTAssertNotNil(stringValue)
            print(" ** .sink() received \(stringValue)")
        })
}| 1 | 前缀 (1) 是显示 retry 操作符上方的交互行为。 |
| 2 | 前缀 (2) 是显示 retry 操作符之后的交互行为。 |
Test Suite 'Selected tests' started at 2019-07-26 15:59:48.042
Test Suite 'UsingCombineTests.xctest' started at 2019-07-26 15:59:48.043
Test Suite 'RetryPublisherTests' started at 2019-07-26 15:59:48.043
Test Case '-[UsingCombineTests.RetryPublisherTests testRetryWithOneShotFailPublisher]' started.
(1)>: receive subscription: (Empty) (1)
(1)>: receive error: (invalidServerResponse)
(1)>: receive subscription: (Empty)
(1)>: receive error: (invalidServerResponse)
(1)>: receive subscription: (Empty)
(1)>: receive error: (invalidServerResponse)
(1)>: receive subscription: (Empty)
(1)>: receive error: (invalidServerResponse)
(2)>: receive error: (invalidServerResponse) (2)
 ** .sink() received the completion: failure(UsingCombineTests.RetryPublisherTests.TestFailureCondition.invalidServerResponse)
(2)>: receive subscription: (Retry)
(2)>: request unlimited
(2)>: receive cancel
Test Case '-[UsingCombineTests.RetryPublisherTests testRetryWithOneShotFailPublisher]' passed (0.010 seconds).
Test Suite 'RetryPublisherTests' passed at 2019-07-26 15:59:48.054.
	 Executed 1 test, with 0 failures (0 unexpected) in 0.010 (0.011) seconds
Test Suite 'UsingCombineTests.xctest' passed at 2019-07-26 15:59:48.054.
	 Executed 1 test, with 0 failures (0 unexpected) in 0.010 (0.011) seconds
Test Suite 'Selected tests' passed at 2019-07-26 15:59:48.057.
Executed 1 test, with 0 failures (0 unexpected) in 0.010 (0.015) seconds| 1 | 在测试例子中,发布者总是返回失败,在输出结果中可以看到带有前缀 (1) 的错误信息,然后 retry 操作符触发重新订阅。 |
| 2 | 在其中4次尝试(3次"重试")之后,你就会看到从管道中输出的错误。
当错误到达 sink 后,你会看到发出的 cancel 信号,该信号在重试操作符之后停止。 |
虽然非常有效,但 print 操作符是一个钝器,它会生成大量的输出,你必须分析和审查它们以得到你想要的信息。
如果你想让标识和打印的内容更具选择性,或者如果你需要处理传输的数据才能更有意义地使用它们,那么你可以查看 handleEvents 操作符。
有关如何使用此操作符进行调试的更多详细信息,请查阅 使用 handleEvents 操作符调试管道。
使用 handleEvents 操作符调试管道
- 目的
-
-
使用断点、打印、记录语句或其他额外的逻辑,以便更有针对性地了解管道内发生的情况。
-
- 参考
-
-
使用 handleEvents 的 ViewController 在 github 项目中位于 UIKit-Combine/GithubViewController.swift
-
有关 handleEvents 的单元测试在 github 项目中位于 UsingCombineTests/HandleEventsPublisherTests.swift
- 另请参阅
- 代码和解释
-
handleEvents 传入数据,不对输出和失败类型或数据进行任何修改。 当你在管道中加入该操作符时,可以指定一些可选的闭包,从而让你能够专注于你想要看到的信息。 具有特定闭包的 handleEvents 操作符是一个打开新窗口的好方法,通过该窗口可以查看管道取消、出错或以其他预期的方式终止时发生的情况。
可以指定的闭包包括:
-
receiveSubscription -
receiveRequest -
receiveCancel -
receiveOutput -
receiveCompletion
如果每个闭包都包含打印语句,则该操作符将非常像 print 操作符,具体表现在 使用 print 操作符调试管道。
使用 handleEvents 调试的强大之处在于可以选择要查看的内容、减少输出量或操作数据以更好地了解它。
在 UIKit-Combine/GithubViewController.swift 的示例 viewcontroller 中,订阅、取消和 completion 的事件被用于启动或停止 UIActivityIndicatorView。
如果你只想看到管道上传递的数据,而不关心控制消息,那么为 receiveOutput 提供单个闭包并忽略其他闭包可以让你专注于这些详细信息。
handleEvents 的单元测试示例展示了所有可提供的闭包:
.handleEvents(receiveSubscription: { aValue in
    print("receiveSubscription event called with \(String(describing: aValue))") (2)
}, receiveOutput: { aValue in (3)
    print("receiveOutput was invoked with \(String(describing: aValue))")
}, receiveCompletion: { aValue in (4)
    print("receiveCompletion event called with \(String(describing: aValue))")
}, receiveCancel: { (5)
    print("receiveCancel event invoked")
}, receiveRequest: { aValue in (1)
    print("receiveRequest event called with \(String(describing: aValue))")
})| 1 | 第一个被调用的闭包是 receiveRequest,所需要的值(the demand value)将传递给它。 |
| 2 | 第二个闭包 receiveSubscription 通常是从发布者返回的订阅消息,它将对订阅的引用传递给发布者。
此时,管道已运行,发布者将根据原始请求中请求的数据量提供数据。 |
| 3 | 当发布者提供这些数据时,这些数据将传递到 receiveOutput 中,每次有值传递过来都将调用该闭包。
这将随着发布者发送更多的值而重复调用。 |
| 4 | 如果管道正常关闭或因失败而终止,receiveCompletion 闭包将收到 completion 事件。
就像 sink 闭包一样,你可以对提供的 completion 事件使用 switch,如果它是一个 .failure completion,那么你可以检查附带的错误。 |
| 5 | 如果管道被取消,则将调用 receiveCancel 闭包。
不会有任何数据传递到该取消闭包中。 |
|
虽然你还可以使用 breakpoint 和 breakpointOnError 操作符进入调试模式(如使用调试器调试管道 中所示),带有闭包的 |
使用调试器调试管道
- 目的
-
-
强制管道在特定场景或条件下进入调试器。
-
- 参考
- 另请参阅
- 代码和解释
-
你可以在管道内的任何操作符的任何闭包内设置一个断点,触发调试器激活以检查数据。 由于 map 操作符经常用于简单的输出类型转换,因此它通常是具有你可以使用的闭包的优秀候选者。 如果你想查看控制消息,那么为 handleEvents 提供的任何闭包添加一个断点,目标实现起来将非常方便。
你还可以使用 breakpoint 操作符触发调试器,这是查看管道中发生情况的一种非常快速和方便的方式。 breakpoint 操作符的行为非常像 handleEvents,使用一些可选参数,期望返回一个布尔值的闭包,如果返回 true 将会调用调试器。
可选的闭包包括:
-
receiveSubscription -
receiveOutput -
receiveCompletion
.breakpoint(receiveSubscription: { subscription in
    return false // return true to throw SIGTRAP and invoke the debugger
}, receiveOutput: { value in
    return false // return true to throw SIGTRAP and invoke the debugger
}, receiveCompletion: { completion in
    return false // return true to throw SIGTRAP and invoke the debugger
})
这允许你提供逻辑来评估正在传递的数据,并且仅在满足特定条件时触发断点。 通过非常活跃的管道会处理大量数据,这将是一个非常有效的工具,在需要调试器时,让调试器处于活动状态,并让其他数据继续移动。
如果你只想在错误条件下进入调试器,则便利的操作符 breakPointOnError 是完美的选择。 它不需要参数或闭包,当任何形式的错误条件通过管道时,它都会调用调试器。
.breakpointOnError()|
断点操作符触发的断点位置不在你的代码中,因此访问本地堆栈和信息可能有点棘手。
这确实允许你在极其特定的情况下检查全局应用状态(每当闭包返回 当你在操作符的闭包中触发断点时,调试器也会立即获取该闭包的上下文,以便你可以查看/检查正在传递的数据。 |
Reference
The reference section of this book is intended to link to, reference, and expand on Apple’s Combine documentation.
Publishers
For general information about publishers see Publishers and Lifecycle of Publishers and Subscribers.
Just
Future
- Summary
-
A
Futureis initialized with a closure that eventually resolves to a single output value or failure completion. - docs
- Usage
-
-
unit tests illustrating using
Future:UsingCombineTests/FuturePublisherTests.swift
-
- Details
-
Futureis a publisher that let’s you combine in any asynchronous call and use that call to generate a value or a completion as a publisher. It is ideal for when you want to make a single request, or get a single response, where the API you are using has a completion handler closure.
The obvious example that everyone immediately thinks about is URLSession.
Fortunately, URLSession.dataTaskPublisher exists to make a call with a URLSession and return a publisher.
If you already have an API object that wraps the direct calls to URLSession, then making a single request using Future can be a great way to integrate the result into a Combine pipeline.
There are a number of APIs in the Apple frameworks that use a completion closure.
An example of one is requesting permission to access the contacts store in Contacts.
An example of wrapping that request for access into a publisher using Future might be:
import Contacts
let futureAsyncPublisher = Future<Bool, Error> { promise in (1)
    CNContactStore().requestAccess(for: .contacts) { grantedAccess, err in (2)
        // err is an optional
        if let err = err { (3)
            promise(.failure(err))
        }
        return promise(.success(grantedAccess)) (4)
    }
}| 1 | Future itself has you define the return types and takes a closure.
It hands in a Result object matching the type description, which you interact. |
| 2 | You can invoke the async API however is relevant, including passing in its required closure. |
| 3 | Within the completion handler, you determine what would cause a failure or a success.
A call to promise(.failure(<FailureType>)) returns the failure. |
| 4 | Or a call to promise(.success(<OutputType>)) returns a value. |
If you want to wrap an async API that could return many values over time, you should not use Future directly, as it only returns a single value.
Instead, you should consider creating your own publisher based on passthroughSubject or currentValueSubject, or wrapping the Future publisher with Deferred.
|
Future creates and invokes its closure to do the asynchronous request at the time of creation, not when the publisher receives a demand request.
This can be counter-intuitive, as many other publishers invoke their closures when they receive demand.
This also means that you can’t directly link a Future publisher to an operator like The The failure of the The |
If you are wanting repeated requests to a Future (for example, wanting to use a retry operator to retry failed requests), wrap the Future publisher with Deferred.
let deferredPublisher = Deferred { (1)
    return Future<Bool, Error> { promise in (2)
        self.asyncAPICall(sabotage: false) { (grantedAccess, err) in
            if let err = err {
                return promise(.failure(err))
            }
            return promise(.success(grantedAccess))
        }
    }
}.eraseToAnyPublisher()| 1 | The closure provided in to Deferred will be invoked as demand requests come to the publisher. |
| 2 | This in turn resolves the underlying api call to generate the result as a Promise, with internal closures to resolve the promise. |
Empty
- Summary
-
emptynever publishes any values, and optionally finishes immediately. - docs
- Usage
-
-
Using catch to handle errors in a one-shot pipeline shows an example of using
catchto handle errors with a one-shot publisher. -
Using flatMap with catch to handle errors shows an example of using
catchwithflatMapto handle errors with a continual publisher. -
The unit tests at
UsingCombineTests/EmptyPublisherTests.swift
-
- Details
-
Emptyis useful in error handling scenarios where the value is an optional, or where you want to resolve an error by simply not sending anything. Empty can be invoked to be a publisher of any output and failure type combination.
Empty is most commonly used where you need to return a publisher, but don’t want to propagate any values (a possible error handling scenario).
If you want a publisher that provides a single value, then look at Just or Deferred publishers as alternatives.
When subscribed to, an instance of the Empty publisher will not return any values (or errors) and will immediately return a finished completion message to the subscriber.
An example of using Empty
let myEmptyPublisher = Empty<String, Never>() (1)| 1 | Because the types are not be able to be inferred, expect to define the types you want to return. |
Fail
- Summary
-
Failimmediately terminates publishing with the specified failure. - docs
- Usage
-
-
The unit tests at
UsingCombineTests/FailedPublisherTests.swift
-
- Details
-
Failis commonly used when implementing an API that returns a publisher. In the case where you want to return an immediate failure, Fail provides a publisher that immediately triggers a failure on subscription. One way this might be used is to provide a failure response when invalid parameters are passed. The Fail publisher lets you generate a publisher of the correct type that provides a failure completion when demand is requested.
Initializing a Fail publisher can be done two ways: with the type notation specifying the output and failure types or with the types implied by handing parameters to the initializer.
For example:
Initializing Fail by specifying the types
let cancellable = Fail<String, Error>(error: TestFailureCondition.exampleFailure)Initializing Fail by providing types as parameters:
let cancellable = Fail(outputType: String.self, failure: TestFailureCondition.exampleFailure)Publishers.Sequence
- Summary
-
Sequencepublishes a provided sequence of elements, most often used through convenience initializers. - docs
- Usage
-
-
The unit tests at
UsingCombineTests/SequencePublisherTests.swift
-
- Details
-
Sequenceprovides a way to return values as subscribers demand them initialized from a collection. Formally, it provides elements from any type conforming to the sequence protocol.
If a subscriber requests unlimited demand, all elements will be sent, and then a .finished completion will terminate the output.
If the subscribe requests a single element at a time, then individual elements will be returned based on demand.
If the type within the sequence is denoted as optional, and a nil value is included within the sequence, that will be sent as an instance of the optional type.
Combine provides an extension onto the Sequence protocol so that anything that corresponds to it can act as a sequence publisher.
It does so by making a .publisher property available, which implicitly creates a Publishers.Sequence publisher.
let initialSequence = ["one", "two", "red", "blue"]
_ = initialSequence.publisher
    .sink {
        print($0)
    }
}
Record
- Summary
-
A publisher that allows for recording a series of inputs and a completion, for later playback to each subscriber.
- docs
- Usage
-
-
Recordis illustrated in the unit testsUsingCombineTests/RecordPublisherTests.swift
-
- Details
-
Recordallows you to create a publisher with pre-recorded values for repeated playback.Recordacts very similarly to Publishers.Sequence if you want to publish a sequence of values and then send a.finishedcompletion. It goes beyond that allowing you to specify a.failurecompletion to be sent from the recording.Recorddoes not allow you to control the timing of the values being returned, only the order and the eventual completion following them.
Record can also be serialized (encoded and decoded) as long as the output and failure values can be serialized as well.
An example of a simple recording that sends several string values and then a .finished completion:
// creates a recording
let recordedPublisher = Record<String, Never> { example in
    // example : type is Record<String, Never>.Recording
    example.receive("one")
    example.receive("two")
    example.receive("three")
    example.receive(completion: .finished)
}
The resulting instance can be used as a publisher immediately:
let cancellable = recordedPublisher.sink(receiveCompletion: { err in
    print(".sink() received the completion: ", String(describing: err))
    expectation.fulfill()
}, receiveValue: { value in
    print(".sink() received value: ", value)
})
Record also has a property recording that can be inspected, with its own properties of output and completion.
Record and recording do not conform to Equatable, so can’t be easily compared within tests.
It is fairly easy to compare the properties of output or completion, which are Equatable if the underlying contents (output type and failure type) are equatable.
|
No convenience methods exist for creating a recording as a subscriber.
You can use the |
Deferred
- Summary
-
The
Deferredpublisher waits for a subscriber before running the provided closure to create values for the subscriber. - docs
- Usage
-
-
The unit tests at
UsingCombineTests/DeferredPublisherTests.swift -
The unit tests at
UsingCombineTests/FuturePublisherTests.swift
-
- Details
-
Deferredis useful when creating an API to return a publisher, where creating the publisher is an expensive effort, either computationally or in the time it takes to set up.Deferredholds off on setting up any publisher data structures until a subscription is requested. This provides a means of deferring the setup of the publisher until it is actually needed.
The Deferred publisher is particularly useful with Future, which does not wait on demand to start the resolution of underlying (wrapped) asynchronous APIs.
MakeConnectable
- Summary
-
Creates a or converts a publisher to one that explicitly conforms to the
ConnectablePublisherprotocol. - Constraints on connected publisher
-
-
The failure type of the publisher must be
<Never>
-
- docs
- Usage
-
-
makeConnectableis illustrated in the unit testsUsingCombineTests/MulticastSharePublisherTests.swift
-
- Details
-
A connectable publisher has an explicit mechanism for enabling when a subscription and the flow of demand from subscribers will be allowed to the publisher. By conforming to the
ConnectablePublisherprotocol, a publisher will have two additional methods exposed for this control:connectandautoconnect. Both of these methods return aCancellable(similar to sink or assign).
When using connect, the receipt of subscription will be under imperative control.
Normally when a subscriber is linked to a publisher, the connection is made automatically, subscriptions get sent, and demand gets negotiated per the Lifecycle of Publishers and Subscribers.
With a connectable publisher, in addition to setting up the subscription connect() needs to be explicitly invoked.
Until connect() is invoked, the subscription won’t be received by the publisher.
var cancellables = Set<AnyCancellable>()
let publisher = Just("woot")
    .makeConnectable()

publisher.sink { value in
    print("Value received in sink: ", value)
}
.store(in: &cancellables)
The above code will not activate the subscription, and in turn show any results.
In order to enable the subscription, an explicit connect() is required:
publisher
    .connect()
    .store(in: &cancellables)
One of the primary uses of having a connectable publisher is to coordinate the timing of connecting multiple subscribers with multicast.
Because multicast only shares existing events and does not replay anything, a subscription joining late could miss some data.
By explicitly enabling the connect(), all subscribers can be attached before any upstream processing begins.
In comparison, autoconnect() makes a Connectable publisher act like a non-connectable one.
When you enabled autoconnect() on a Connectable publisher, it will automate the connection such that the first subscription will activate upstream publishers.
var cancellables = Set<AnyCancellable>()
let publisher = Just("woot")
    .makeConnectable() (1)
    .autoconnect() (2)

publisher.sink { value in
    print("Value received in sink: ", value)
}
.store(in: &cancellables)| 1 | makeConnectable wraps an existing publisher and makes it explicitly connectable. |
| 2 | autoconnect automates the process of establishing the connection for you; The first subscriber will establish the connection, subscriptions will be forwards and demand negotiated. |
|
Making a publisher connectable and then immediately enabling |
SwiftUI
The SwiftUI framework is based upon displaying views from explicit state; as the state changes, the view updates.
SwiftUI uses a variety of property wrappers within its Views to reference and display content from outside of those views.
@ObservedObject, @EnvironmentObject, and @Published are the most common that relate to Combine.
SwiftUI uses these property wrappers to create a publisher that will inform SwiftUI when those models have changed, creating a objectWillChange publisher.
Having an object conform to ObservableObject will also get a default objectWillChange publisher.
SwiftUI uses ObservableObject, which has a default concrete class implementation called ObservableObjectPublisher that exposes a publisher for reference objects (classes) marked with @ObservedObject.
Binding
SwiftUI does this primarily by tracking the state and changes to the state using the SwiftUI struct Binding.
A binding is not a Combine pipeline, or even usable as one.
A Binding is based on closures that are used when you get or set data through the binding.
When creating a Binding, you can specify the closures, or use the defaults, which handles the needs of SwiftUI elements to react when data is set or request data when a view requires it.
There are a number of SwiftUI property wrappers that create bindings:
@State: creates a binding to a local view property, and is intended to be used only in one view
when you create:
@State private var exampleString = ""then: exampleString is the state itself and the property wrapper creates $exampleString (also known as property wrapper’s projected value) which is of type Binding<String>.
-
@Binding: is used to reference an externally provided binding that the view wants to use to present itself. You will see there upon occasion when a view is expected to be component, and it is watching for its relevant state data from an enclosing view. -
@EnvironmentObject: make state visible and usable across a set of views.@EnvironmentObjectis used to inject your own objects or state models into the environment, making them available to be used by any of the views within the current view hierarchy.
|
The exception to |
-
@Environmentis used to expose environmental information already available from within the frameworks, for example:
@Environment(\.horizontalSizeClass) var horizontalSizeClassSwiftUI and Combine
All of this detail on Binding is important to how SwiftUI works, but irrelevant to Combine - Bindings are not combine pipelines or structures, and the classes and structs that SwiftUI uses are directly transformable from Combine publishers or subscribers.
SwiftUI does, however, use combine in coordination with Bindings.
Combine fits in to SwiftUI when the state has been externalized into a reference to a model object, most often using the property wrappers @ObservedObject to reference a class conforming to the ObservableObject protocol.
The core of the ObservableObject protocol is a combine publisher objectWillChange, which is used by the SwiftUI framework to know when it needs to invalidate a view based on a model changing.
The objectWillChange publisher only provides an indicator that something has changed on the model, not which property, or what changed about it.
The author of the model class can "opt-in" properties into triggering that change using the @Published property wrapper.
If a model has properties that aren’t wrapped with @Published, then the automatic objectWillChange notification won’t get triggered when those values are modified.
Typically the model properties will be referenced directly within the View elements.
When the view is invalidated by a value being published through the objectWillChange publisher, the SwiftUI View will request the data it needs, as it needs it, directly from the various model references.
The other way that Combine fits into SwiftUI is the method onReceive, which is a generic instance method on SwiftUI views.
onReceive can be used when a view needs to be updated based on some external event that isn’t directly reflected in a model’s state being updated.
While there is no explicit guidance from Apple on how to use onReceive vs. models, as a general guideline it will be a cleaner pattern to update the model using Combine, keeping the combine publishers and pipelines external to SwiftUI views.
In this mode, you would generally let the @ObservedObject SwiftUI declaration automatically invalidate and update the view, which separates the model updating from the presentation of the view itself.
The alternative ends up having the view bound fairly tightly to the combine publishers providing asynchronous updates, rather than a coherent view of the end state.
There are still some edge cases and needs where you want to trigger a view update directly from a publishers output, and that is where onReceive is most effectively used.
ObservableObject
- Summary
-
Used with SwiftUI, objects conforming to ObservableObject protocol can provide a publisher.
- docs
- Usage
-
-
The unit tests at
UsingCombineTests/ObservableObjectPublisherTests.swift
-
- Details
-
When a class includes a Published property and conforms to the ObservableObject protocol, this class instances will get a
objectWillChangepublisher endpoint providing this publisher. TheobjectWillChangepublisher will not return any of the changed data, only an indicator that the referenced object has changed.
The output type of ObservableObject.Output is type aliased to Void, so while it is not nil, it will not provide any meaningful data.
Because the output type does not include what changes on the referenced object, the best method for responding to changes is probably best done using sink.
In practice, this method is most frequently used by the SwiftUI framework.
SwiftUI views use the @ObservedObject property wrapper to know when to invalidate and refresh views that reference classes implementing ObservableObject.
Classes implementing ObservedObject are also expected to use @Published to provide notifications of changes on specific properties, or to optionally provide a custom announcement that indicates the object has changed.
It can also be used locally to watch for updates to a reference-type model.
@Published
- Summary
-
A property wrapper that adds a Combine publisher to any property
- docs
- Usage
-
-
unit tests illustrating using Published:
UsingCombineTests/PublisherTests.swift
- Details
-
@Publishedis part of Combine, but allows you to wrap a property, enabling you to get a publisher that triggers data updates whenever the property is changed. The publisher’s output type is inferred from the type of the property, and the error type of the provided publisher is<Never>.
A smaller examples of how it can be used:
@Published var username: String = "" (1)

$username (2)
    .sink { someString in
        print("value of username updated to: ", someString)
    }

$username (3)
    .assign(\.text, on: myLabel)

@Published private var githubUserData: [GithubAPIUser] = [] (4)| 1 | @Published wraps the property, username, and will generate events whenever the property is changed.
If there is a subscriber at initialization time, the subscriber will also receive the initial value being set.
The publisher for the property is available at the same scope, and with the same permissions, as the property itself. |
| 2 | The publisher is accessible as $username, of type Published<String>.publisher. |
| 3 | A Published property can have more than one subscriber pipeline triggering from it. |
| 4 | If you are publishing your own type, you may find it convenient to publish an array of that type as the property, even if you only reference a single value. This allows you represent an "Empty" result that is still a concrete result within Combine pipelines, as assign and sink subscribers will only trigger updates on non-nil values. |
If the publisher generated from @Published receives a cancellation from any subscriber, it is expected to, and will cease, reporting property changes.
Because of this expectation, it is common to arrange pipelines from these publishers that have an error type of <Never> and do all error handling within the pipelines.
For example, if a sink subscriber is set up to capture errors from a pipeline originating from a` @Published` property, when the error is received, the sink will send a cancel message, causing the publisher to cease generating any updates on change.
This is illustrated in the test testPublishedSinkWithError at UsingCombineTests/PublisherTests.swift
Additional examples of how to arrange error handling for a continuous publisher like @Published can be found at Using flatMap with catch to handle errors.
|
Using |
Foundation
NotificationCenter
- Summary
-
Foundation’s NotificationCenter added the capability to act as a publisher, providing Notifications to pipelines.
- Constraints on connected publisher
-
-
none
-
- docs
- Usage
- Details
-
AppKit and MacOS applications have heavily relied on Notifications to provide general application state information. A number of components also use Notifications through NotificationCenter to provide updates on user interactions, such as
NotificationCenter provides a publisher upon which you may create pipelines to declaratively react to application or system notifications. The publisher optionally takes an object reference which further filters notifications to those provided by the specific reference.
Notifications are identified primarily by name, defined by a string in your own code, or a constant from a relevant framework. You can find a good general list of existing Notifications by name at https://developer.apple.com/documentation/foundation/nsnotification/name. A number of specific notifications are often included within cocoa frameworks. For example, within AppKit, there are a number of common notifications under NSControl.
A number of AppKit controls provide notifications when the control has been updated. For example, AppKit’s TextField triggers a number of notifications including:
-
textDidBeginEditingNotification -
textDidChangeNotification -
textDidEndEditingNotification
extension Notification.Name {
    static let yourNotification = Notification.Name("your-notification") (1)
}

let cancellable = NotificationCenter.default.publisher(for: .yourNotification, object: nil) (2)
    .sink {
        print ($0) (3)
}| 1 | Notifications are defined by a string for their name. If defining your own, be careful to define the strings uniquely. |
| 2 | A NotificationCenter publisher can be created for a single type of notification, .yourNotification in this case, defined previously in your code. |
| 3 | Notifications are received from the publisher.
These include at least their name, and optionally a object reference from the sending object - most commonly provided from Apple frameworks.
Notifications may also include a userInfo dictionary of arbitrary values, which can be used to pass additional information within your application. |
Timer
- Summary
-
Foundation’s
Timeradded the capability to act as a publisher, providing a publisher to repeatedly send values to pipelines based on aTimerinstance. - Constraints on connected publisher
-
-
none
-
- docs
- Usage
-
-
The unit tests at
UsingCombineTests/TimerPublisherTests.swift
-
- Details
-
Timer.publishreturns an instance ofTimer.TimerPublisher. This publisher is a connectable publisher, conforming toConnectablePublisher. This means that even when subscribers are connected to it, it will not start producing values untilconnect()orautoconnect()is invoked on the publisher.
Creating the timer publisher requires an interval in seconds, and a RunLoop and mode upon which to run.
The publisher may optionally take an additional parameter tolerance, which defines a variance allowed in the generation of timed events.
The default for tolerance is nil, allowing any variance.
The publisher has an output type of Date and a failure type of <Never>.
If you want the publisher to automatically connect and start receiving values as soon as subscribers are connected and make requests for values, then you may include autoconnect() in the pipeline to have it automatically start to generate values as soon as a subscriber requests data.
let cancellable = Timer.publish(every: 1.0, on: RunLoop.main, in: .common)
    .autoconnect()
    .sink { receivedTimeStamp in
        print("passed through: ", receivedTimeStamp)
    }
Alternatively, you can connect up the subscribers, which will receive no values until you invoke connect() on the publisher, which also returns a Cancellable reference.
let timerPublisher = Timer.publish(every: 1.0, on: RunLoop.main, in: .default)
let cancellableSink = timerPublisher
    .sink { receivedTimeStamp in
        print("passed through: ", receivedTimeStamp)
    }
// no values until the following is invoked elsewhere/later:
let cancellablePublisher = timerPublisher.connect()
publisher from a KeyValueObserving instance
- Summary
-
Foundation added the ability to get a publisher on any
NSObjectthat can be watched with Key Value Observing. - docs
- Usage
-
-
The unit tests at
UsingCombineTests/PublisherTests.swift
-
- Details
-
Any key-value-observing instance can produce a publisher. To create this publisher, you call the function
publisheron the object, providing it with a single (required) KeyPath value.
For example:
private final class KVOAbleNSObject: NSObject {
    @objc dynamic var intValue: Int = 0
    @objc dynamic var boolValue: Bool = false
}

let foo = KVOAbleNSObject()

let _ = foo.publisher(for: \.intValue)
    .sink { someValue in
        print("value updated to: >>\(someValue)<<")
}|
KVO publisher access implies that with macOS 10.15 release or iOS 13, most of Appkit and UIKit interface instances will be accessible as publishers. Relying on the interface element’s state to trigger updates into pipelines can lead to your state being very tightly bound to the interface elements, rather than your model. You may be better served by explicitly creating your own state to react to from a @Published property wrapper. |
URLSession.dataTaskPublisher
- Summary
-
Foundation’s
URLSessionhas a publisher specifically for requesting data from URLs:dataTaskPublisher - Constraints on connected publisher
-
-
none
-
- docs
- Usage
- Details
-
dataTaskPublisher, on URLSession, has two variants for creating a publisher. The first takes an instance of URL, the second URLRequest. The data returned from the publisher is a tuple of(data: Data, response: URLResponse).
let request = URLRequest(url: regularURL)
return URLSession.shared.dataTaskPublisher(for: request)
Result
- Summary
-
Foundation also adds
Resultas a publisher. - Constraints on connected publisher
-
-
none
-
- docs
- Usage
-
-
Result.publisheris illustrated in the unit testsUsingCombineTests/MulticastSharePublisherTests.swift
-
- Details
-
Combine augments
Resultfrom the swift standard library with a.publisherproperty, returning a publisher with an output type ofSuccessand a failure type ofFailure, defined by theResultinstance.
Any method that returns an instance of Result can use this property to get a publisher that will provide the resulting value and followed by a .finished completion, or a .failure completion with the relevant Error.
Operators
The chapter on Core Concepts includes an overview of all available Operators.
Mapping elements
scan
- Summary
-
scanacts like an accumulator, collecting and modifying values according to a closure you provide, and publishing intermediate results with each change from upstream.

- Constraints on connected publisher
-
-
none
-
- docs
-
https://developer.apple.com/documentation/combine/publishers/scan
While the published docs are unfortunately anemic, the generated swift headers has useful detail:
/// Transforms elements from the upstream publisher by providing the current element to a closure along with the last value returned by the closure.
///
///     let pub = (0...5)
///         .publisher
///         .scan(0, { return $0 + $1 })
///         .sink(receiveValue: { print ("\($0)", terminator: " ") })
///      // Prints "0 1 3 6 10 15 ".
///
///
/// - Parameters:
///   - initialResult: The previous result returned by the `nextPartialResult` closure.
///   - nextPartialResult: A closure that takes as its arguments the previous value returned by the closure and the next element emitted from the upstream publisher.
/// - Returns: A publisher that transforms elements by applying a closure that receives its previous return value and the next element from the upstream publisher.- Usage
-
-
unit tests illustrating using
scan:UsingCombineTests/ScanPublisherTests.swift
-
- Details
-
Scanlets you accumulate values or otherwise modify a type as changes flow through the pipeline. You can use this to collect values into an array, implement a counter, or any number of other interesting use cases.
If you want to be able to throw an error from within the closure doing the accumulation to indicate an error condition, use the tryScan operator. If you want to accumulate and process values, but refrain from publishing any results until the upstream publisher completes, consider using the reduce or tryReduce operators.
When you create a scan operator, you provide an initial value (of the type determined by the upstream publisher) and a closure that takes two parameters - the result returned from the previous invocation of the closure and a new value from the upstream publisher.
You do not need to maintain the type of the upstream publisher, but can convert the type in your closure, returning whatever is appropriate to your needs.
For example, the following scan operator implementation counts the number of characters in strings provided by an upstream publisher, publishing an updated count every time a new string is received:
.scan(0, { prevVal, newValueFromPublisher -> Int in
    return prevVal + newValueFromPublisher.count
})
tryScan
- Summary
-
tryScanis a variant of thescanoperator which allows for the provided closure to throw an error and cancel the pipeline. The closure provided updates and modifies a value based on any inputs from an upstream publisher and publishing intermediate results.

- Constraints on connected publisher
-
-
none
-
- docs
-
https://developer.apple.com/documentation/combine/publishers/tryscan
While the published docs are unfortunately anemic, the generated swift headers has some detail:
/// Transforms elements from the upstream publisher by providing the current element to an error-throwing closure along with the last value returned by the closure.
///
/// If the closure throws an error, the publisher fails with the error.
/// - Parameters:
///   - initialResult: The previous result returned by the `nextPartialResult` closure.
///   - nextPartialResult: An error-throwing closure that takes as its arguments the previous value returned by the closure and the next element emitted from the upstream publisher.
/// - Returns: A publisher that transforms elements by applying a closure that receives its previous return value and the next element from the upstream publisher.- Usage
-
-
unit tests illustrating using
tryScan:UsingCombineTests/ScanPublisherTests.swift
-
- Details
-
tryScanlets you accumulate values or otherwise modify a type as changes flow through the pipeline while also supporting an error state. If either the combined and updates values, or the incoming value, matches logic you define within the closure, you can throw an error, terminating the pipeline.
map
- Summary
-
mapis most commonly used to convert one data type into another along a pipeline.

- Constraints on connected publisher
-
-
none
-
- docs
-
https://developer.apple.com/documentation/combine/publishers/map
- Usage
-
-
unit tests illustrating using map with dataTaskPublisher:
UsingCombineTests/DataTaskPublisherTests.swift
- Details
-
The
mapoperator does not allow for any additional failures to be thrown and does not transform the failure type. If you want to throw an error within your closure, use the tryMap operator.
map takes a single closure where you provide the logic for the map operation.
|
|
For example, the URLSession.dataTaskPublisher provides a tuple of (data: Data, response: URLResponse)` as its output.
You can use map to pass along the data, for example to use with decode.
.map { $0.data } (1)| 1 | the $0 indicates to grab the first parameter passed in, which is a tuple of data and response. |
In some cases, the closure may not be able to infer what data type you are returning, so you may need to provide a definition to help the compiler. For example, if you have an object getting passed down that has a boolean property "isValid" on it, and you want the boolean for your pipeline, you might set that up like:
struct MyStruct {
    isValid: bool = true
}
//
Just(MyStruct())
.map { inValue -> Bool in (1)
  inValue.isValid (2)
}| 1 | inValue is named as the parameter coming in, and the return type is being explicitly specified to Bool |
| 2 | A single line is an implicit return, in this case it is pulling the isValid property off the struct and passing it down. |
tryMap
- Summary
-
tryMapis similar to map, except that it also allows you to provide a closure that throws additional errors if your conversion logic is unsuccessful. - Constraints on connected publisher
-
-
none
-
- docs
-
https://developer.apple.com/documentation/combine/publishers/trymap
- Usage
-
-
unit tests illustrating using tryMap with dataTaskPublisher:
UsingCombineTests/DataTaskPublisherTests.swift
- Details
-
tryMapis useful when you have more complex business logic around your map and you want to indicate that the data passed in is an error, possibly handling that error later in the pipeline. If you are looking attryMapto decode JSON, you may want to consider using the decode operator instead, which is set up for that common task.
enum MyFailure: Error {
    case notBigEnough
}

//
Just(5)
.tryMap {
  if inValue < 5 { (1)
      throw MyFailure.notBigEnough (2)
  }
  return inValue (3)
}| 1 | You can specify whatever logic is relevant to your use case within tryMap |
| 2 | and throw an error, although throwing an Error isn’t required. |
| 3 | If the error condition doesn’t occur, you do need to pass down data for any further subscribers. |
flatMap
- Summary
-
Used with error recovery or async operations that might fail (for example
Future),flatMapwill replace any incoming values with another publisher. - Constraints on connected publisher
-
-
none
-
- docs
- Usage
-
-
unit tests illustrating
flatMap:UsingCombineTests/SwitchAndFlatMapPublisherTests.swift
- Details
-
Typically used in error handling scenarios,
flatMaptakes a closure that allows you to read the incoming data value, and provide a publisher that returns a value to the pipeline.
In error handling, this is most frequently used to take the incoming value and create a one-shot pipeline that does some potentially failing operation, and then handling the error condition with a catch operator.
A simple example flatMap, arranged to show recovering from a decoding error and returning a placeholder value:
.flatMap { data in
    return Just(data)
    .decode(YourType.self, JSONDecoder())
    .catch {
        return Just(YourType.placeholder)
    }
}
A diagram version of this pipeline construct:

|
|
setFailureType
- Summary
-
setFailureTypedoes not send a.failurecompletion, it just changes the Failure type associated with the pipeline. Use this publisher type when you need to match the error types for two otherwise mismatched publishers.

- Constraints on connected publisher
-
-
The upstream publisher must have a failure type of
<Never>.
-
- docs
- Usage
-
-
unit tests illustrating setFailureType:
UsingCombineTests/FailedPublisherTests.swift
-
- Details
-
setFailureTypeis an operator for transforming the error type within a pipeline, often from<Never>to some error type you may want to produce.setFailureTypedoes not induce an error, but changes the types of the pipeline.
This can be especially convenient if you need to match an operator or subscriber that expects a failure type other than <Never> when you are working with a test or single-value publisher such as Just or Sequence.
If you want to return a .failure completion of a specific type into a pipeline, use the Fail operator.
Filtering elements
compactMap
- Summary
-
Calls a closure with each received element and publishes any returned optional that has a value.

- Constraints on connected publisher
-
-
none
-
- docs
- Usage
-
-
unit tests illustrating using
compactMap:UsingCombineTests/FilteringOperatorTests.swift
-
- Details
-
compactMap is very similar to the map operator, with the exception that it expects the closure to return an optional value, and drops any nil values from published responses. This is the combine equivalent of the
compactMapfunction which iterates through aSequenceand returns a sequence of any non-nil values.
It can also be used to process results from an upstream publisher that produces an optional Output type, and collapse those into an unwrapped type.
The simplest version of this just returns the incoming value directly, which will filter out the nil values.
.compactMap {
    return $0
}
There is also a variation of this operator, tryCompactMap, which allows the provided closure to throw an Error and cancel the stream on invalid conditions.
If you want to convert an optional type into a concrete type, always replacing the nil with an explicit value, you should likely use the replaceNil operator.
tryCompactMap
- Summary
-
Calls a closure with each received element and publishes any returned optional that has a value, or optionally throw an Error cancelling the pipeline.
- Constraints on connected publisher
-
-
none
-
- docs
- Usage
-
-
unit tests illustrating using
tryCompactMap:UsingCombineTests/FilteringOperatorTests.swift
-
- Details
-
tryCompactMapis a variant of the compactMap operator, allowing the values processed to throw anErrorcondition.
.tryCompactMap { someVal -> String? in (1)
    if (someVal == "boom") {
        throw TestExampleError.example
    }
    return someVal
}| 1 | If you specify the return type within the closure, it should be an optional value.
The operator that invokes the closure is responsible for filtering the non-nil values it publishes. |
If you want to convert an optional type into a concrete type, always replacing the nil with an explicit value, you should likely use the replaceNil operator.
filter
- Summary
-
Filterpasses through all instances of the output type that match a provided closure, dropping any that don’t match.

- Constraints on connected publisher
-
-
none
-
- docs
- Usage
-
-
unit tests illustrating using
filter:UsingCombineTests/FilterPublisherTests.swift
- Details
-
Filtertakes a single closure as a parameter that is provided the value from the previous publisher and returns a Bool value. If the return from the closure istrue, then the operator republishes the value further down the chain. If the return from the closure isfalse, then the operator drops the value.
If you need a variation of this that will generate an error condition in the pipeline to be handled use the tryFilter operator, which allows the closure to throw an error in the evaluation.
tryFilter
- Summary
-
tryFilterpasses through all instances of the output type that match a provided closure, dropping any that don’t match, and allows generating an error during the evaluation of that closure. - Constraints on connected publisher
-
-
none
-
- docs
- Usage
-
-
unit tests illustrating using
tryFilter:UsingCombineTests/FilterPublisherTests.swift
-
- Details
-
Like filter, tryFilter takes a single closure as a parameter that is provided the value from the previous publisher and returns a Bool value. If the return from the closure is
true, then the operator republishes the value further down the chain. If the return from the closure isfalse, then the operator drops the value. You can additionally throw an error during the evaluation of tryFilter, which will then be propagated as the failure type down the pipeline.
removeDuplicates
- Summary
-
removeDuplicatesremembers what was previously sent in the pipeline, and only passes forward values that don’t match the current value.

- Constraints on connected publisher
-
-
Available when Output of the previous publisher conforms to Equatable.
-
- docs
- Usage
-
-
unit tests illustrating using
removeDuplicates:UsingCombineTests/DebounceAndRemoveDuplicatesPublisherTests.swift
-
- Details
-
The default usage of
removeDuplicatesdoesn’t require any parameters, and the operator will publish only elements that don’t match the previously sent element.
.removeDuplicates()A second usage of removeDuplicates takes a single parameter by that accepts a closure that allows you to determine the logic of what will be removed.
The parameter version does not have the constraint on the Output type being equatable, but requires you to provide the relevant logic.
If the closure returns true, the removeDuplicates predicate will consider the values matched and not forward a the duplicate value.
.removeDuplicates(by: { first, second -> Bool in
    // your logic is required if the output type doesn't conform to equatable.
    first.id == second.id
})
A variation of removeDuplicates exists that allows the predicate closure to throw an error exists: tryRemoveDuplicates
tryRemoveDuplicates
- Summary
-
tryRemoveDuplicatesis a variant of removeDuplicates that allows the predicate testing equality to throw an error, resulting in anErrorcompletion type. - Constraints on connected publisher
-
-
none
-
- docs
- Usage
-
-
unit tests illustrating using
tryRemoveDuplicates:UsingCombineTests/DebounceAndRemoveDuplicatesPublisherTests.swift
-
- Details
-
tryRemoveDuplicatesis a variant of removeDuplicates taking a single parameter that can throw an error. The parameter is a closure that allows you to determine the logic of what will be removed. If the closure returns true,tryRemoveDuplicateswill consider the values matched and not forward a the duplicate value. If the closure throws an error, a failure completion will be propagated down the chain, and no value is sent.
.removeDuplicates(by: { first, second -> Bool throws in
    // your logic is required if the output type doesn't conform to equatable.

})
replaceEmpty
- Summary
-
Replaces an empty stream with the provided element. If the upstream publisher finishes without producing any elements, this publisher emits the provided element, then finishes normally.

- Constraints on connected publisher
-
-
none
-
- docs
- Usage
-
-
unit tests illustrating using
replaceEmpty:UsingCombineTests/ChangingErrorTests.swift
-
- Details
-
replaceEmptywill only produce a result if it has not received any values before it receives a.finishedcompletion. This operator will not trigger on an error passing through it, so if no value has been received with a.failurecompletion is triggered, it will simply not provide a value. The operator takes a single parameter,withwhere you specify the replacement value.
.replaceEmpty(with: "-replacement-")This operator is useful specifically when you want a stream to always provide a value, even if an upstream publisher may not propagate one.
replaceError
- Summary
-
A publisher that replaces any errors with an output value that matches the upstream Output type.
- Constraints on connected publisher
-
-
none
-
- docs
- Usage
-
-
unit tests illustrating using
replaceError:UsingCombineTests/ChangingErrorTests.swift
-
- Details
-
Where mapError transforms an error,
replaceErrorcaptures the error and returns a value that matches the Output type of the upstream publisher. If you don’t care about the specifics of the error itself, it can be a more convenient operator than using catch to handle an error condition.
.replaceError(with: "foo")is more compact than
.catch { err in
    return Just("foo")
}
catch would be the preferable error handler if you wanted to return another publisher rather than a singular value.
replaceNil
- Summary
-
Replaces nil elements in the stream with the provided element.

- Constraints on connected publisher
-
-
The output type of the upstream publisher must be an optional type
-
- docs
- Usage
-
-
unit tests illustrating using
replaceNil:UsingCombineTests/FilteringOperatorTests.swift
-
- Details
-
Used when the output type is an optional type, the
replaceNiloperator replaces any nil instances provided by the upstream publisher with a value provided by the user. The operator takes a single parameter,withwhere you specify the replacement value. The type of the replacement should be a non-optional version of the type provided by the upstream publisher.
.replaceNil(with: "-replacement-")This operator can also be viewed as a way of converting an optional type to an explicit type, where optional values have a pre-determined placeholder.
Put another way, the replaceNil operator is a Combine specific variant of the swift coalescing operator that you might use when unwrapping an optional.
If you want to convert an optional type into a concrete type, simply ignoring or collapsing the nil values, you should likely use the compactMap (or tryCompactMap) operator.
Reducing elements
collect
- Summary
-
Collects all received elements, and emits a single array of the collection when the upstream publisher finishes.

- Constraints on connected publisher
-
-
none
-
- docs
- Usage
-
-
unit tests illustrating using
collect:UsingCombineTests/ReducingOperatorTests.swift
-
- Details
-
There are two primary forms of
collect, one you specify without any parameters, and one you provide acountparameter.Collectcan also take a more complex form, with a defined strategy for how to buffer and send on items.
For the version without any parameters, for example:
.collect()The operator will collect all elements from an upstream publisher, holding those in memory until the upstream publisher sends a completion.
Upon receiving the .finished completion, the operator will publish an array of all the values collected.
If the upstream publisher fails with an error, the collect operator forwards the error to the downstream receiver instead of sending its output.
|
This operator uses an unbounded amount of memory to store the received values. |
Collect without any parameters will request an unlimited number of elements from its upstream publisher.
It only sends the collected array to its downstream after a request whose demand is greater than 0 items.
The second variation of collect takes a single parameter (count), which influences how many values it buffers and when it sends results.
.collect(3)This version of collect will buffer up to the specified count number of elements.
When it has received the count specified, it emits a single array of the collection.
If the upstream publisher finishes before filling the buffer, this publisher sends an array of all the items it has received upon receiving a finished completion.
This may be fewer than count elements.
If the upstream publisher fails with an error, this publisher forwards the error to the downstream receiver instead of sending its output.
The more complex form of collect operates on a provided strategy of how to collect values and when to emit.
As of iOS 13.3 there are two strategies published in Publishers.TimeGroupingStrategy:
-
byTime -
byTimeOrCount
byTime allows you to specify a scheduler on which to operate, and a time interval stride over which to run.
It collects all values received within that stride and publishes any values it has received from its upstream publisher during that interval.
Like the parameterless version of collect, this will consume an unbounded amount of memory during that stride interval to collect values.
let q = DispatchQueue(label: self.debugDescription)

let cancellable = publisher
    .collect(.byTime(q, 1.0))
byTime operates very similarly to throttle with its defined Scheduler and Stride, but where throttle collapses the values over a sequence of time, collect(.byTime(q, 1.0)) will buffer and capture those values.
When the time stride interval is exceeded, the collected set will be sent to the operator’s subscriber.
byTimeOrCount also takes a scheduler and a time interval stride, and in addition allows you to specify an upper bound on the count of items received before the operator sends the collected values to its subscriber.
The ability to provide a count allows you to have some confidence about the maximum amount of memory that the operator will consume while buffering values.
If either of the count or time interval provided are elapsed, the collect operator will forward the currently collected set to its subscribers.
If a .finished completion is received, the currently collected set will be immediately sent to it’s subscribers.
If a .failure completion is received, any currently buffered values are dropped and the failure completion is forwarded to collect’s subscribers.
let q = DispatchQueue(label: self.debugDescription)

let cancellable = publisher
    .collect(.byTimeOrCount(q, 1.0, 5))
ignoreOutput
- Summary
-
A publisher that ignores all upstream elements, but passes along a completion state (finish or failed).
- Constraints on connected publisher
-
-
none
-
- docs
- Usage
-
-
unit tests illustrating using
ignoreOutput:UsingCombineTests/ReducingOperatorTests.swift
-
- Details
-
If you only want to know if a stream has finished (or failed), then
ignoreOutputmay be what you want.
.ignoreOutput()
.sink(receiveCompletion: { completion in
    print(".sink() received the completion", String(describing: completion))
    switch completion {
    case .finished: (2)
        finishReceived = true
        break
    case .failure(let anError): (3)
        print("received error: ", anError)
        failureReceived = true
        break
    }
}, receiveValue: { _ in (1)
    print(".sink() data received")
})| 1 | No data will ever be presented to a downstream subscriber of ignoreOutput, so the receiveValue closure will never be invoked. |
| 2 | When the stream completes, it will invoke receiveCompletion.
You can switch on the case from that completion to respond to the success. |
| 3 | Or you can do further processing based on receiving a failure. |
reduce
- Summary
-
A publisher that applies a closure to all received elements and produces an accumulated value when the upstream publisher finishes.

- Constraints on connected publisher
-
-
none
-
- docs
- Usage
-
-
unit tests illustrating using reduce:
UsingCombineTests/ReducingOperatorTests.swift
-
- Details
-
Very similar in function to the scan operator,
reducecollects values produced within a stream. The big difference betweenscanandreduceis thatreducedoes not trigger any values until the upstream publisher completes successfully.
When you create a reduce operator, you provide an initial value (of the type determined by the upstream publisher) and a closure that takes two parameters - the result returned from the previous invocation of the closure and a new value from the upstream publisher.
Like scan, you don’t need to maintain the type of the upstream publisher, but can convert the type in your closure, returning whatever is appropriate to your needs.
An example of reduce that collects strings and appends them together:
.reduce("", { prevVal, newValueFromPublisher -> String in
    return prevVal+newValueFromPublisher
})
The reduce operator is excellent at converting a stream that provides many values over time into one that provides a single value upon completion.
tryReduce
- Summary
-
A publisher that applies a closure to all received elements and produces an accumulated value when the upstream publisher finishes, while also allowing the closure to throw an exception, terminating the pipeline.
- Constraints on connected publisher
-
-
none
-
- docs
- Usage
-
-
unit tests illustrating using
tryReduce:UsingCombineTests/ReducingOperatorTests.swift
-
- Details
-
tryReduceis a variation of the reduce operator that allows for the closure to throw an error. If the exception path is taken, thetryReduceoperator will not publish any output values to downstream subscribers. Likereduce, thetryReducewill only publish a single downstream result upon a.finishedcompletion from the upstream publisher.
Mathematic operations on elements
max
- Summary
-
Publishes the max value of all values received upon completion of the upstream publisher.

- Constraints on connected publisher
-
-
The output type of the upstream publisher must conform to
Comparable
-
- docs
- Usage
-
-
unit tests illustrating using
max:UsingCombineTests/MathOperatorTests.swift
-
- Details
-
maxcan be set up with either no parameters, or taking a closure. If defined as an operator with no parameters, the Output type of the upstream publisher must conform toComparable.
.max()If what you are publishing doesn’t conform to Comparable, then you may specify a closure to provide the ordering for the operator.
.max { (struct1, struct2) -> Bool in
    return struct1.property1 < struct2.property1
    // returning boolean true to order struct2 greater than struct1
    // the underlying method parameter for this closure hints to it:
    // `areInIncreasingOrder`
}
The parameter name of the closure hints to how it should be provided, being named areInIncreasingOrder.
The closure will take two values of the output type of the upstream publisher, and within it you should provide a boolean result indicating if they are in increasing order.
The operator will not provide any results under the upstream published has sent a .finished completion.
If the upstream publisher sends a failure completion, then no values will be published and the .failure completion will be forwarded.
tryMax
- Summary
-
Publishes the
maxvalue of all values received upon completion of the upstream publisher. - Constraints on connected publisher
-
-
The output type of the upstream publisher must conform to
Comparable
-
- docs
- Usage
-
-
unit tests illustrating using
tryMax:UsingCombineTests/MathOperatorTests.swift
-
- Details
-
A variation of the max operator that takes a closure to define ordering, and it also allowed to throw an error.
min
- Summary
-
Publishes the minimum value of all values received upon completion of the upstream publisher.

- Constraints on connected publisher
-
-
The output type of the upstream publisher must conform to
Comparable
-
- docs
- Usage
-
-
unit tests illustrating using
min:UsingCombineTests/MathOperatorTests.swift
-
- Details
-
mincan be set up with either no parameters, or taking a closure. If defined as an operator with no parameters, the Output type of the upstream publisher must conform toComparable.
.min()If what you are publishing doesn’t conform to Comparable, then you may specify a closure to provide the ordering for the operator.
.min { (struct1, struct2) -> Bool in
    return struct1.property1 < struct2.property1
    // returning boolean true to order struct2 greater than struct1
    // the underlying method parameter for this closure hints to it:
    // `areInIncreasingOrder`
}
The parameter name of the closure hints to how it should be provided, being named areInIncreasingOrder.
The closure will take two values of the output type of the upstream publisher, and within it you should provide a boolean result indicating if they are in increasing order.
The operator will not provide any results under the upstream published has sent a .finished completion.
If the upstream publisher sends a .failure completion, then no values will be published and the failure completion will be forwarded.
tryMin
- Summary
-
Publishes the minimum value of all values received upon completion of the upstream publisher.
- Constraints on connected publisher
-
-
The output type of the upstream publisher must conform to
Comparable
-
- docs
- Usage
-
-
unit tests illustrating using
tryMin:UsingCombineTests/MathOperatorTests.swift
-
- Details
-
A variation of the min operator that takes a closure to define ordering, and it also allowed to throw an error.
count
- Summary
-
count publishes the number of items received from the upstream publisher

- Constraints on connected publisher
-
-
none
-
- docs
- Usage
-
-
unit tests illustrating using
count:UsingCombineTests/MathOperatorTests.swift
-
- Details
-
The operator will not provide any results under the upstream published has sent a
.finishedcompletion. If the upstream publisher sends a.failurecompletion, then no values will be published and thefailurecompletion will be forwarded.
Applying matching criteria to elements
allSatisfy
- Summary
-
A publisher that publishes a single Boolean value that indicates whether all received elements pass a provided predicate.

- Constraints on connected publisher
-
-
none
-
- docs
- Usage
-
-
unit tests illustrating using
allSatisfy:UsingCombineTests/CriteriaOperatorTests.swift
-
- Details
-
similar to the containsWhere operator, this operator is provided with a closure. The type of the incoming value to this closure must match the Output type of the upstream publisher, and the closure must return a Boolean.
The operator will compare any incoming values, only responding when the upstream publisher sends a .finished completion.
At that point, the allSatisfies operator will return a single boolean value indicating if all the values received matched (or not) based on processing through the provided closure.
If the operator receives a .failure completion from the upstream publisher, or throws an error itself, then no data values will be published to subscribers.
In those cases, the operator will only return (or forward) the .failure completion.
tryAllSatisfy
- Summary
-
A publisher that publishes a single Boolean value that indicates whether all received elements pass a given throwing predicate.
- Constraints on connected publisher
-
-
none
-
- docs
- Usage
-
-
unit tests illustrating using
tryAllSatisfy:UsingCombineTests/CriteriaOperatorTests.swift
-
- Details
-
similar to the tryContainsWhere operator, you provide this operator with a closure which may also throw an error. The type of the incoming value to this closure must match the Output type of the upstream publisher, and the closure must return a Boolean.
The operator will compare any incoming values, only responding when the upstream publisher sends a .finished completion.
At that point, the tryAllSatisfies operator will return a single boolean value indicating if all the values received matched (or not) based on processing through the provided closure.
If the operator receives a .failure completion from the upstream publisher, or throws an error itself, then no data values will be published to subscribers.
In those cases, the operator will only return (or forward) the .failure completion.
contains
- Summary
-
A publisher that emits a Boolean value when a specified element is received from its upstream publisher.

- Constraints on connected publisher
-
-
The upstream publisher’s output value must conform to the
Equatableprotocol
-
- docs
- Usage
-
-
unit tests illustrating using
contains:UsingCombineTests/CriteriaOperatorTests.swift
-
- Details
-
The simplest form of
containsaccepts a single parameter. The type of this parameter must match the Output type of the upstream publisher.
The operator will compare any incoming values, only responding when the incoming value is equatable to the parameter provided.
When it does find a match, the operator returns a single boolean value (true) and then terminates the stream.
Any further values published from the upstream provider are then ignored.
If the upstream published sends a .finished completion before any values do match, the operator will publish a single boolean (false) and then terminate the stream.
containsWhere
- Summary
-
A publisher that emits a Boolean value upon receiving an element that satisfies the predicate closure.

- Constraints on connected publisher
-
-
none
-
- docs
- Usage
-
-
unit tests illustrating using
containsWhere:UsingCombineTests/CriteriaOperatorTests.swift
-
- Details
-
A more flexible version of the contains operator. Instead of taking a single parameter value to match, you provide a closure which takes in a single value (of the type provided by the upstream publisher) and returns a boolean.
Like contains, it will compare multiple incoming values, only responding when the incoming value is equatable to the parameter provided. When it does find a match, the operator returns a single boolean value and terminates the stream. Any further values published from the upstream provider are ignored.
If the upstream published sends a .finished completion before any values do match, the operator will publish a single boolean (false) and terminates the stream.
If you want a variant of this functionality that checks multiple incoming values to determine if all of them match, consider using the allSatisfy operator.
tryContainsWhere
- Summary
-
A publisher that emits a Boolean value upon receiving an element that satisfies the throwing predicate closure.
- Constraints on connected publisher
-
-
none
-
- docs
- Usage
-
-
unit tests illustrating using
tryContainsWhere:UsingCombineTests/CriteriaOperatorTests.swift
-
- Details
-
A variation of the tryContainsWhere operator which allows the closure to throw an error. You provide a closure which takes in a single value (of the type provided by the upstream publisher) and returns a boolean. This closure may also throw an error. If the closure throws an error, then the operator will return no values, only the error to any subscribers, terminating the pipeline.
Like contains, it will compare multiple incoming values, only responding when the incoming value is equatable to the parameter provided. When it does find a match, the operator returns a single boolean value and terminates the stream. Any further values published from the upstream provider are ignored.
If the upstream published sends a .finished completion before any values do match, the operator will publish a single boolean (false) and terminates the stream.
If the operator receives a .failure completion from the upstream publisher, or throws an error itself, no data values will be published to subscribers.
In those cases, the operator will only return (or forward) the .failure completion.
Applying sequence operations to elements
first
- Summary
-
Publishes the first element of a stream and then finishes.

- Constraints on connected publisher
-
-
none
-
- docs
- Usage
-
-
unit tests illustrating using
first:UsingCombineTests/SequentialOperatorTests.swift
-
- Details
-
The first operator, when used without any parameters, will pass through the first value it receives, after which it sends a
.finishcompletion message to any subscribers. If no values are received before the first operator receives a.finishcompletion from upstream publishers, the stream is terminated and no values are published.
.first()If you want a set number of values from the front of the stream you can also use prefixUntilOutput or the variants: prefixWhile and tryPrefixWhile.
If you want a set number of values from the middle the stream by count, you may want to use output, which allows you to select either a single value, or a range value from the sequence of values received by this operator.
firstWhere
- Summary
-
A publisher that only publishes the first element of a stream to satisfy a predicate closure.
- Constraints on connected publisher
-
-
none
-
- docs
- Usage
-
-
unit tests illustrating using
firstWhere:UsingCombineTests/SequentialOperatorTests.swift
-
- Details
-
The firstWhere operator is similar to first, but instead lets you specify if the value should be the first value published by evaluating a closure. The provided closure should accept a value of the type defined by the upstream publisher, returning a bool.
.first { (incomingobject) -> Bool in
    return incomingobject.count > 3 (1)
}| 1 | The first value received that satisfies this closure - that is, has count greater than 3 - is published. |
If you want to support an error condition that will terminate the pipeline within this closure, use tryFirstWhere.
tryFirstWhere
- Summary
-
A publisher that only publishes the first element of a stream to satisfy a throwing predicate closure.
- Constraints on connected publisher
-
-
none
-
- docs
- Usage
-
-
unit tests illustrating using
tryFirstWhere:UsingCombineTests/SequentialOperatorTests.swift
-
- Details
-
The tryFirstWhere operator is a variant of firstWhere that accepts a closure that can throw an error. The closure provided should accept a value of the type defined by the upstream publisher, returning a bool.
.tryFirst { (incomingobject) -> Bool in
    if (incomingobject == "boom") {
        throw TestExampleError.invalidValue
    }
    return incomingobject.count > 3
}
last
- Summary
-
A publisher that only publishes the last element of a stream, once the stream finishes.

- Constraints on connected publisher
-
-
none
-
- docs
- Usage
-
-
unit tests illustrating using
last:UsingCombineTests/SequentialOperatorTests.swift
-
- Details
-
The last operator waits until the upstream publisher sends a
finishedcompletion, then publishes the last value it received. If no values were received prior to receiving thefinishedcompletion, no values are published to subscribers.
.last()lastWhere
- Summary
-
A publisher that only publishes the last element of a stream that satisfies a predicate closure, once the stream finishes.
- Constraints on connected publisher
-
-
none
-
- docs
- Usage
-
-
unit tests illustrating using
lastWhere:UsingCombineTests/SequentialOperatorTests.swift
-
- Details
-
The lastWhere operator takes a single closure, accepting a value matching the output type of the upstream publisher, and returning a boolean. The operator publishes a value when the upstream published completes with a
.finishedcompletion. The value published will be the last one to satisfy the provide closure. If no values satisfied the closure, then no values are published and the pipeline is terminated normally with a.finishedcompletion.
.last { (incomingobject) -> Bool in
    return incomingobject.count > 3 (1)
}| 1 | Publishes the last value that has a length greater than 3. |
tryLastWhere
- Summary
-
A publisher that only publishes the last element of a stream that satisfies a error-throwing predicate closure, once the stream finishes.
- Constraints on connected publisher
-
-
none
-
- docs
- Usage
-
-
unit tests illustrating using
tryLastWhere:UsingCombineTests/SequentialOperatorTests.swift
-
- Details
-
The tryLastWhere operator is a variant of the lastWhere operator that accepts a closure that may also throw an error.
.tryLast { (incomingobject) -> Bool in
    if (incomingobject == "boom") { (2)
        throw TestExampleError.invalidValue
    }
    return incomingobject.count > 3 (1)
}| 1 | Publishes the last value that has a length greater than 3. |
| 2 | Logic that triggers an error, which will terminate the pipeline. |
dropUntilOutput
- Summary
-
A publisher that ignores elements from the upstream publisher until it receives an element from second publisher.
- Constraints on connected publisher
-
-
none
-
- docs
- Usage
-
-
unit tests illustrating using
dropUntilOutput:UsingCombineTests/SequentialOperatorTests.swift
-
- Details
-
The dropUntilOutput operator uses another publisher as a trigger, stopping output through a pipeline until a value is received. Values received from the upstream publisher are ignored (and dropped) until the trigger is activated.
Any value propagated through the trigger publisher will cause the switch to activate, and allow future values through the pipeline.
Errors are still propagated from the upstream publisher, terminating the pipeline with a failure completion.
An error (failure completion) on either the upstream publisher or the trigger publisher will be propagated to any subscribers and terminate the pipeline.
.drop(untilOutputFrom: triggerPublisher)If you want to use this kind of mechanism, but with a closure determining values from the upstream publisher, use the dropWhile operator.
dropWhile
- Summary
-
A publisher that omits elements from an upstream publisher until a given closure returns false.
- Constraints on connected publisher
-
-
none
-
- docs
- Usage
-
-
unit tests illustrating using
dropWhile:UsingCombineTests/SequentialOperatorTests.swift
-
- Details
-
The dropWhile operator takes a single closure, accepting an input value of the output type defined by the upstream publisher, returning a bool. This closure is used to determine a trigger condition, after which values are allowed to propagate.
This is not the same as the filter operator, acting on each value. Instead it uses a trigger that activates once, and propagates all values after it is activated until the upstream publisher finishes.
.drop { upstreamValue -> Bool in
    return upstreamValue.count > 3
}
If you want to use this mechanism, but with a publisher as the trigger instead of a closure, use the dropUntilOutput operator.
tryDropWhile
- Summary
-
A publisher that omits elements from an upstream publisher until a given error-throwing closure returns false.
- Constraints on connected publisher
-
-
none
-
- docs
- Usage
-
-
unit tests illustrating using
tryDropWhile:UsingCombineTests/SequentialOperatorTests.swift
-
- Details
-
This is a variant of the dropWhile operator that accepts a closure that can also throw an error.
.tryDrop { upstreamValue -> Bool in
    return upstreamValue.count > 3
}
prepend
- Summary
-
A publisher that emits all of one publisher’s elements before those from another publisher.
- Constraints on connected publisher
-
-
Both publishers must match on Output and Failure types.
-
- docs
- Usage
-
-
unit tests illustrating using
prepend:UsingCombineTests/SequentialOperatorTests.swift
-
- Details
-
The prepend operator will act as a merging of two pipelines. Also known as
Publishers.Concatenate, it accepts all values from one publisher, publishing them to subscribers. Once the first publisher is complete, the second publisher is used to provide values until it is complete.
The most general form of this can be invoked directly as:
Publishers.Concatenate(prefix: firstPublisher, suffix: secondPublisher)This is equivalent to the form directly in a pipeline:
secondPublisher
.prepend(firstPublisher)
The prepend operator is often used with single or sequence values that have a failure type of <Never>.
If the publishers do accept a failure type, then all values will be published from the prefix publisher even if the suffix publisher receives a .failure completion before it is complete.
Once the prefix publisher completes, the error will be propagated.
The prepend operator also has convenience operators to send a sequence. For example:
secondPublisher
.prepend(["one", "two"]) (1)| 1 | The sequence values will be published immediately on a subscriber requesting demand.
Further demand will be propagated upward to secondPublisher.
Values produced from secondPublisher will then be published until it completes. |
Another convenience operator exists to send a single value:
secondPublisher
.prepend("one") (1)| 1 | The value will be published immediately on a subscriber requesting demand.
Further demand will be propagated upward to secondPublisher.
Values produced from secondPublisher will then be published until it completes. |
drop
- Summary
-
A publisher that omits a specified number of elements before republishing later elements.
- Constraints on connected publisher
-
-
none
-
- docs
- Usage
-
-
unit tests illustrating using
drop:UsingCombineTests/SequentialOperatorTests.swift
-
- Details
-
The simplest form of the drop operator drops a single value and then allows all further values to propagate through the pipeline.
.dropFirst()A variant of this operator allows a count of values to be specified:
.dropFirst(3) (1)| 1 | Drops the first three values received from the upstream publisher before propagating any further values published to downstream subscribers. |
prefixUntilOutput
- Summary
-
Republishes elements until another publisher emits an element. After the second publisher publishes an element, the publisher returned by this method finishes.
- Constraints on connected publisher
-
-
none
-
- docs
- Usage
-
-
unit tests illustrating using
prefixUntilOutput:UsingCombineTests/SequentialOperatorTests.swift
-
- Details
-
The prefixUntilOutput will propagate values from an upstream publisher until a second publisher is used as a trigger. Once the trigger is activated by receiving a value, the operator will terminate the stream.
.prefix(untilOutputFrom: secondPublisher)prefixWhile
- Summary
-
A publisher that republishes elements while a predicate closure indicates publishing should continue.
- Constraints on connected publisher
-
-
none
-
- docs
- Usage
-
-
unit tests illustrating using
prefixWhile:UsingCombineTests/SequentialOperatorTests.swift
-
- Details
-
The prefixWhile operator takes a single closure, with an input matching the output type defined by the upstream publisher, returning a boolean. This closure is evaluated on the data from the upstream publisher. While it returns
truethe values are propagated to the subscriber. Once the value returnsfalse, the operator terminates the stream with a.finishedcompletion.
.prefix { upstreamValue -> Bool in
    return upstreamValue.count > 3
}
tryPrefixWhile
- Summary
-
A publisher that republishes elements while an error-throwing predicate closure indicates publishing should continue.
- Constraints on connected publisher
-
-
none
-
- docs
- Usage
-
-
unit tests illustrating using
tryPrefixWhile:UsingCombineTests/SequentialOperatorTests.swift
-
- Details
-
The tryPrefixWhile operator is a variant of the prefixWhile operator that accepts a closure and may also throw an error.
.prefix { upstreamValue -> Bool in
    return upstreamValue.count > 3
}
output
- Summary
-
A publisher that publishes elements specified by a range in the sequence of published elements.
- Constraints on connected publisher
-
-
none
-
- docs
- Usage
-
-
unit tests illustrating using
output:UsingCombineTests/SequentialOperatorTests.swift
-
- Details
-
The output operator takes a single parameter, either an integer or a swift range. This value is used to select a specific value, or sequence of values, from an upstream publisher to send to subscribers.
output is choosing values from the middle of the stream.
If the upstream publisher completes before the values is received, the .finished completion will be propagated to the subscriber.
.output(at: 3) (1)| 1 | The selection is 0 indexed (meaning the count starts at 0). This will select the fourth item published from the upstream publisher to propagate. |
The alternate form takes a swift range descriptor:
.output(at: 2...3) (1)| 1 | The selection is 0 indexed (the count starts at 0). This will select the third and fourth item published from the upstream publisher to propagate. |
Mixing elements from multiple publishers
combineLatest
- Summary
-
CombineLatestmerges two pipelines into a single output, converting the output type to a tuple of values from the upstream pipelines, and providing an update when any of the upstream publishers provide a new value. - Constraints on connected publishers
-
-
All upstream publishers must have the same failure type.
-
- docs
- Usage
-
-
unit tests illustrating using
combineLatest:UsingCombineTests/MergingPipelineTests.swift
- Details
-
CombineLatest, and its variants of
combineLatest3andcombineLatest4, take multiple upstream publishers and create a single output stream, merging the streams together.CombineLatestmerges two upstream publishers.ComineLatest3merges three upstream publishers andcombineLatest4merges four upstream publishers.
The output type of the operator is a tuple of the output types of each of the publishers.
For example, if combineLatest was used to merge a publisher with the output type of <String> and another with the output type of <Int>, the resulting output type would be a tuple of (<String, Int>).
CombineLatest is most often used with continual publishers, and remembering the last output value provided from each publisher.
In turn, when any of the upstream publishers sends an updated value, the operator makes a new combined tuple of all previous "current" values, adds in the new value in the correct place, and sends that new combined value down the pipeline.
The CombineLatest operator requires the failure types of all three upstream publishers to be identical.
For example, you can not have one publisher that has a failure type of Error and another (or more) that have a failure type of Never.
If the combineLatest operator does receive a failure from any of the upstream publishers, then the operator (and the rest of the pipeline) is cancelled after propagating that failure.
If any of the upstream publishers finish normally (that is, they send a .finished completion), the combineLatest operator will continue operating and processing any messages from any of the other publishers that has additional data to send.
Other operators that merge multiple upstream pipelines include merge and zip. If your upstream publishers have the same type and you want a stream of single values as opposed to tuples, use the merge operator. If you want to wait on values from all upstream provides before providing an updated value, use the zip operator.
merge
- Summary
-
Mergetakes two upstream publishers and mixes the elements published into a single pipeline as they are received. - Constraints on connected publishers
-
-
All upstream publishers must have the same output type.
-
All upstream publishers must have the same failure type.
-
- docs
- Usage
-
-
unit tests illustrating using
merge:UsingCombineTests/MergingPipelineTests.swift
-
- Details
-
Mergesubscribers to two upstream publishers, and as they provide data for the subscriber it interleaves them into a single pipeline.Merge3accepts three upstream publishers,merge4accepts four upstream publishers, and so forth - throughmerge8accepting eight upstream publishers.
In all cases, the upstreams publishers are required to have the same output type, as well as the same failure type.
As with combineLatest, if an error is propagated down any of the upstream publishers, the cancellation from the subscriber will terminate this operator and will propagate cancel to all upstream publishers as well.
If an upstream publisher completes with a normal finish, the merge operator continues interleaving and forwarding from any values other upstream publishers.
In the unlikely event that two values are provided at the same time from upstream publishers, the merge operator will interleave the values in the order upstream publishers are specified when the operator is initialized.
If you want to mix different upstream publisher types into a single stream, then you likely want to use either combineLatest or zip, depending on how you want the timing of values to be handled.
If your upstream publishers have different types, but you want interleaved values to be propagated as they are available, use combineLatest. If you want to wait on values from all upstream provides before providing an updated value, then use the zip operator.
MergeMany
- Summary
-
The
MergeManypublisher takes multiple upstream publishers and mixes the published elements into a single pipeline as they are received. The upstream publisher can be of any type. - Constraints on connected publishers
-
-
All upstream publishers must have the same output type.
-
All upstream publishers must have the same failure type.
-
- docs
- Usage
-
-
Unit tests illustrating using
MergeMany:UsingCombineTests/MergeManyPublisherTests.swift
-
- Details
-
When you went to mix together data from multiple sources as the data arrives,
MergeManyprovides a common solution for a wide number of publishers. It is an evolution of the Merge3, Merge4, etc sequence of publishers that came about as the Swift language enabled variadic parameters.
Like merge, it publishes values until all publishers send a finished completion, or cancels entirely if any of the publishers sends a cancellation completion.
zip
- Summary
-
Ziptakes two upstream publishers and mixes the elements published into a single pipeline, waiting until values are paired up from each upstream publisher before forwarding the pair as a tuple. - Constraints on connected publishers
-
-
All upstream publishers must have the same failure type.
-
- docs
- Usage
-
-
unit tests illustrating using
zip:UsingCombineTests/MergingPipelineTests.swift
-
- Details
-
Zipworks very similarly to combineLatest, connecting two upstream publishers and providing the output of those publishers as a single pipeline with a tuple output type composed of the types of the upstream publishers.Zip3supports connecting three upstream publishers, andzip4supports connecting four upstream publishers.
The notable difference from combineLatest is that zip waits for values to arrive from the upstream publishers, and will only publish a single new tuple when new values have been provided from all upstream publishers.
One example of using this is to wait until all streams have provided a single value to provide a synchronization point.
For example, if you have two independent network requests and require them to both be complete before continuing to process the results, you can use zip to wait until both publishers are complete before forwarding the combined tuples.
Other operators that merge multiple upstream pipelines include combineLatest and merge. If your upstream publishers have different types, but you want interleaved values to be propagated as they are available, use combineLatest. If your upstream publishers have the same type and you want a stream of single values, as opposed to tuples, then you probably want to use the merge operator.
Error Handling
See Error Handling for more detail on how you can design error handling.
catch
- Summary
-
The operator
catchhandles errors (completion messages of type.failure) from an upstream publisher by replacing the failed publisher with another publisher. Thecatchoperator also transforms the Failure type to<Never>. - Constraints on connected publisher
-
-
none
-
- Documentation reference
- Usage
-
-
Using catch to handle errors in a one-shot pipeline shows an example of using
catchto handle errors with a one-shot publisher. -
Using flatMap with catch to handle errors shows an example of using
catchwithflatMapto handle errors with a continual publisher.
-
- Details
-
Once
catchreceives a.failurecompletion, it won’t send any further incoming values from the original upstream publisher. You can also viewcatchas a switch that only toggles in one direction: to using a new publisher that you define, but only when the original publisher to which it is subscribed sends an error.
This is illustrated with the following example:
enum TestFailureCondition: Error {
    case invalidServerResponse
}

let simplePublisher = PassthroughSubject<String, Error>()

let _ = simplePublisher
    .catch { err in
        // must return a Publisher
        return Just("replacement value")
    }
    .sink(receiveCompletion: { fini in
        print(".sink() received the completion:", String(describing: fini))
    }, receiveValue: { stringValue in
        print(".sink() received \(stringValue)")
    })

simplePublisher.send("oneValue")
simplePublisher.send("twoValue")
simplePublisher.send(completion: Subscribers.Completion.failure(TestFailureCondition.invalidServerResponse))
simplePublisher.send("redValue")
simplePublisher.send("blueValue")
simplePublisher.send(completion: .finished)
In this example, we are using a PassthroughSubject so that we can control when and what gets sent from the publisher.
In the above code, we are sending two good values, then a failure, then attempting to send two more good values.
The values you would see printed from our .sink() closures are:
.sink() received oneValue
.sink() received twoValue
.sink() received replacement value
.sink() received the completion: finished
When the failure was sent through the pipeline, catch intercepts it and returns a replacement value.
The replacement publisher it used (Just) sends a single value and then a completion.
If we want the pipeline to remain active, we need to change how we handle the errors.
See the pattern Using flatMap with catch to handle errors for an example of how that can be achieved.
tryCatch
- Summary
-
A variant of the catch operator that also allows an
<Error>failure type, and doesn’t convert the failure type to<Never>. - Constraints on connected publisher
-
-
none
-
- docs
- Usage
- Details
-
tryCatchis a variant of catch that has a failure type of<Error>rather than catch’s failure type of<Never>. This allows it to be used where you want to immediately react to an error by creating another publisher that may also produce a failure type.
assertNoFailure
- Summary
-
Raises a fatal error when its upstream publisher fails, and otherwise republishes all received input and converts failure type to
<Never>. - Constraints on connected publisher
-
-
none
-
- docs
-
https://developer.apple.com/documentation/combine/publishers/assertnofailure
- Usage
- Details
-
If you need to verify that no error has occurred (treating the error output as an invariant), this is the operator to use. Like its namesakes, it will cause the program to terminate if the assert is violated.
Adding it into the pipeline requires no additional parameters, but you can include a string:
.assertNoFailure()
// OR
.assertNoFailure("What could possibly go wrong?")|
I’m not entirely clear on where that string would appear if you did include it. When trying out this code in unit tests, the tests invariably drop into a debugger at the assertion point when a .failure is processed through the pipeline. |
If you want to convert an failure type output of <Error> to <Never>, you probably want to look at the catch operator.
Apple asserts this function should be primarily used for testing and verifying internal sanity checks that are active during testing.
retry
- Summary
-
The
retryoperator is used to repeat requests to a previous publisher in the event of an error. - Constraints on connected publisher
-
-
failure type must be
<Error>
-
- docs
-
https://developer.apple.com/documentation/combine/publishers/retry
- Usage
-
-
unit tests illustrating using
retrywith dataTaskPublisher:UsingCombineTests/DataTaskPublisherTests.swift -
unit tests illustrating
retry:UsingCombineTests/RetryPublisherTests.swift
- Details
-
When you specify this operator in a pipeline and it receives a subscription, it first tries to request a subscription from its upstream publisher. If the response to that subscription fails, then it will retry the subscription to the same publisher.
The retry operator accepts a single parameter that specifies a number of retries to attempt.
|
Using |
If the number of retries is specified and all requests fail, then the .failure completion is passed down to the subscriber of this operator.
In practice, this is mostly commonly desired when attempting to request network resources with an unstable connection.
If you use a retry operator, you should add a specific number of retries so that the subscription doesn’t effectively get into an infinite loop.
struct IPInfo: Codable {
    // matching the data structure returned from ip.jsontest.com
    var ip: String
}
let myURL = URL(string: "http://ip.jsontest.com")
// NOTE(heckj): you'll need to enable insecure downloads
// in your  Info.plist for this example
// because the URL scheme is 'http'

let remoteDataPublisher = URLSession.shared.dataTaskPublisher(for: myURL!)
    // the dataTaskPublisher output combination is
    // (data: Data, response: URLResponse)
    .retry(3)
    // if the URLSession returns a .failure completion,
    // retry at most 3 times to get a successful response
    .map({ (inputTuple) -> Data in
        return inputTuple.data
    })
    .decode(type: IPInfo.self, decoder: JSONDecoder())
    .catch { err in
        return Publishers.Just(IPInfo(ip: "8.8.8.8"))
    }
    .eraseToAnyPublisher()
mapError
- Summary
-
Converts any failure from the upstream publisher into a new error.
- Constraints on connected publisher
-
-
Failure type is some instance of
Error
-
- docs
- Usage
-
-
unit tests illustrating
mapError:UsingCombineTests/ChangingErrorTests.swift
-
- Details
-
mapErroris an operator that allows you to transform the failure type by providing a closure where you convert errors from upstream publishers into a new type.mapErroris similar to replaceError, butreplaceErrorignores any upstream errors and returns a single kind of error, where this operator lets you construct using the error provided by the upstream publisher.
.mapError { error -> ChangingErrorTests.APIError in
    // if it's our kind of error already, we can return it directly
    if let error = error as? APIError {
        return error
    }
    // if it is a URLError, we can convert it into our more general error kind
    if let urlerror = error as? URLError {
        return APIError.networkError(from: urlerror)
    }
    // if all else fails, return the unknown error condition
    return APIError.unknown
}
Adapting publisher types
switchToLatest
- Summary
-
A publisher that flattens any nested publishers, using the most recent provided publisher.
- Constraints on connected publisher
-
-
none
-
- docs
- Usage
-
-
unit tests illustrating
switchToLatest:UsingCombineTests/SwitchAndFlatMapPublisherTests.swift
- Details
-
switchToLatestoperates similarly to flatMap, taking in a publisher instance and returning its value (or values). Where flatMap operates over the values it is provided,switchToLatestoperates on whatever publisher it is provided. The primary difference is in where it gets the publisher. In flatMap, the publisher is returned within the closure provided to flatMap, and the operator works upon that to subscribe and provide the relevant value down the pipeline. InswitchToLatest, the publisher instance is provided as the output type from a previous publisher or operator.
The most common form of using this is with a one-shot publisher such as Just getting its value as a result of a map transform.
It is also commonly used when working with an API that provides a publisher.
switchToLatest assists in taking the result of the publisher and sending that down the pipeline rather than sending the publisher as the output type.
The following snippet is part of the larger example Declarative UI updates from user input:
.map { username -> AnyPublisher<[GithubAPIUser], Never> in (2)
    return GithubAPI.retrieveGithubUser(username: username) (1)
}
// ^^ type returned in the pipeline is a Publisher, so we use
// switchToLatest to flatten the values out of that
// pipeline to return down the chain, rather than returning a
// publisher down the pipeline.
.switchToLatest() (3)| 1 | In this example, an API instance (GithubAPI) has a function that returns a publisher. |
| 2 | map takes an earlier String output type, returning a publisher instance. |
| 3 | We want to use the value from that publisher, not the publisher itself, which is exactly what switchToLatest provides. |
Controlling timing
debounce
- Summary
-
debounce collapses multiple values within a specified time window into a single value


- Constraints on connected publisher
-
-
none
-
- docs
- Usage
-
-
unit tests illustrating using
debounce:UsingCombineTests/DebounceAndRemoveDuplicatesPublisherTests.swift
-
- Details
-
The operator takes a minimum of two parameters, an amount of time over which to
debouncethe signal and a scheduler on which to apply the operations. The operator will collapse any values received within the timeframe provided to a single, last value received from the upstream publisher within the time window. If any value is received within the specified time window, it will collapse it. It will not return a result until the entire time window has elapsed with no additional values appearing.
This operator is frequently used with removeDuplicates when the publishing source is bound to UI interactions, primarily to prevent an "edit and revert" style of interaction from triggering unnecessary work.
If you wish to control the value returned within the time window, or if you want to simply control the volume of events by time, you may prefer to use throttle, which allows you to choose the first or last value provided.
delay
- Summary
-
Delays delivery of all output to the downstream receiver by a specified amount of time on a particular scheduler.
- Constraints on connected publisher
-
-
none
-
- docs
- Usage
- Details
-
The
delayoperator passes through the data after a delay defined to the operator. Thedelayoperator also requires a scheduler, where the delay is explicitly invoked.
.delay(for: 2.0, scheduler: headingBackgroundQueue)measureInterval
- Summary
-
measureIntervalmeasures and emits the time interval between events received from an upstream publisher, in turn publishing a value ofSchedulerTimeType.Stride(which includes a magnitude and interval since the last value). The specific upstream value is ignored beyond the detail of the time at which it was received. - Constraints on connected publisher
-
-
none
-
- docs
Output types:
-
Immediate.SchedulerTimeType.Stride
- Usage
-
-
unit tests illustrating using throttle:
UsingCombineTests/MeasureIntervalTests.swift
-
- Details
-
The operator takes a single parameter, the scheduler to be used. The output type is the type
SchedulerTimeType.Stridefor the scheduler you designate.
For example:
.measureInterval(using: q) // Output type is DispatchQueue.SchedulerTimeType.StrideThe magnitude (an Int) the stride is the number of nanoseconds since the last value, which is generally in nanoseconds.
You can also use the interval (a DispatchTimeInterval) which carries with it the specific units of the interval.
These values are not guaranteed on a high resolution timer, so use the resulting values judiciously.
throttle
- Summary
-
Throttleconstrains the stream to publishing zero or one value within a specified time window, independent of the number of elements provided by the publisher.
Timing diagram with latest set to true:

Timing diagram with latest set to false:

The timing examples in the marble diagrams are from the unit tests running under iOS 13.3.
- Constraints on connected publisher
-
-
none
-
- docs
- Usage
-
-
unit tests illustrating using
throttle:UsingCombineTests/DebounceAndRemoveDuplicatesPublisherTests.swift
-
- Details
-
Throttleis akin to the debounce operator in that it collapses values. The primary difference is thatdebouncewill wait for no further values, wherethrottlewill last for a specific time window and then publish a result. The operator will collapse any values received within the timeframe provided to a single value received from the upstream publisher within the time window. The value chosen within the time window is influenced by the parameterlatest.
If values are received very close to the edges of the time window, the results can be a little unexpected.
The operator takes a minimum of three parameters, for: an amount of time over which to collapse the values received, scheduler: a scheduler on which to apply the operations, and latest: a boolean indicating if the first value or last value should be chosen.
This operator is often used with removeDuplicates when the publishing source is bound to UI interactions, primarily to prevent an "edit and revert" style of interaction from triggering unnecessary work.
.throttle(for: 0.5, scheduler: RunLoop.main, latest: false)|
In iOS 13.2 the behavior for setting If you are relying on specific timing for some of your functions, double check you systems with tests to verify the behavior. The outputs for timing scenarios are detailed in comments within the throttle unit tests written for this book. |
timeout
- Summary
-
Terminates publishing if the upstream publisher exceeds the specified time interval without producing an element.
- Constraints on connected publisher
-
-
Requires the failure type to be
<Never>.
-
- docs
-
https://developer.apple.com/documentation/combine/publishers/timeout
- Usage
-
-
unit tests illustrating using
retryandtimeoutwithdataTaskPublisher:UsingCombineTests/DataTaskPublisherTests.swift
-
- Details
-
Timeoutwill force a resolution to a pipeline after a given amount of time, but does not guarantee either data or errors, only a completion. If atimeoutdoes trigger and force a completion, it will not generate an failure completion with an error.
Timeout is specified with two parameters: time and scheduler.
If you are using a specific background thread (for example, with the subscribe operator), then timeout should likely be using the same scheduler.
The time period specified will take a literal integer, but otherwise needs to conform to the protocol SchedulerTimeIntervalConvertible.
If you want to set a number from a Float or Int, you need to create the relevant structure, as Int or Float does not conform to SchedulerTimeIntervalConvertible.
For example, while using a DispatchQueue, you could use DispatchQueue.SchedulerTimeType.Stride.
let remoteDataPublisher = urlSession.dataTaskPublisher(for: self.mockURL!)
    .delay(for: 2, scheduler: backgroundQueue)
    .retry(5) // 5 retries, 2 seconds each ~ 10 seconds for this to fall through
    .timeout(5, scheduler: backgroundQueue) // max time of 5 seconds before failing
    .tryMap { data, response -> Data in
        guard let httpResponse = response as? HTTPURLResponse,
            httpResponse.statusCode == 200 else {
                throw TestFailureCondition.invalidServerResponse
        }
        return data
    }
    .decode(type: PostmanEchoTimeStampCheckResponse.self, decoder: JSONDecoder())
    .subscribe(on: backgroundQueue)
    .eraseToAnyPublisher()
Encoding and decoding
encode
- Summary
-
Encodeconverts the output from upstream Encodable object using a specified TopLevelEncoder. For example, useJSONEncoderorPropertyListEncoder.. - Constraints on connected publisher
-
-
Available when the output type conforms to
Encodable.
-
- docs
-
https://developer.apple.com/documentation/combine/publishers/encode
- Usage
-
-
unit tests illustrating using
encodeanddecode:UsingCombineTests/EncodeDecodeTests.swift
-
- Details
-
The
encodeoperator takes a single parameter:encoderThis is an instance of an object conforming to TopLevelEncoder. Frequently it is an instance of JSONEncoder or PropertyListEncoder.
fileprivate struct PostmanEchoTimeStampCheckResponse: Codable {
    let valid: Bool
}

let dataProvider = PassthroughSubject<PostmanEchoTimeStampCheckResponse, Never>()
    .encode(encoder: JSONEncoder())
    .sink { data in
        print(".sink() data received \(data)")
        let stringRepresentation = String(data: data, encoding: .utf8)
        print(stringRepresentation)
    })
Like the decode operator, the encode process can also fail and throw an error.
Therefore it also returns a failure type of <Error>.
|
A common issue is if you try to pass an optional type to the |
decode
- Summary
-
A commonly desired operation is to decode some provided data, so Combine provides the
decodeoperator suited to that task. - Constraints on connected publisher
-
-
Available when the output type conforms to
Decodable.
-
- docs
-
https://developer.apple.com/documentation/combine/publishers/decode
- Usage
- Details
-
The
decodeoperator takes two parameters:-
typewhich is typically a reference to a struct you defined -
decoderan instance of an object conforming to TopLevelDecoder, frequently an instance of JSONDecoder or PropertyListDecoder.
-
Since decoding can fail, the operator returns a failure type of Error.
The data type returned by the operator is defined by the type you provided to decode.
let testUrlString = "https://postman-echo.com/time/valid?timestamp=2016-10-10"
// checks the validity of a timestamp - this one should return {"valid":true}
// matching the data structure returned from https://postman-echo.com/time/valid
fileprivate struct PostmanEchoTimeStampCheckResponse: Decodable, Hashable {
    let valid: Bool
}

let remoteDataPublisher = URLSession.shared.dataTaskPublisher(for: URL(string: testUrlString)!)
    // the dataTaskPublisher output combination is (data: Data, response: URLResponse)
    .map { $0.data }
    .decode(type: PostmanEchoTimeStampCheckResponse.self, decoder: JSONDecoder())
Working with multiple subscribers
share
- Summary
-
A publisher implemented as a class, which otherwise behaves like its upstream publisher.
- Constraints on connected publisher
-
-
none
-
- docs
-
https://developer.apple.com/documentation/combine/publishers/share
- Usage
-
-
shareandMulticastPublisherare illustrated in the unit testsUsingCombineTests/MulticastSharePublisherTests.swift
-
- Details
-
A publisher is often a struct within swift, following value semantics.
shareis used when you want to create a publisher as a class to take advantage of reference semantics. This is most frequently employed when creating a publisher that does expensive work so that you can isolate the expensive work and use it from multiple subscribers.
Very often, you will see share used to provide multicast - to create a shared instance of a publisher and have multiple subscribers connected to that single publisher.
let expensivePublisher = somepublisher
    .share()
multicast
- Summary
-
Use a multicast publisher when you have multiple downstream subscribers, but you want upstream publishers to only process one receive(_:) call per event.
- Constraints on connected publisher
-
-
none
-
- docs
-
https://developer.apple.com/documentation/combine/publishers/multicast
- Usage
-
-
shareandMulticastPublisherare illustrated in the unit testsUsingCombineTests/MulticastSharePublisherTests.swift
-
- Details
-
A multicast publisher provides a means of consolidating the requests of data from a publisher into a single request. A multicast publisher does not change data or types within a pipeline. It does provide a bastion for subscriptions so that when demand is created from one subscriber, multiple subscribers can benefit from it. It effectively allows one value to go to multiple subscribers.
Multicast is often created after using share on a publisher to create a reference object as a publisher. This allows you to consolidate expensive queries, such as external network requests, and provide the data to multiple consumers.
When creating using multicast, you either provide a Subjects (with the parameter `subject) or create a Subjects inline in a closure.
let pipelineFork = PassthroughSubject<Bool, Error>()
let multicastPublisher = somepublisher.multicast(subject: pipelineFork)
let multicastPublisher = somepublisher
.multicast {
PassthroughSubject<Bool, Error>()
}A multicast publisher does not cache or maintain the history of a value. If a multicast publisher is already making a request and another subscriber is added after the data has been returned to previously connected subscribers, new subscribers may only get a completion. For this reason, multicast returns a connectable publisher.
|
When making a multicast publisher, make sure you explicitly connect the publishers or you will see no data flow through your pipeline.
Do this either using |
Debugging
breakpoint
- Summary
-
The
breakpointoperator raises a debugger signal when a provided closure identifies the need to stop the process in the debugger. - Constraints on connected publisher
-
-
none
-
- docs
-
https://developer.apple.com/documentation/combine/publishers/breakpoint
- Usage
- Details
-
When any of the provided closures returns true, this publisher raises a
SIGTRAPsignal to stop the process in the debugger. Otherwise, this publisher passes through values and completions.
The operator takes 3 optional closures as parameters, used to trigger when to raise a SIGTRAP signal:
-
receiveSubscription -
receiveOutput -
receiveCompletion
.breakpoint(receiveSubscription: { subscription in
    return false // return true to throw SIGTRAP and invoke the debugger
}, receiveOutput: { value in
    return false // return true to throw SIGTRAP and invoke the debugger
}, receiveCompletion: { completion in
    return false // return true to throw SIGTRAP and invoke the debugger
})
breakpointOnError
- Summary
-
Raises a debugger signal upon receiving a failure.
- Constraints on connected publisher
-
-
none
-
- docs
-
https://developer.apple.com/documentation/combine/publishers/breakpoint/3205192-breakpointonerror
- Usage
- Details
-
breakpointOnErroris a convenience method used to raise aSIGTRAPsignal when an error is propagated through it within a pipeline.
.breakpointOnError()handleEvents
- Summary
-
handleEventsis an all purpose operator that allow you to specify closures be invoked when publisher events occur. - Constraints on connected publisher
-
-
none
-
- docs
-
https://developer.apple.com/documentation/combine/publishers/handleevents
- Usage
-
-
unit tests illustrating using
handleEvents:UsingCombineTests/HandleEventsPublisherTests.swift
-
- Details
-
handleEventsdoes not require any parameters, allowing you to specify a response to specific publisher events. Optional closures can be provided for the following events:-
receiveSubscription -
receiveOutput -
receiveCompletion -
receiveCancel -
receiveRequest
-
All of the closures are expected to return Void, which makes handleEvents useful for intentionally creating side effects based on what is happening in the pipeline.
You could, for example, use handleEvents to update an activityIndicator UI element, triggering it on with the receipt of the subscription, and terminating with the receipt of either cancel or completion.
If you only want to view the information flowing through the pipeline, you might consider using the print operator instead.
.handleEvents(receiveSubscription: { _ in
    DispatchQueue.main.async {
        self.activityIndicator.startAnimating()
    }
}, receiveCompletion: { _ in
    DispatchQueue.main.async {
        self.activityIndicator.stopAnimating()
    }
}, receiveCancel: {
    DispatchQueue.main.async {
        self.activityIndicator.stopAnimating()
    }
})- Summary
-
Prints log messages for all publishing events.
- Constraints on connected publisher
-
-
none
-
- docs
-
https://developer.apple.com/documentation/combine/publishers/print
- Usage
-
-
unit tests illustrating using
print:UsingCombineTests/PublisherTests.swift
-
- Details
-
The
printoperator does not require a parameter, but if provided will prepend it to any console output.
Print is incredibly useful to see "what’s happening" within a pipeline, and can be used as printf debugging within the pipeline.
Most of the example tests illustrating the operators within this reference use a print operator to provide additional text output to illustrate lifecycle events.
The print operator is not directly integrated with Apple’s unified logging, although there is an optional to parameter that lets you specific an instance conforming to TextOutputStream to which it will send the output.
let _ = foo.$username
    .print(self.debugDescription)
    .tryMap({ myValue -> String in
        if (myValue == "boom") {
            throw FailureCondition.selfDestruct
        }
        return "mappedValue"
    })
Scheduler and Thread handling operators
receive
- Summary
-
Receivedefines the scheduler on which to receive elements from the publisher. - Constraints on connected publisher
-
-
none
-
- docs
- Usage
-
-
使用 assign 创建一个订阅者 shows an example of using
receivewithassignto set an a boolean property on a UI element. -
unit tests illustrating using
assignwith adataTaskPublisher, as well assubscribeandreceive:UsingCombineTests/SubscribeReceiveAssignTests.swift
-
- Details
-
Receivetakes a single required parameter (on:) which accepts a scheduler, and an optional parameter (optional:) which can acceptSchedulerOptions. Scheduler is a protocol in Combine, with the conforming types that are commonly used of RunLoop, DispatchQueue and OperationQueue.Receiveis frequently used with assign to make sure any following pipeline invocations happen on a specific thread, such asRunLoop.mainwhen updating user interface objects.Receiveeffects itself and any operators chained after it, but not previous operators.
If you want to influence a previously chained publishers (or operators) for where to run, you may want to look at the subscribe operator.
Alternately, you may also want to put a receive operator earlier in the pipeline.
examplePublisher.receive(on: RunLoop.main)subscribe
- Summary
-
Subscribedefines the scheduler on which to run a publisher in a pipeline. - Constraints on connected publisher
-
-
none
-
- docs
- Usage
-
-
Creating a subscriber with assign shows an example of using assign to set an a boolean property on a UI element.
-
unit tests illustrating using an
assignsubscriber in a pipeline from adataTaskPublisherwithsubscribeandreceive:UsingCombineTests/SubscribeReceiveAssignTests.swift
-
- Details
-
Subscribeassigns a scheduler to the preceding pipeline invocation. It is relatively infrequently used, specifically to encourage a publisher such as Just or Deferred to run on a specific queue. If you want to control which queue operators run on, then it is more common to use the receive operator, which effects all following operators and subscribers.
Subscribe takes a single required parameter (on:) which accepts a scheduler, and an optional parameter (optional:) which can accept SchedulerOptions.
Scheduler is a protocol in Combine, with the conforming types that are commonly used of RunLoop, DispatchQueue and OperationQueue.
Subscribe effects a subset of the functions, and does not guarantee that a publisher will run on that queue.
In particular, it effects a publishers receive function, the subscribers request function, and the cancel function.
Some publishers (such as URLSession.dataTaskPublisher) have complex internals that will run on alternative queues based on their configuration, and will be relatively unaffected by subscribe.
networkDataPublisher
    .subscribe(on: backgroundQueue) (1)
    .receive(on: RunLoop.main) (2)
.assign(to: \.text, on: yourLabel) (3)| 1 | the subscribe call requests the publisher (and any pipeline invocations before this in a chain) be invoked on the backgroundQueue. |
| 2 | the receive call transfers the data to the main runloop, suitable for updating user interface elements |
| 3 | the assign call uses the assign subscriber to update the property text on a KVO compliant object, in this case yourLabel. |
|
When creating a This is not enforced by the compiler or any internal framework constraints. |
Type erasure operators
eraseToAnyPublisher
- Summary
-
The
eraseToAnyPublisheroperator takes a publisher and provides a type erased instance of AnyPublisher. - Constraints on connected publisher
-
-
none
-
- docs
-
https://developer.apple.com/documentation/combine/anypublisher
- Usage
- Details
-
When chaining operators together, the resulting type signature accumulates all the various types. This can get complicated quite quickly, and can provide an unnecessarily complex signature for an API.
eraseToAnyPublisher takes the signature and "erases" the type back to the common type of AnyPublisher.
This provides a cleaner type for external declarations.
Combine was created prior to Swift 5 inclusion of opaque types, which may have been an alternative.
.eraseToAnyPublisher() (1)| 1 | eraseToAnyPublisher is often at the end of chains of operators, cleaning up the signature of the returned property. |
AnySubscriber
- Summary
-
The
AnySubscriberprovides a type erased instance of AnySubscriber. - Constraints on connected publisher
-
-
none
-
- docs
-
https://developer.apple.com/documentation/combine/anysubscriber
- Usage
-
-
none
-
- Details
-
Use an
AnySubscriberto wrap an existing subscriber whose details you don’t want to expose. You can also useAnySubscriberto create a custom subscriber by providing closures for the methods defined inSubscriber, rather than implementingSubscriberdirectly.
Subjects
General information on Subjects can be found in the Core Concepts section.
currentValueSubject
- Summary
-
CurrentValueSubjectcreates an object that can be used to integrate imperative code into a pipeline, starting with an initial value. - docs
- Usage
- Details
-
currentValueSubjectcreates an instance to which you can attach multiple subscribers. When creating acurrentValueSubject, you do so with an initial value of the relevant output type for the Subject.
CurrentValueSubject remembers the current value so that when a subscriber is attached, it immediately receives the current value.
When a subscriber is connected and requests data, the initial value is sent.
Further calls to .send() afterwards will then pass through values to any subscribers.
PassthroughSubject
- Summary
-
PassthroughSubjectcreates an object that can be used to integrate imperative code into a Combine pipeline. - docs
- Usage
- Details
-
PassthroughSubjectcreates an instance to which you can attach multiple subscribers. When it is created, only the types are defined.
When a subscriber is connected and requests data, it will not receive any values until a .send() call is invoked.
PassthroughSubject doesn’t maintain any state, it only passes through provided values.
Calls to .send() will then send values to any subscribers.
PassthroughSubject is commonly used in scenarios where you want to create a publisher from imperative code.
One example of this might be a publisher from a delegate callback structure, common in Apple’s APIs.
Another common use is to test subscribers and pipelines, providing you with imperative control of when events are sent within a pipeline.
This is very useful when creating tests, as you can put when data is sent to a pipeline under test control.
Subscribers
For general information about subscribers and how they fit with publishers and operators, see Subscribers.
assign
- Summary
-
Assigncreates a subscriber used to update a property on a KVO compliant object. - Constraints on connected publisher
-
-
Failure type must be
<Never>.
-
- docs
- Usage
-
-
Creating a subscriber with assign shows an example of using
assignto set an a boolean property on a UI element. -
unit tests illustrating using an
assignsubscriber in a pipeline from adataTaskPublisherwithsubscribeandreceive:UsingCombineTests/SubscribeReceiveAssignTests.swift
-
- Details
-
Assignonly handles data, and expects all errors or failures to be handled in the pipeline before it is invoked. The return value from setting upassigncan be cancelled, and is frequently used when disabling the pipeline, such as when a viewController is disabled or deallocated.Assignis frequently used in conjunction with the receive operator to receive values on a specific scheduler, typicallyRunLoop.mainwhen updating UI objects.
The type of KeyPath required for the assign operator is important.
It requires a ReferenceWritableKeyPath, which is different from both WritableKeyPath and KeyPath.
In particular, ReferenceWritableKeyPath requires that the object you’re writing to is a reference type (an instance of a class), as well as being publicly writable.
A WritableKeyPath is one that’s a mutable value reference (a mutable struct), and KeyPath reflects that the object is simply readable by keypath, but not mutable.
It is not always clear (for example, while using code-completion from the editor) what a property may reflect.
examplePublisher
    .receive(on: RunLoop.main)
.assign(to: \.text, on: yourLabel)|
An error you may see: This happens when you are attempting to assign to a property that is read-only.
An example of this is Another error you might see on using the Xcode 11.7 supplies improved swift compiler diagnostics, which enable an easier to understand error message: This error can occur when you are attempting to assign a non-optional type to a keypath that expects has an optional type.
For example, The solution is to either use sink, or to include a |
sink
- Summary
-
Sinkcreates an all-purpose subscriber. At a minimum, you provide a closure to receive values, and optionally a closure that receives completions. - Constraints on connected publisher
-
-
none
-
- docs
- Usage
-
-
Creating a subscriber with sink shows an example of creating a
sinkthat receives both completion messages as well as data from the publisher. -
unit tests illustrating a
sinksubscriber and how it works:UsingCombineTests/SinkSubscriberTests.swift
-
- Details
-
There are two forms of the
sinkoperator. The first is the simplest form, taking a single closure, receiving only the values from the pipeline (if and when provided by the publisher). Using the simpler version comes with a constraint: the failure type of the pipeline must be<Never>. If you are working with a pipeline that has a failure type other than<Never>you need to use the two closure version or add error handling into the pipeline itself.
An example of the simple form of sink:
let examplePublisher = Just(5)

let cancellable = examplePublisher.sink { value in
    print(".sink() received \(String(describing: value))")
}
Be aware that the closure may be called repeatedly. How often it is called depends on the pipeline to which it is subscribing. The closure you provide is invoked for every update that the publisher provides, up until the completion, and prior to any cancellation.
|
It may be tempting to ignore the cancellable you get returned from However, this has the side effect that as soon as the function returns, the ignored variable is deallocated, causing the pipeline to be cancelled. If you want the pipeline to operate beyond the scope of the function (you probably do), then assign it to a longer lived variable that doesn’t get deallocated until much later. Simply including a variable declaration in the enclosing object is often a good solution. |
The second form of sink takes two closures, the first of which receives the data from the pipeline, and the second receives pipeline completion messages.
The closure parameters are receiveCompletion and receiveValue:
A .failure completion may also encapsulate an error.
An example of the two-closure sink:
let examplePublisher = Just(5)

let cancellable = examplePublisher.sink(receiveCompletion: { err in
    print(".sink() received the completion", String(describing: err))
}, receiveValue: { value in
    print(".sink() received \(String(describing: value))")
})
The type that is passed into receiveCompletion is the enum Subscribers.Completion.
The completion .failure includes an Error wrapped within it, providing access to the underlying cause of the failure.
To get to the error within the .failure completion, switch on the returned completion to determine if it is .finished or .failure, and then pull out the error.
When you chain a .sink subscriber onto a publisher (or pipeline), the result is cancellable.
At any time before the publisher sends a completion, the subscriber can send a cancellation and invalidate the pipeline.
After a cancel is sent, no further values will be received.
let simplePublisher = PassthroughSubject<String, Never>()
let cancellablePipeline = simplePublisher.sink { data in
  // do what you need with the data...
}

cancellablePublisher.cancel() // when invoked, this invalidates the pipeline
// no further data will be received by the sink
similar to publishers having a type-erased struct AnyPublisher to expose publishers through an API, subscribers have an equivalent: AnyCancellable. This is often used with sink to convert the resulting type into AnyCancellable.
onReceive
- Summary
-
onReceiveis a subscriber built into SwiftUI that allows publishers to be linked into local views to trigger relevant state changes. - Constraints on connected publisher
-
-
Failure type must be
<Never>
-
- docs
- Usage
-
-
The SwiftUI example code at
SwiftUI-Notes/HeadingView.swift -
The SwiftUI example code at
SwiftUI-Notes/ReactiveForm.swift
-
- Details
-
onReceiveis a subscriber, taking a reference to a publisher, a closure which is invoked when the publisher provided toonReceivereceives data. This acts very similarly to the sink subscriber with a single closure, including requiring that the failure type of the publisher be<Never>.onReceivedoes not automatically invalidate the view, but allows the developers to react to the published data in whatever way is appropriate - this could be updating some local view property (@State) with the value directly, or first transforming the data in some fashion.
A common example of this with SwiftUI is hooking up a publisher created from a Timer, which generates a Date reference, and using that to trigger an update to a view from a timer.
AnyCancellable
- Summary
-
AnyCancellabletype erases a subscriber to the general form of Cancellable. - docs
-
https://developer.apple.com/documentation/combine/anycancellable
- Usage
- Details
-
This is used to provide a reference to a subscriber that allows the use of
cancelwithout access to the subscription itself to request items. This is most typically used when you want a reference to a subscriber to clean it up on deallocation. Since the assign returns anAnyCancellable, this is often used when you want to save the reference to a sink anAnyCancellable.
var mySubscriber: AnyCancellable?

let mySinkSubscriber = remotePublisher
    .sink { data in
        print("received ", data)
    }
mySubscriber = AnyCancellable(mySinkSubscriber)
A pattern that is supported with Combine is collecting AnyCancellable references into a set and then saving references to the cancellable subscribers with a store method.
private var cancellableSet: Set<AnyCancellable> = []

let mySinkSubscriber = remotePublisher
    .sink { data in
        print("received ", data)
    }
    .store(in: &cancellableSet)