TDD(Test-driven development) 是我们常聊的一种开发方式,我曾在开发 BFF(Backend For Frontend) 时实践 TDD,大为受益,也在编写 iOS 的 ViewModel 层时略有实践,但除了 ViewModel 层以外的许多场景,我都困惑于怎么实践 TDD,所以我阅读了 iOS Test-Driven Development 这本书,希望能从中找到答案。
本篇将不会介绍如何在 iOS 项目中编写单元测试等基础概念,而是着重于分享如何对我平时觉得难以测试的部分进行 TDD。
什么是 TDD
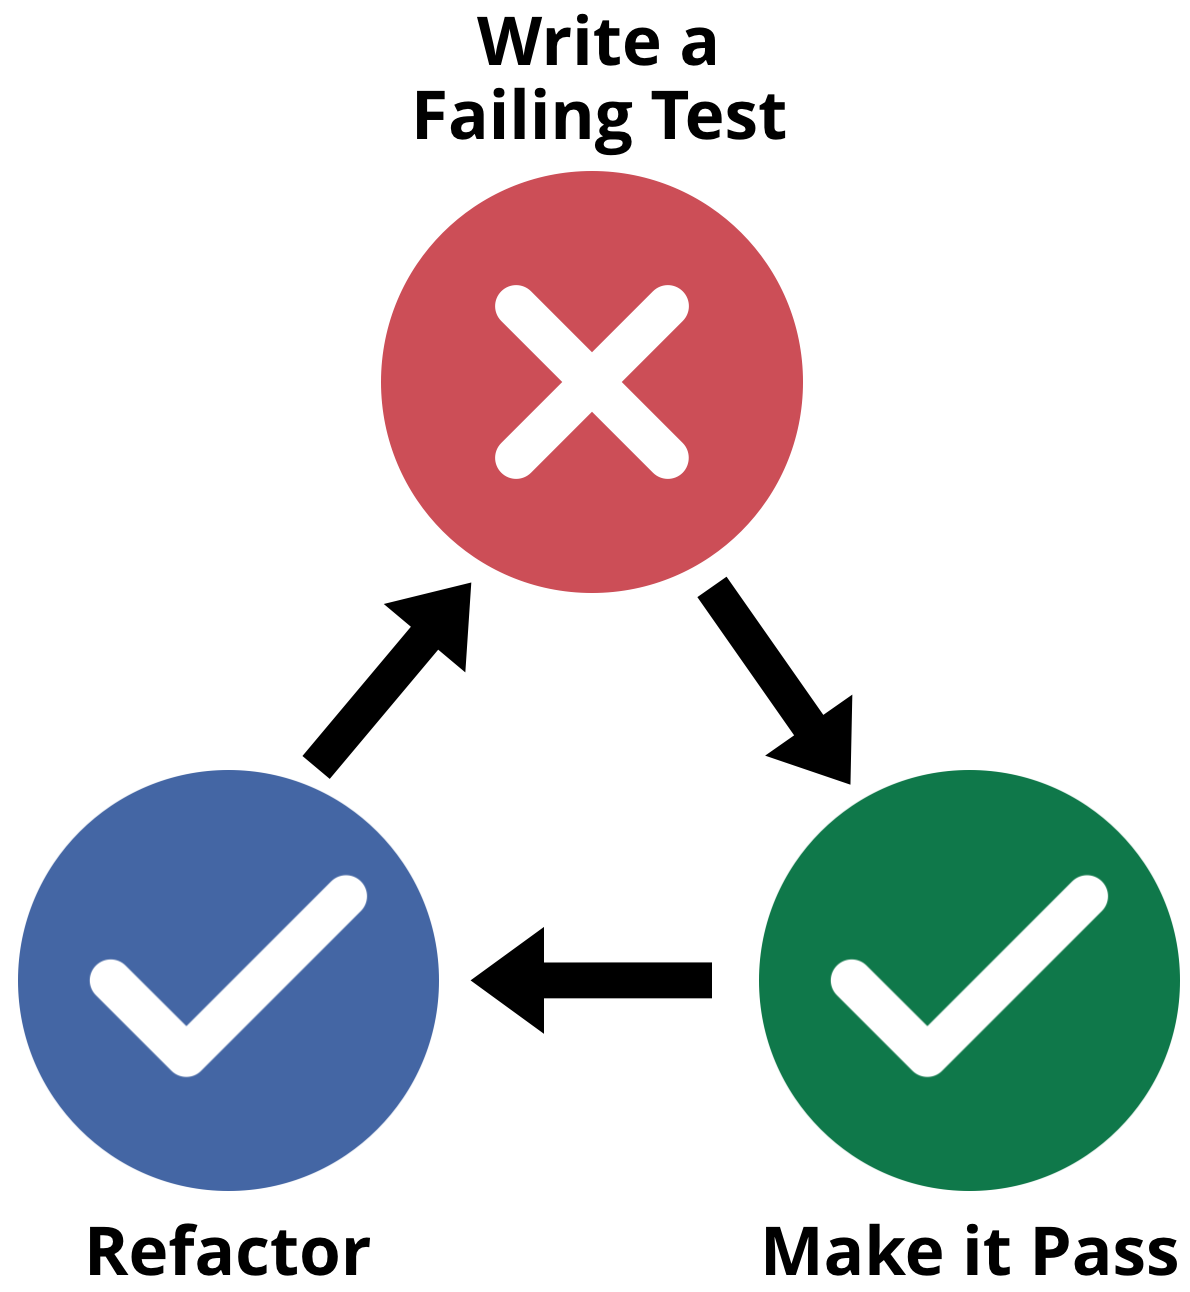
TDD 顾名思义,就是用测试驱动开发,先写测试程序,然后编码实现其功能。下图非常形象地展示了 TDD 的过程。
 本图片出自书中
- 先写一个失败的等待被实现的测试用例
- 然后编写实现代码使测试通过
- 重构代码
- 重复此过程
针对什么是 TDD 以及它的优缺点和争论,在这儿就不展开讲了,如果不熟悉的同学可以在网上查阅一下资料。
可遵循的一种测试编写规范
1
2
3
4
5
6
7
8
9
10
11
func testAppModel_whenStarted_isInInProgressState() {
  // 1 given app in not started
  let sut = AppModel()

  // 2 when started
  sut.start()

  // 3 then it is in inProgress
  let observedState = sut.appState
  XCTAssertEqual(observedState, AppState.inProgress)
}
- 首先是测试的命名,建议要描述出测试的条件和意图,可以使用 testgiven_when_then 的模式来对测试命名,这样在测试日志中就能轻易地看出是哪里出错了。
- sut 是 system under test 的缩写,如果都遵循这个变量命名的话,是非常简洁易懂的。
最重要的是测试方法的结构,同样按照 given/when/then 来进行:
- given 一般即系统的初始状态
- when 则是会影响系统的行为、事件或状态改变
- then 则是对得到的结果和预期进行比对
第一个测试
第一个测试,往往是从测试一个还没有的类开始的,比如我们希望测试一个类 AppModel 刚初始化完之后的状态
1
2
3
4
5
func testAppModel_whenInitialized_isInNotStartedState() {
  let sut = AppModel()
  let initialState = sut.appState
  XCTAssertEqual(initialState, AppState.notStarted)
}
这个时候我们其实都还没有创建 AppModel 这个类,一定记住,测试先行,我们把编译错误也认为是测试失败,因此我们已经做到了 TDD 的第一步,Red,即写了一个失败的测试。
怎么对 ViewController 进行测试
The important thing when testing view controllers is to not test the views and controls directly. This is better done using UI automation tests. Here, the goal is to check the logic and state of the view controller.
我们测试的是 ViewController 的逻辑和状态,而视图和交互组件的测试则交给 UI 测试。怎么样才能使其中的逻辑和状态更容易被测试呢,想必对架构有所研究的同学们应该知道答案了,那就是使用 MVVM 或者 VIPER 等架构,把逻辑从 ViewController 中抽取出来,使得 ViewModel 变得容易被测试。
这里我们还是先从 MVC 的架构入手,看看如何进行测试。
如何获取正确加载的 ViewController 实例
在测试中,如果我们使用 let sut = ViewController() 去实例化 ViewController 然后对其中的一些状态进行测试,那么和我们正常启动 App 运行 ViewController 的过程是不一样的,这个实例是没有被正确初始化的,因此在使用其测试时不能获取到它正确的子视图或者一些状态。因此我们需要找到一种办法获取正确的 ViewController 实例。
从 App 的运行环境中获取
其实在运行测试时,Xcode 是会运行一个 Host Application 的,默认会运行我们的 App Target,这就是有时候我们在跑测试时,会看到在模拟器运行 App 的原因,其实测试都是被运行在 App 的上下文中的,我们可以取到 UIApplication 对象以及整个视图层级。
1
2
3
4
let window = UIApplication.shared.windows[0]
let rootViewController = window.rootViewController
// 取到 rootViewController 之后,根据你自己的视图层级,获取想要的 VC
let yourViewController = rootViewController.children.first { $0 is YourViewController }
通过上面的代码片段,我们即可取到 App 运行起来之后你想要的 ViewController 的正确实例。
实例化并加载视图
如果你的视图是从 Storyboard 加载的,那么可以使用以下方法正确的实例化一个 ViewController
1
2
3
let storyboard = UIStoryboard(name: "Main", bundle: nil)
let yourViewController = storyboard.instantiateViewcontroller(withIdentifier: "yourViewController") as! YourViewController
yourViewController.loadViewIfNeeded()
从 xib 加载也是类似的。
测试 ViewController 中的状态或逻辑
获取到 ViewController 的实例后,然后我们就要甄别出 UI 之外的状态和逻辑,这样测试起来就和 ViewModel 很类似了。比如对其中的某个方法进行测试,期望它正确的修改了 ViewController 中的变量:
1
2
3
4
5
6
7
8
9
10
func testDataModel_whenGoalUpdate_updatesToNewGoal() {
  // given
  let sut = yourViewController

  // when
  sut.updateGoal(newGoal: 50)

  // then
  XCTAssertEqual(sut.goal, 50)
}
我们对 ViewController 的测试,不需要追求 100% 的测试覆盖率,因为视图部分的测试将被 UI automation 测试所覆盖。
对异步事件进行测试
在上个例子中使用 XCTAssert 断言语句时,我们测试的是同步事件,那么如何对异步耗时事件进行测试呢?这也是 iOS 测试中需要面临的重要问题。
XCTestExpectation 为我们测试异步事件提供了很好的能力,它主要分别两部分:expectation 和 waiter。 waiter 会一直等待 expectation 被 fulfill,然后再继续执行;或者在等不到的某个时间之后超时失败。
1
2
3
4
5
6
7
8
9
10
11
12
13
14
15
16
17
18
func testStoryLoading() throws {
    let parser = FeedParser()

    // create the expectation
    let exp = expectation(description: "Loading stories")

    // call my asynchronous method
    parser.loadStories {
        // when it finishes, mark my expectation as being fulfilled
        exp.fulfill()
    }

    // wait three seconds for all outstanding expectations to be fulfilled
    waitForExpectations(timeout: 3)

    // our expectation has been fulfilled, so we can check the result is correct
    XCTAssertEqual(parser.stories.count, 20, "We should have loaded exactly 20 stories.")
}
这就是我们如何测试异步事件的。
一些特殊异步事件的测试
XCTestExpectation 还有一些别的方法,可以用来方便的测试一些其它的异步场景,比如下面的方法可以用来针对性的测试通知事件。
1
func expectation(forNotification notificationName: NSNotification.Name, object objectToObserve: Any?, handler: XCTNSNotificationExpectation.Handler? = nil) -> XCTestExpectation
使用 XCTKVOExpectation 可以观察某一个 keyPath 的改变;使用 XCTNSPredicateExpectation 可以监听某一个 predicate 是否为真。
在使用 expectation 时的一个好的实践是:总是在异步回调中调用 fulfill(),就算是对于一些异步事件中的错误,也不要依赖超时去抛出错误,而是应该在 fulfill 之后,使用断言语句检查期望的错误。等待 wait 超时是非常浪费时间的。
Dependency Injection & Mocks
我们在对系统进行测试时,难免会遇到受外部依赖的限制这种情况,比如依赖网络请求获取到的数据,依赖三方库提供的能力等等。这种依赖是不稳定的,并且我们如果在测试时真正去做发起网络请求类似的事情,会非常浪费时间,因此我们会把依赖分离开来,通过注入的方式,给系统提供某种能力,然后在测试时,使用 Test Doubles 来模仿出这种能力,进而不影响系统的测试。Mock 是 Test Double 的非正式叫法。
提到 Test Doubles,不得不说一下它的几种不同类型: Stub、Spy、Mock、Fake。
Test Doubles 的不同类型
以下例子来自 The Little Mocker,为 Java 代码。
假设现在有一个接口
interface Authorizer {
  public Boolean authorize(String username, String password);
}
如果希望创建该接口的 test doubles 的话,我们分别来看几种不同的形式。
Stub
用来返回 hard coded 的数据,推荐使用。
1
2
3
4
5
public class AcceptingAuthorizerStub implements Authorizer {
  public Boolean authorize(String username, String password) {
	  return true;
  }
}
Spy
用来返回 hard coded 的数据,并且记录一些信息,不推荐使用但对于复杂情况可以接受,容易使测试和代码实现强耦合。
1
2
3
4
5
6
7
8
public class AcceptingAuthorizerSpy implements Authorizer {
  public boolean authorizeWasCalled = false;

  public Boolean authorize(String username, String password) {
    authorizeWasCalled = true;
    return true;
  }
}
Mock
用来返回 hard coded 的数据,同时记录一些信息,并且进行断言验证。Mock 总是包含 Spy 的,它更多的是验证行为,哪些函数被调用了、都有哪些参数、何时以及调用次数等行为。不推荐使用,因为它讲断言的验证隐藏在了 Mock 中。
1
2
3
4
5
6
7
8
9
10
11
12
public class AcceptingAuthorizerVerificationMock implements Authorizer {
  public boolean authorizeWasCalled = false;

  public Boolean authorize(String username, String password) {
    authorizeWasCalled = true;
    return true;
  }

  public boolean verify() {
	  return authorizedWasCalled;
  }
}
Fake
根据不同的逻辑返回不同的假数据,完全不推荐,因为它包含了真正的业务逻辑在里面,还需要给 Fake 再写测试。
public class AcceptingAuthorizerFake implements Authorizer {
  public Boolean authorize(String username, String password) {
    return username.equals("Bob");
  }
}
Dependency Injection
现在假设我们正在做一个计步器的 App,我们获取步数的数据来源是 Apple 的 CoreMotion 框架提供给我们的 CMPedometer 类。一个预期的功能是,当点击开始时,来启动 CMPedometer 服务。根据这个 case,可以写出一个下面这样的测试:
1
2
3
4
5
6
7
8
9
10
11
12
13
14
15
func testAppModel_whenStarted_startsPedometer() {
  //given
  let sut = AppModel()
  let exp = expectation(for: NSPredicate(block:
  { thing, _ -> Bool in
    return (thing as! AppModel).pedometerStarted
  }), evaluatedWith: sut, handler: nil)

  // when
  sut.start()

  // then
  wait(for: [exp], timeout: 1)
  XCTAssertTrue(sut.pedometerStarted)
}
基于以上测试,AppModel 的实现可以是这样的:
1
2
3
4
5
6
7
8
9
10
11
12
class AppModel {
  let pedometer = CMPedometer()
  private(set) var pedometerStarted = false

  func start() {
    pedometer.startEventUpdates { event, error in
      if error == nil {
        self.pedometerStarted = true
      }
    }
  }
}
如果我们在真实的设备上执行测试,并且给予了获取步数的权限,这个测试是可以通过的。但是请注意我们给测试通过加了两个前提,这是不正常的,这时候就该 Test Doubles 出场了,创建 Mock 的对象,来摆脱外部的依赖。一起来看看怎么做吧!
我们希望测试的是点击了 start 之后,之后的行为是正确的。那么可以通过模拟 start() 函数,来验证期望的行为。怎么将 CMPedometer 这个外部依赖进行分离呢,一个好的方式就是通过注入的方式提供给消费它的对象。
首先创建一个协议,来提供 start() 应该有的行为,并让 CMPedometer 实现这个协议。
1
2
3
4
5
6
7
8
9
10
11
protocol Pedometer {
  func start()
}

extension CMPedometer: Pedometer {
  func start() {
    startEventUpdates { event, error in
      // do nothing here for now
    }
  }
}
然后来重构 AppModel,注入 Pedometer 服务。
1
2
3
4
5
6
7
8
9
10
11
class AppModel {
  let pedometer: Pedometer

  init(pedometer: Pedometer = CMPedometer()) {
    self.pedometer = pedometer
  }

  func start() {
    pedometer.start()
  }
}
然后再去重构测试,创建 PedometerSpy。
1
2
3
4
5
6
7
8
9
10
11
12
13
14
15
16
17
18
19
class PedometerSpy: Pedometer {
  private(set) var started: Bool = false

  func start() {
    started = true
  }
}

func testAppModel_whenStarted_startsPedometer() {
  //given
  var pedometerSpy = PedometerSpy()
  let sut = AppModel(pedometer: pedometerSpy)

  // when
  sut.start()

  // then
  XCTAssertTrue(pedometerSpy.started)
}
这样就完成了外部依赖的分离,成功的创建一个 Mock 的对象,来完成我们的测试。
其它的外部依赖,比如网络请求,都可以用这种模式进行分离。

Comments powered by Disqus.