我们在使用地图服务时,需要结合 Core Location 和 MapKit 两个框架,Core Location 主要是提供用户当前的位置和方向等信息,MapKit 用来显示地图、标注点、路径等信息。可以把 MapKit 理解为 View 层用来展示 Core Location 获取到的数据。
获取位置权限
在使用位置服务前,首先需要获取权限,并在每次使用前都检查权限,因为用户可以自己在设置中开关权限。目前权限有 5 种状态,定位精度有两种状态:
1
2
3
4
5
6
7
8
9
10
11
12
13
14
15
16
17
18
19
enum CLAuthorizationStatus {
    // 用户还未做出选择
    case notDetermined = 0
    // 受限制,可能是家长控制等
    case restricted = 1
    // 用户明确拒绝
    case denied = 2
    // 始终允许
    case authorizedAlways = 3
    // 只在使用App时允许
    case authorizedWhenInUse = 4
}

enum CLAccuracyAuthorization : Int {
    // 精确定位
    case fullAccuracy = 0
    // 降低精准度,定位水平精度大概在5km
    case reducedAccuracy = 1
}
在 Info.plist 中添加描述
根据自己的需求,在 Info.plist 中添加需要获取位置权限的描述,该描述会在请求权限时展示给用户。例如添加
1
2
<key>NSLocationWhenInUseUsageDescription</key>
<string>我们会在导航时使用您的位置信息</string>
如果需要 AlwaysUsage 权限的话,还需要在 Target - Signing & Capabilities 中添加 Background Modes 并勾选 Location updates
请求权限
1
2
3
4
5
6
7
8
let locationManager = CLLocationManager()
// 先检查权限
if locationManager.authorizationStatus == .authorizedWhenInUse || locationManager.authorizationStatus ==
.authorizedAlways {
  // 已经获取到权限
} else {
  locationManager.requestWhenInUseAuthorization()
}
请求权限之后就会出现如下弹窗,用户可以选择是否允许以及定位精度

地图配置
显示定位蓝点
显示用户定位点非常简单,设置 mapView.showsUserLocation = true ,然后开始获取位置更新就可以了:
1
locationManager.startUpdatingLocation()
切换地图图层
目前有6种图层类型可供切换,只需要修改 mapType 就可以了
1
mapView.mapType = .satellite
调整 Logo 和 Legal 的位置
目前 MapKit 还没有官方可用的 API 来调整 Logo 的位置,如果想要调整其位置,可以通过添加 Margins 的方式:
1
mapView.layoutMargins = UIEdgeInsets(top: 0, left: 0, bottom: 48, right: 0)
需要注意的是,需要遵守苹果官方的设计规范,即放在用户可见的地方,只可以暂时被遮挡。
改变显示区域
我们可以通过设置中心点以及离中心点的距离来改变地图显示的区域以及缩放级别,比如获取到用户的位置 location 之后,将地图以用户位置为中心点显示:
1
2
let region = MKCoordinateRegion(center: location.coordinate, latitudinalMeters: 1000, longitudinalMeters: 1000)
mapView.setRegion(region, animated: true)
限制显示区域
如果只在某些特定区域提供服务,想要局部限制用户拖动地图的行为,那么可以使用如下方法限制地图的区域,也可以限制缩放级别,个人感觉这个使用场景并不多。
1
2
3
4
5
6
7
8
9
let center = CLLocation(latitude: 34.2596292, longitude: 108.6870159)
let region = MKCoordinateRegion(center: center.coordinate, latitudinalMeters: 5_000_000,
longitudinalMeters: 5_000_000)
mapView.setCameraBoundary(
  MKMapView.CameraBoundary(coordinateRegion: region),
  animated: true
)
let zoomRange = MKMapView.CameraZoomRange(maxCenterCoordinateDistance: 1_000_000)
mapView.setCameraZoomRange(zoomRange, animated: true)
在地图上绘制
绘制标记点
绘制点标记调用的方法是 func addAnnotation(annotation: MKAnnotation),这里需要添加的 MKAnnotation 是一个协议:
1
2
3
4
5
public protocol MKAnnotation : NSObjectProtocol {
    var coordinate: CLLocationCoordinate2D { get }
    optional var title: String? { get }
    optional var subtitle: String? { get }
}
我们实现这个协议,提供必备的坐标点,然后就可以添加到地图上了。
如果想要改变标记点的UI,那么可以实现 MKMapViewDelegate 中的方法,返回 MKAnnotationView 的子类或者自定义类继承于它。
1
2
3
4
5
6
7
8
9
10
11
12
13
func mapView(_ mapView: MKMapView, viewFor annotation: MKAnnotation) -> MKAnnotationView? {
  if annotation is MallAnnotation {
    let mallIdentifier = "MallIdentifier"
    var annotationView = mapView.dequeueReusableAnnotationView(withIdentifier: mallIdentifier) as?
MKMarkerAnnotationView
    if annotationView == nil {
      annotationView = MKMarkerAnnotationView(annotation: annotation, reuseIdentifier: mallIdentifier)
      annotationView?.glyphImage = UIImage(systemName: "cart")
    }
    return annotationView
  }
  return nil
}

使用标记点簇
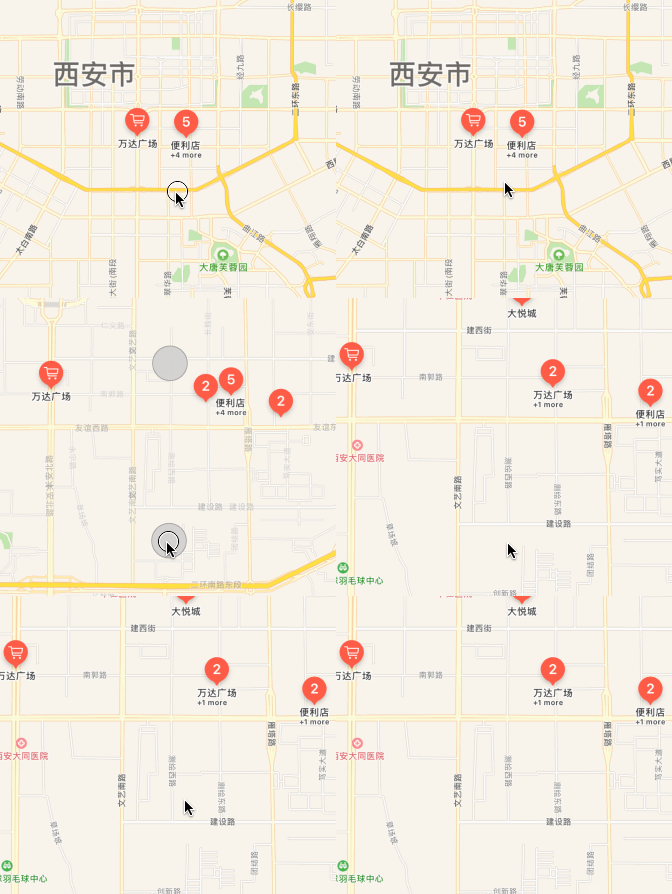
如果有多个标记点出现在相近的地方,那么当用户缩小地图时就会出现大量标记点叠在一起的现象,并且如果有大量标记点,有可能会有性能问题,解决这个问题的好办法就是使用标记点簇,效果如下:

需要添加如下设置:
annotationView?.clusteringIdentifier = "MallCluster"
Identifier 相同的标注点都会被自动的聚集在一起。
自定义气泡
如果想要自定义点击标注点弹出的气泡,可以将自定义的 View 设置给 AnnotationView,并设置 canShowCallout = true ,这里简单实现了显示副标题的气泡。
1
2
3
4
5
6
annotationView?.canShowCallout = true

let label = UILabel()
label.font = UIFont.systemFont(ofSize: 12)
label.text = "营业时间: \(annotation.subtitle ?? "暂无")"
annotationView?.detailCalloutAccessoryView = label
绘制线
在地图上绘制其他图形,使用的是 addOverlay(overlay: MKOverlay) 方法,如果需要绘制线,可以使用 MKPolyline ,它实现了 MKOverlay 协议。
1
2
let polyline = MKPolyline(coordinates: viewModel.coordinates, count: viewModel.coordinates.count)
mapView.addOverlay(polyline)
和绘制标记点一样,还需要通过代理提供视图,告诉地图我们想要绘制的线长什么样子,MKPolyline 对应的 Renderer 是 MKPolylineRenderer
1
2
3
4
5
6
7
8
9
func mapView(_ mapView: MKMapView, rendererFor overlay: MKOverlay) -> MKOverlayRenderer {
  if let polyline = overlay as? MKPolyline {
  let polylineRenderer = MKPolylineRenderer(polyline: polyline)
  polylineRenderer.lineWidth = 5
  polylineRenderer.strokeColor = .systemBlue
  return polylineRenderer
  }
  return MKOverlayRenderer()
}
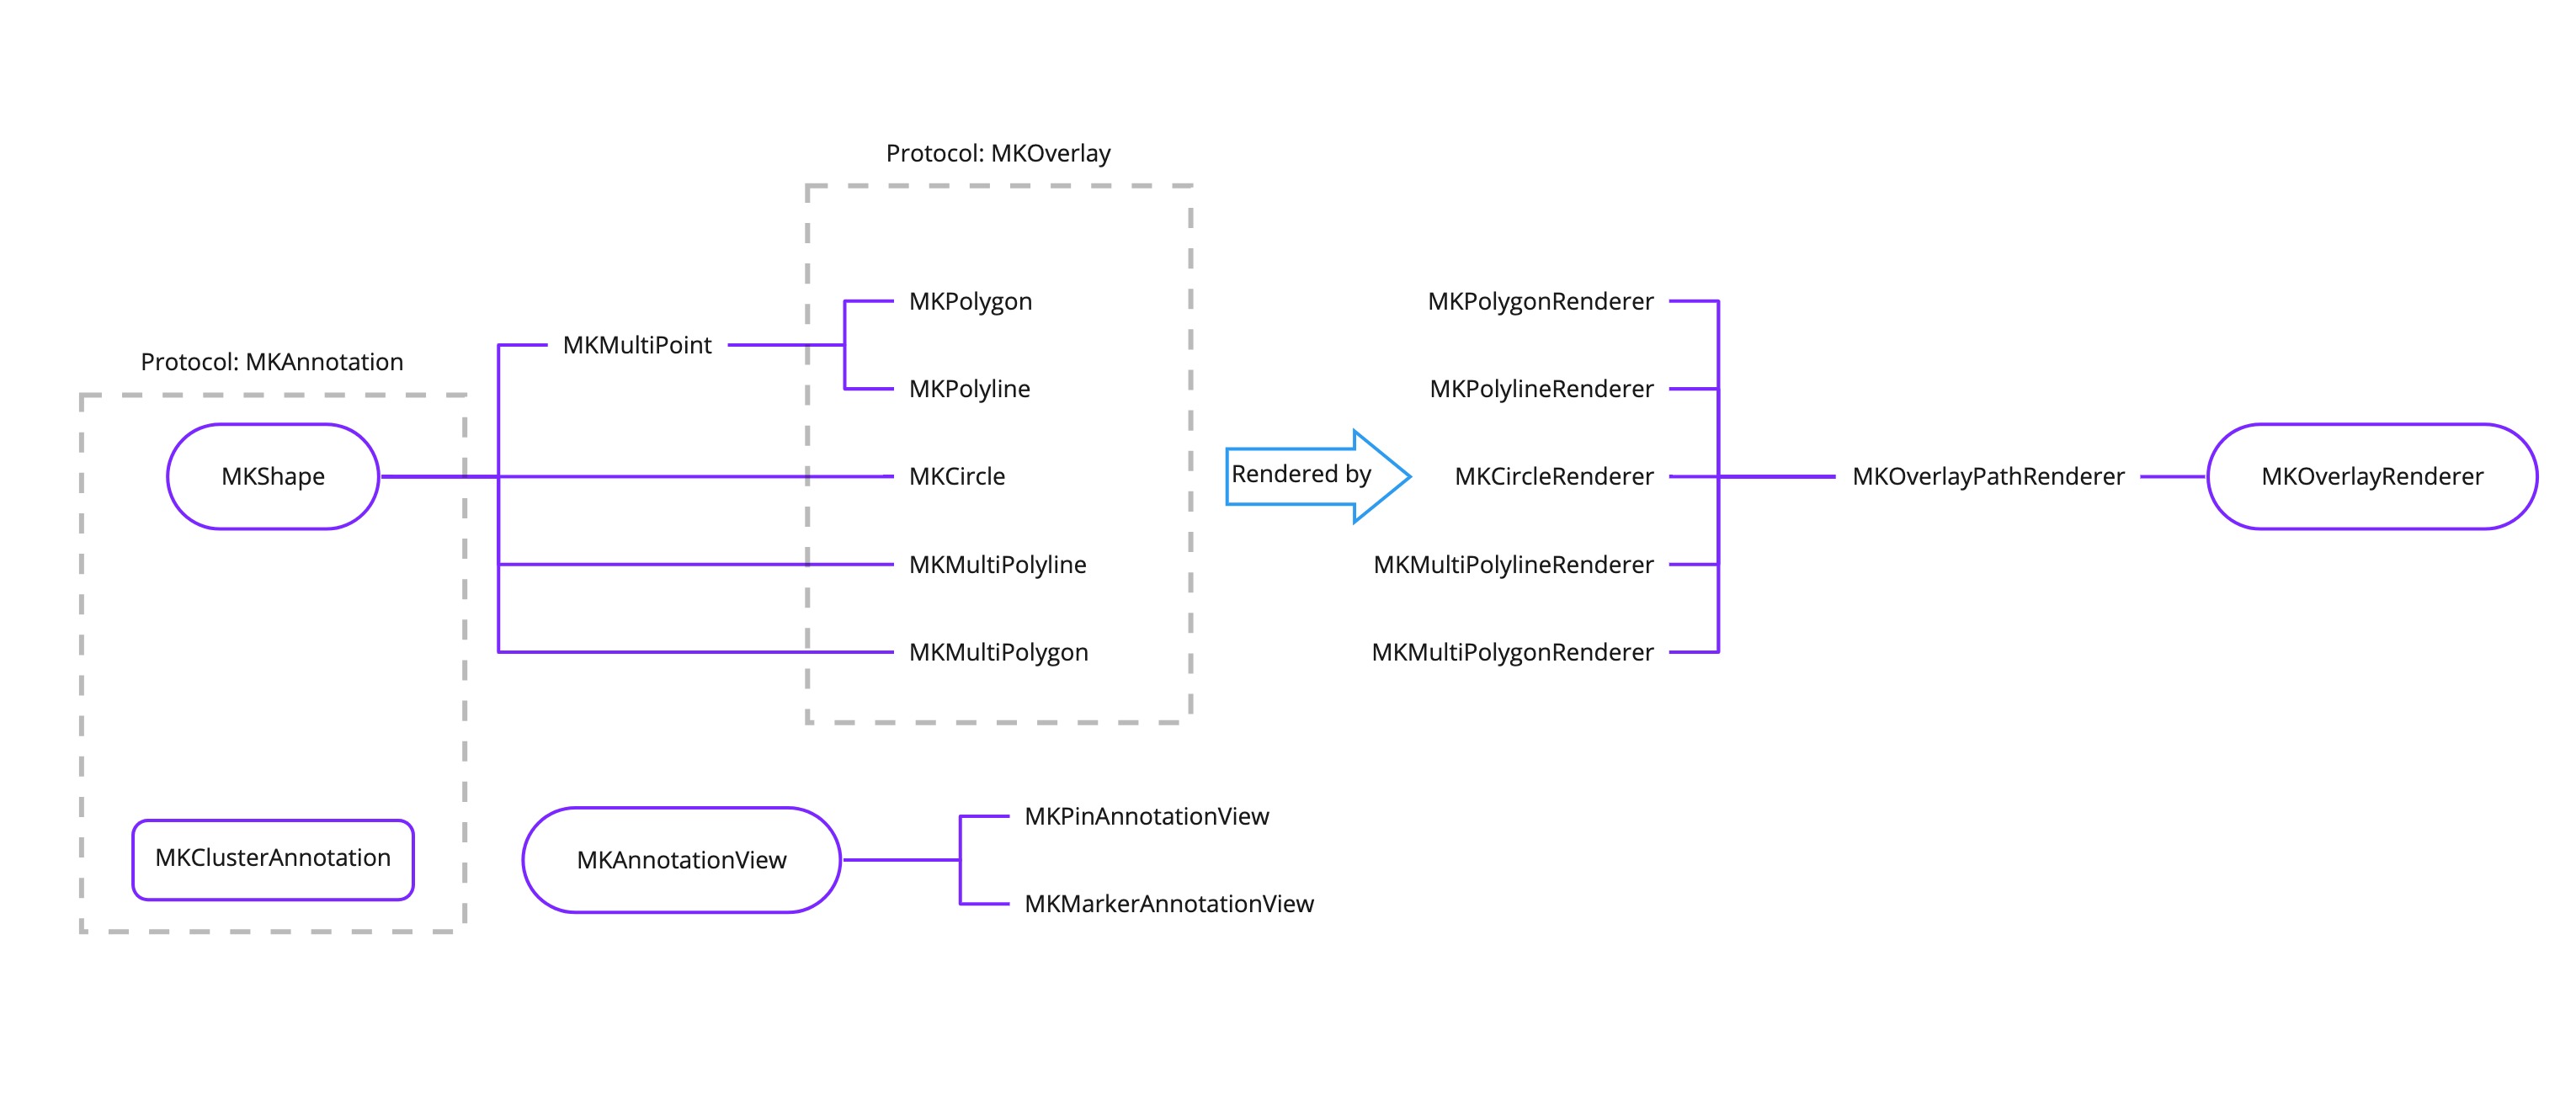
绘制相关类的关系图
在地图上绘制的子类比较多,所以这里画了一个简单的图,看起来更清晰,虚线框代表里面的类实现了相应的协议。

到这里,涉及到 MapKit 的显示以及交互部分基本就都覆盖到了,下一篇文章会介绍如何利用 MapKit 搜索感兴趣的地方,并进行路径规划,显示在地图上。

Comments powered by Disqus.